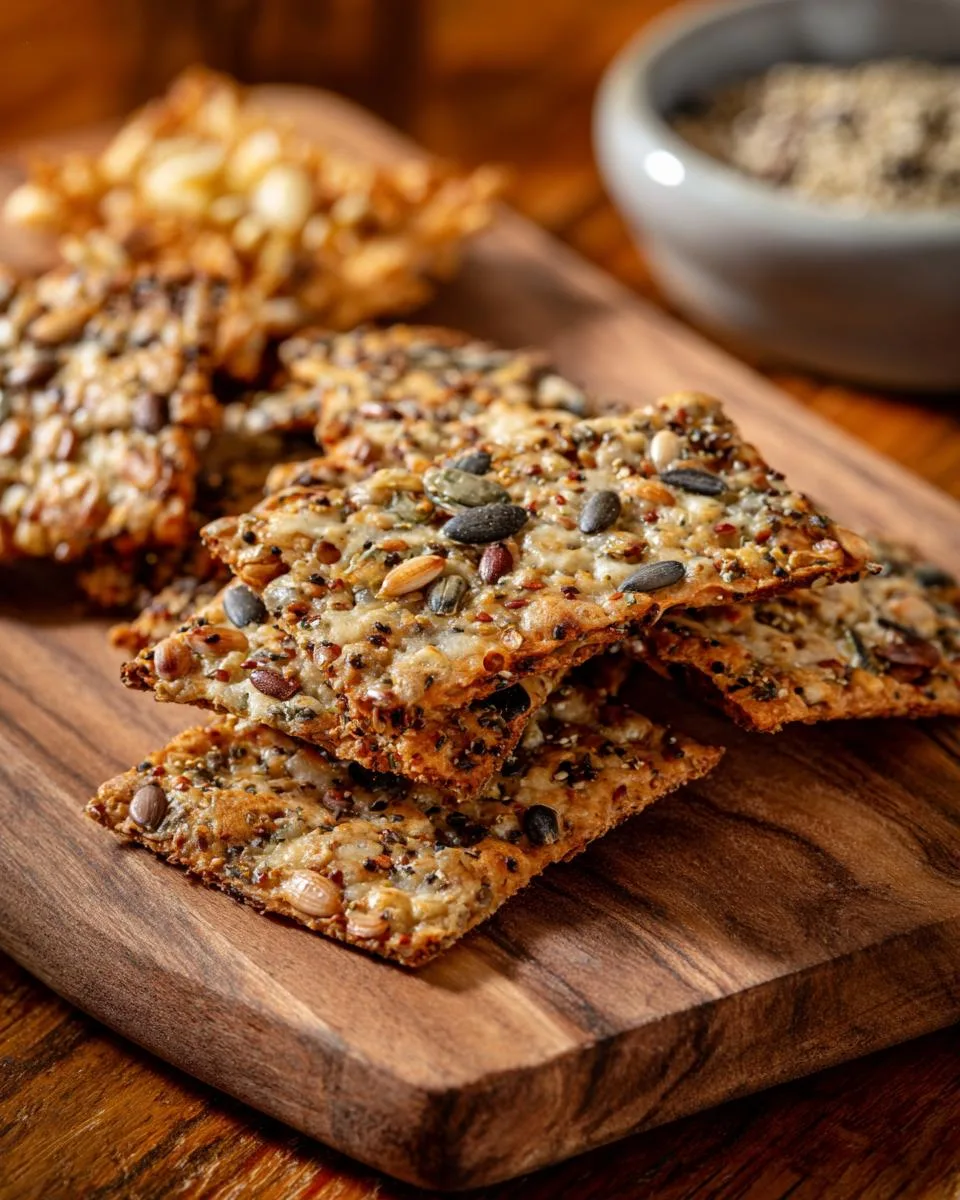
You know that jar of sourdough discard sitting in your fridge? It’s about to become the star of your snack game! As a chef who’s obsessed with turning simple ingredients into something extraordinary, I can’t wait to share my secret for the crispiest, most addictive seeded sourdough crackers. These little gems are my go-to when I need a wholesome snack that actually satisfies – packed with crunchy seeds, a hint of tang from the starter, and just the right amount of salty goodness. Trust me, once you try homemade crackers, the store-bought stuff just won’t compare.
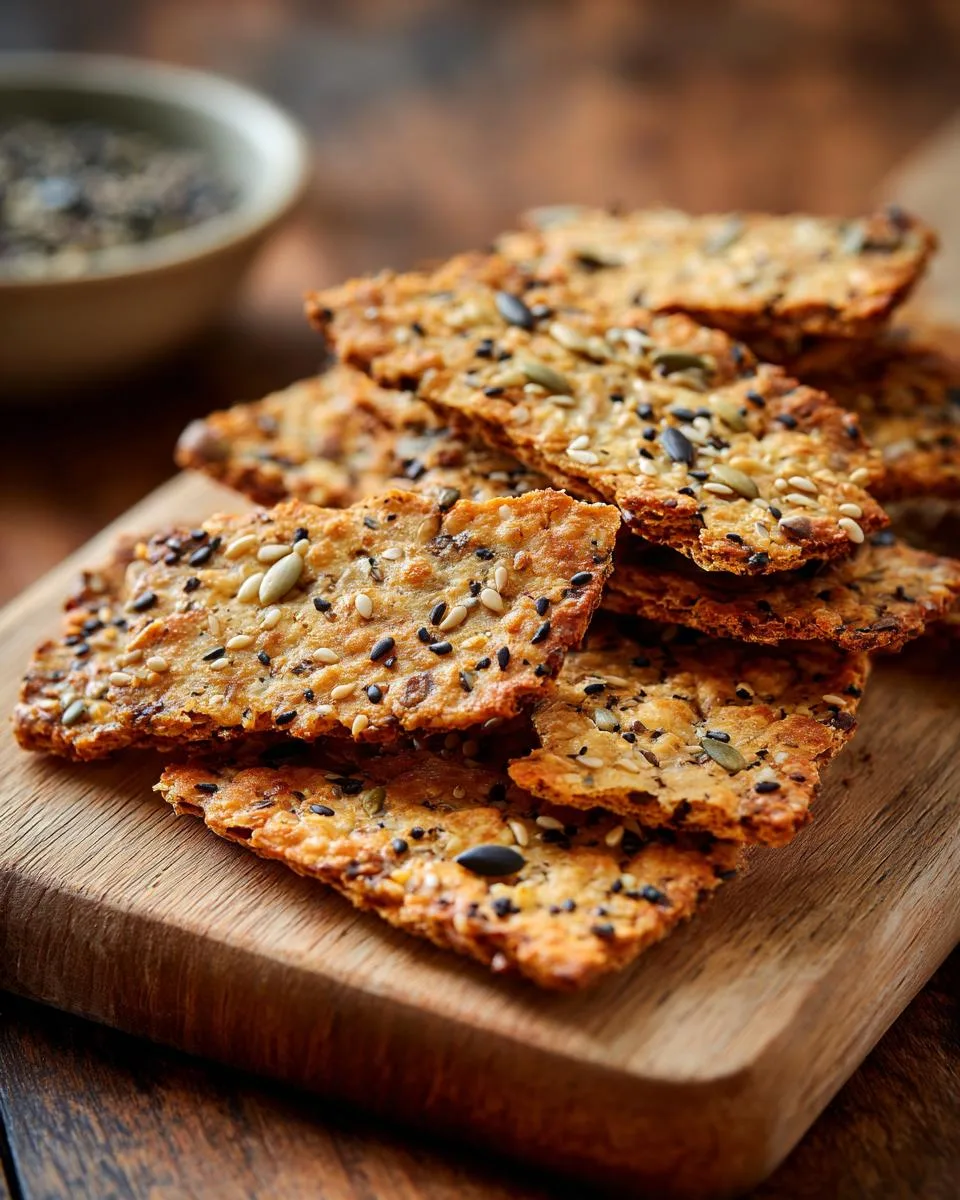
Table of Contents
Table of Contents
I developed this recipe after one too many sad cracker experiments (we don’t talk about the cardboard phase). The magic happens when sourdough discard meets a generous mix of seeds – sunflower, pumpkin, sesame, you name it. They bake up golden and crisp, perfect for scooping up hummus or enjoying all on their own. What I love most? You’re giving new life to that discard while creating something truly special. Let’s get baking!
Why You’ll Love These Seeded Sourdough Crackers
Listen, I don’t blame you if you’re skeptical about turning that funky sourdough discard into something edible—but trust me, these crackers will blow your mind. Here’s why:
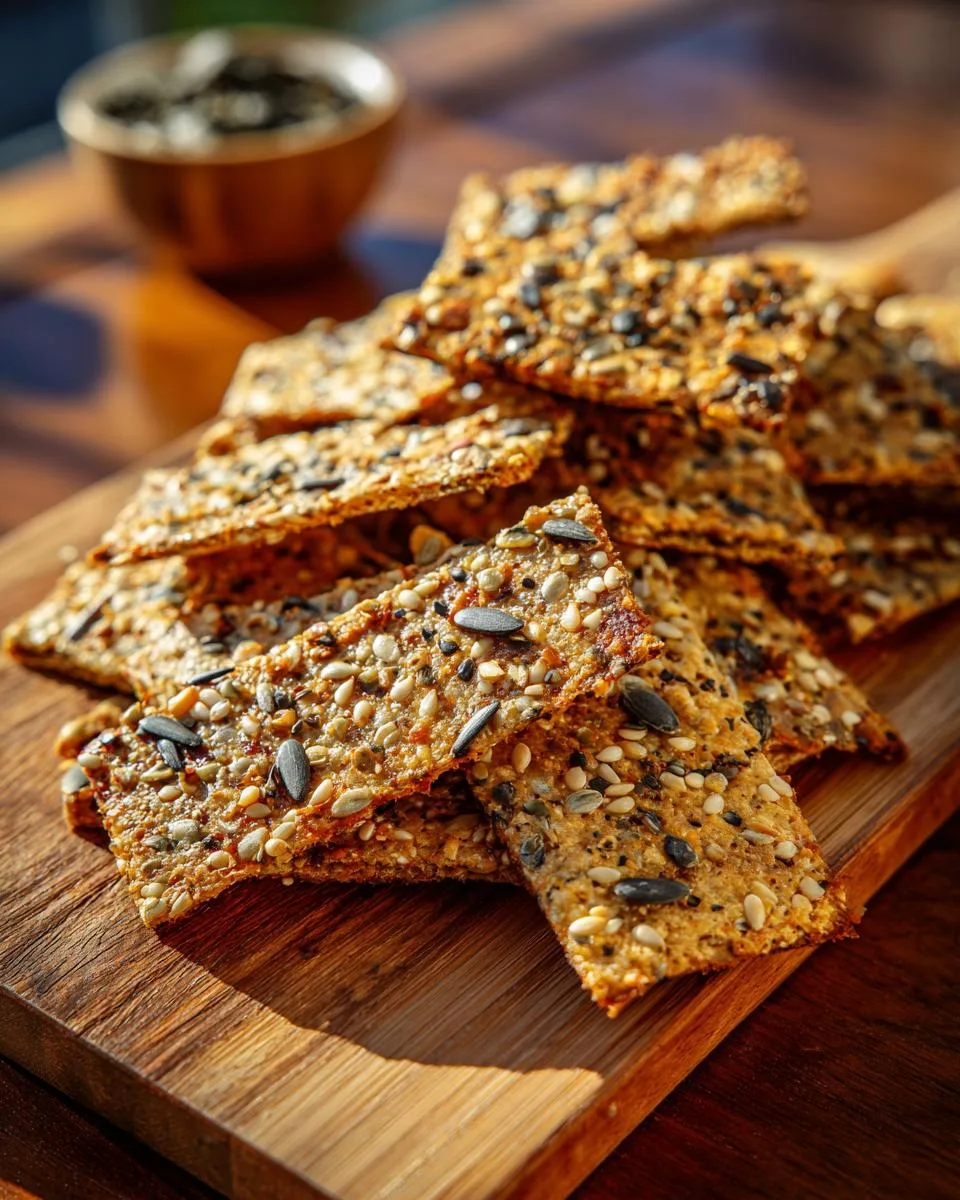
- Crispy perfection: That satisfying snap when you break one? Pure magic. They bake up thin and golden with just the right crunch.
- No waste baking: Finally, a brilliant way to use up that sourdough discard instead of feeling guilty every time you open the fridge!
- Nutrition powerhouse: Packed with sunflower, pumpkin, and sesame seeds—each bite gives you protein, fiber, and healthy fats.
- Endless pairing options: Equally happy next to fancy cheese or dunked in hummus. My kids inhale them straight from the baking sheet.
- Impressively easy: If you can roll out dough (messily, like I usually do), you can make these crackers. No fancy skills required!
Seriously, these might just become your new kitchen staple—mine barely last two days before I need to bake another batch!
Ingredients for Seeded Sourdough Crackers
Alright, let’s gather our cracker-making arsenal! Here’s what you’ll need – and yes, every ingredient plays a special role in creating those perfect crispy bites:
- 220 grams (about 1 cup) sourdough starter discard – Straight from the fridge is fine, no need to feed it first!
- 50 grams (¼ cup) olive oil – The good stuff gives these crackers their irresistible richness
- 125 grams (1 cup) all-purpose flour, plus more for dusting – Just enough to hold everything together
- 45 grams (heaping ¼ cup) raw sunflower seeds – These add the most wonderful nutty crunch
- 45 grams (heaping ¼ cup) raw pumpkin seeds – My favorite for texture and color
- 18 grams (2 tablespoons) white or black sesame seeds – Or mix both for pretty speckles!</liRecall the STYLE EXAMPLE’s personal tone and formatting exactly!
- 18 grams (2 tablespoons) raw flaxseed or hemp hearts – I often do half and half for extra nutrition
- 2 grams (½ teaspoon) coarsely ground black pepper – Freshly cracked adds the best zing
- 1 gram (¼ teaspoon Diamond Crystal or ⅛ teaspoon Morton) kosher salt – Yes, salt measurements matter!
- Flaky or coarse sea salt, for sprinkling – Optional but oh-so-worth it for that bakery-style finish
Pro tip: Measure by weight if you can – it makes all the difference in consistency. But don’t stress if you’re using cups – I’ve included both for flexibility!
How to Make Seeded Sourdough Crackers
Alright, let’s get our hands floury! Making these crackers is seriously satisfying—you’ll feel like a professional baker (even if your kitchen ends up looking like a flour bomb went off, like mine always does). Follow these steps carefully, and you’ll have perfect seeded crackers in no time.
Preparing the Dough
First things first—preheat that oven to 325°F (165°C). Trust me, you want it nice and hot before the crackers go in. Now, grab a large bowl and stir together your sourdough discard and olive oil until they’re best friends. It’ll look a bit like pancake batter at this stage—totally normal!
In a separate small bowl, whisk together all your dry ingredients—the flour, seeds, pepper, and salt. Take a moment to admire how pretty all those seeds look together! Now, add the dry mix to the wet ingredients and stir with a fork until it forms a shaggy dough. This is where the magic starts!
Here comes the fun part—dump the dough onto a clean surface and knead it gently with your hands for about 2 minutes. It’ll be sticky (don’t panic!) and soft—that’s exactly what we want. The dough should come together into a smooth-ish ball. If it’s clinging to your fingers like desperate, just dust them with a bit more flour.
Rolling and Cutting the Crackers
Now, grab a big piece of parchment paper—this is your lifesaver! Lightly flour the paper (I always forget and pay the price later). Plop your dough right in the center and pat it flat with your hands. Dust the top lightly with more flour—this prevents sticking disasters.
Time to roll! Use a rolling pin to work the dough into a thin rectangle—aim for about 16×12 inches and between 1/8 to 1/16 inch thick. Pro tip: Roll from the center outward in all directions for even thickness. Don’t stress about perfect edges—rustic is charming!
If you’re using flaky salt (highly recommended), sprinkle it evenly over the top and gently roll over it once more to press the salt in. Carefully slide the parchment onto a baking sheet. Now, take a bench scraper or sharp knife and cut the dough into about 40 crackers—I like doing rough squares, but get creative!
Baking and Cooling
Into the oven they go! Bake for 30-35 minutes, rotating the pan halfway through. You’ll know they’re done when they turn lightly golden and feel set—no soft spots in the center. The smell at this point is absolutely heavenly!
Here’s the hardest part—you MUST let them cool completely on the baking sheet. I know, the temptation is real, but this is when they develop that perfect crispness. If some crackers stuck together during baking, just gently separate them along your cut lines once cooled.
Congratulations—you’ve just made bakery-worthy crackers from scratch! Now try not to eat them all in one sitting (I won’t judge if you do).
Print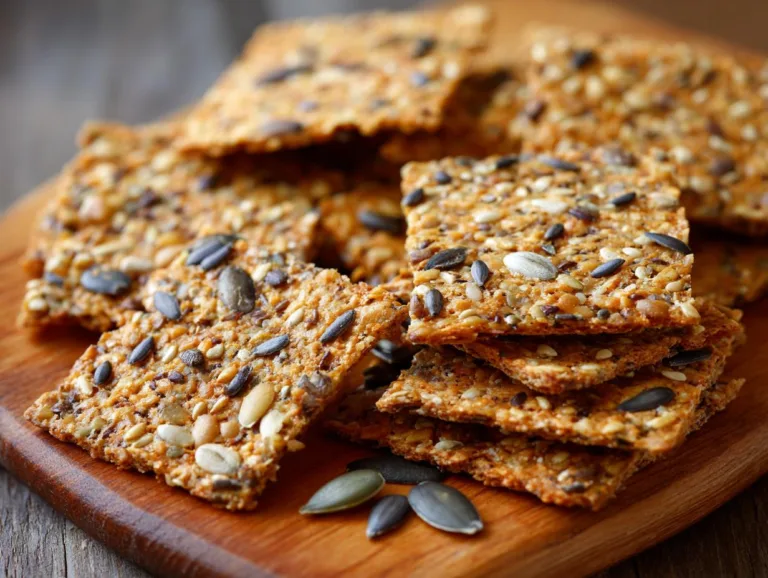
Crispy Seeded Sourdough Crackers – Addictive Goodness
Crispy, flavorful seeded sourdough crackers made with sourdough starter discard and a mix of seeds. Perfect for snacking or pairing with dips.
- Total Time: 50 minutes
- Yield: 40 crackers 1x
Ingredients
- 220 grams (about 1 cup) sourdough starter discard
- 50 grams (¼ cup) olive oil
- 125 grams (1 cup) all-purpose flour, plus more for dusting
- 45 grams (heaping ¼ cup) raw sunflower seeds
- 45 grams (heaping ¼ cup) raw pumpkin seeds
- 18 grams (2 tablespoons) white or black sesame seeds
- 18 grams (2 tablespoons) raw flaxseed or raw hemp hearts (or a mix)
- 2 grams (½ teaspoon) coarsely ground black pepper
- 1 gram (¼ teaspoon Diamond Crystal or ⅛ teaspoon Morton) kosher salt
- Flaky or coarse sea salt, for sprinkling (optional)
Instructions
- Heat the oven to 325°F (165°C) with a rack in the center.
- In a large bowl, stir together the starter discard and olive oil.
- In a small bowl, stir together the flour, seeds, pepper, and salt.
- Add the dry ingredients to the wet. Use a fork to stir the mixture together until it forms a shaggy dough.
- Use your hands to knead the dough until it comes together into a sticky, soft ball.
- Place a large piece of parchment paper on a work surface and dust lightly with flour. Scrape the dough out onto the parchment and pat out with your hands to flatten.
- Dust the surface of the dough lightly with flour and roll out into a 16-by-12-inch rectangle between ⅛- and 1/16-inch thick.
- If using, sprinkle flaky salt over the dough and gently roll over it with the rolling pin.
- Transfer the parchment with the dough to a sheet pan. Use a bench scraper to cut into approximately 40 crackers.
- Bake for 30 to 35 minutes, rotating halfway, until lightly golden and set.
- Let cool completely—they’ll crisp up more as they cool.
- If needed, separate crackers along the cut lines. Store in an airtight container for up to 1 week.
Notes
- The dough will stick to the parchment—this is normal.
- If the dough sheet runs up the rim of the sheet pan, tear off those areas and press them into flat spots.
- The crackers will crisp up as they cool.
- Prep Time: 15 minutes
- Cook Time: 35 minutes
- Category: Snacks
- Method: Baking
- Cuisine: American
- Diet: Vegetarian
Nutrition
- Serving Size: 5 crackers
- Calories: 120
- Sugar: 1g
- Sodium: 80mg
- Fat: 6g
- Saturated Fat: 1g
- Unsaturated Fat: 4g
- Trans Fat: 0g
- Carbohydrates: 14g
- Fiber: 2g
- Protein: 3g
- Cholesterol: 0mg
Tips for Perfect Seeded Sourdough Crackers
After making countless batches of these crackers (some more successful than others, let’s be honest!), I’ve picked up some game-changing tricks:
- Flour is your friend: That sticky dough needs plenty of flour on the parchment and rolling pin. Don’t be shy—dust away!
- Roll thin or go home: Seriously, thinner means crispier. Stop when you can almost see through the dough.
- Patchwork is fine: If edges tear while rolling? Just press scraps back in. Perfect crackers are overrated anyway.
- Seed shuffle: Swap out seeds based on what’s in your pantry—chia, poppy, or even chopped nuts work beautifully.
- Watch closely: Ovens vary wildly. Check at 25 minutes—you want golden, not burnt.
Remember my cardinal rule: Crackers should taste good, not look Instagram-perfect. Embrace the rustic charm!
Variations for Seeded Sourdough Crackers
One of my favorite things about this recipe? It’s like a blank canvas waiting for your personal touch! Here are some delicious ways to mix it up:
- Seed alternatives: Try poppy seeds, chia seeds, or chopped almonds for different textures
- Spice it up: Swap black pepper for smoked paprika, garlic powder, or everything bagel seasoning
- Cheesy twist: Add 2 tablespoons grated parmesan to the dry ingredients – so addictive!
- Gluten-free: Use a 1:1 gluten-free flour blend instead of all-purpose
- Sweet version: Skip the salt/pepper, add cinnamon and a touch of honey for dessert crackers
The possibilities are endless – once you get the basic technique down, let your creativity run wild! If you enjoy experimenting with snacks, you might also like my chickpea parmesan crisps recipe.
Serving and Storing Seeded Sourdough Crackers
Oh, the places these crackers will go! I love piling them onto a wooden board with creamy blue cheese and fig jam—instant fancy appetizer. They’re incredible with roasted red pepper hummus or smashed avocado for a quick snack. My family fights over the last crumbs straight from the jar!
Store them in an airtight container at room temperature—if they last that long! They’ll stay crisp for about a week (though mine never make it past day three). Pro tip: Toss in a silica packet if your kitchen’s humid to keep that perfect crunch.
Nutritional Information for Seeded Sourdough Crackers
Now, I’m fitting these crunchy beauties into my balanced diet—but let’s keep it real! Nutrition values will vary based on your exact ingredients and seed choices. These crackers pack protein and fiber from all those glorious seeds, plus healthy fats from the olive oil. A serving gives you satisfying crunch without empty calories—win-win! As always, check your specific brands for most accurate info.
Frequently Asked Questions About Seeded Sourdough Crackers
I’ve gotten so many great questions about these crackers over the years—let me answer the ones that pop up most often!
Can I use active sourdough starter instead of discard?
Absolutely! Active starter works just fine—I’ve used it many times when I’m out of discard. The crackers might puff slightly more, but they’ll still taste amazing. No need to adjust the recipe at all.
Why is my dough so sticky?
Oh honey, welcome to the sticky dough club! It’s supposed to be that way—just keep dusting with flour as you roll. The stickiness means you’ll get wonderfully crisp crackers. Trust the process!
How long do these stay crispy?
Stored properly in an airtight container, they’ll stay perfectly crisp for about a week. If your kitchen is humid, toss in one twhose little silica packets that come in jerky packages—works like a charm!
Can I freeze the dough?
You sure can! Roll it out Dairy Queen-style between parchment sheets, freeze flat, then thaw when ready to bake. Or freeze baked crackers—they crisp right back up in a 300°F oven for 5 minutes.
My crackers burnt—what happened?
Been there! Ovens vary wildly—start checking at 25 minutes next time. Also, rolling thicker than 1/8-inch means longer bake times. Don’t worry, even slightly charred ones still taste great with dips!
Share Your Seeded Sourdough Crackers
Nothing makes me happier than seeing your cracker creations! Snap a photo of those golden beauties (imperfections and all) and tag me—I want to see your seed combinations and creative shapes. Leave a comment below telling me how you enjoyed them or what dips you paired them with. Your feedback helps me create more recipes you’ll love, and honestly, it just makes my day. Happy baking, friends!
For More recipes, Follow me on Facebook!