Listen, I’ll let you in on a little secret – those irresistible Red Lobster Cheddar Bay Biscuits don’t require a trip to the restaurant! My obsession with recreating these fluffy, cheesy wonders started years ago when I’d practically beg for extra baskets at dinner. After what felt like hundreds of batches (and more than a few kitchen disasters), I’ve perfected a homemade version that’s somehow even better than the original. The magic? It’s all in that garlicky butter topping soaking into tender biscuit crumb loaded with sharp cheddar cheese. Best part? You’re just 22 minutes away from biscuit heaven with ingredients you probably already have.
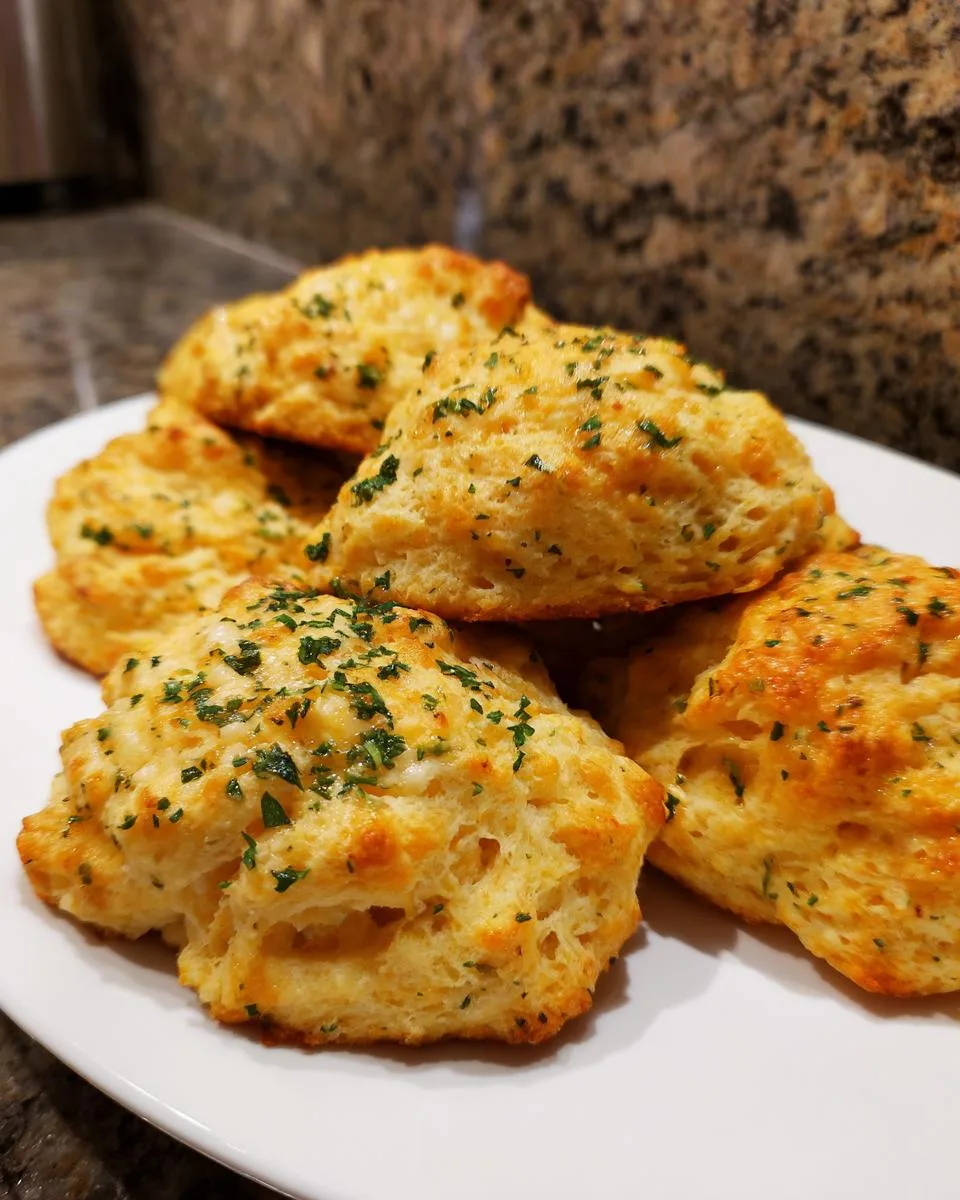
Table of Contents
Table of Contents
Why You’ll Love These Red Lobster Cheddar Bay Biscuits
Let me tell you why these biscuits are about to become your new kitchen addiction:
- Restaurant magic at home – That iconic cheddar-garlic flavor you crave, without waiting for a table
- Faster than takeout – From bowl to table in under 30 minutes (yes, really!)
- Better than the original – Fresh-from-the-oven warmth with extra garlicky butter love
- No fancy skills needed – Just mix, drop, and bake – I promise you can’t mess these up
- Happiness in every bite – That perfect combo of fluffy interior, crispy edges, and melty cheese
Seriously, your family will beg you to make these every night – mine still does!
Ingredients for Red Lobster Cheddar Bay Biscuits
Alright, let’s dig into what makes these biscuits so magical. The ingredient list is simple, but each one plays a special role in creating that perfect texture and flavor. Here’s what you’ll need:

- 2 cups all-purpose flour – The foundation of our fluffy biscuits (I like to fluff mine with a fork before measuring)
- 1 tablespoon baking powder – Our rising superstar – make sure yours is fresh!
- 1 teaspoon granulated sugar – Just a touch to balance the flavors
- 1/2 teaspoon garlic powder + another 1/2 teaspoon for the topping – Because you can never have enough garlic
- 1/4 teaspoon baking soda – Our secret weapon for that perfect lift
- 1/4 teaspoon salt – To make all the flavors pop
- 1 cup milk – Whole milk works best, but anything you have will do (plus maybe an extra splash if needed)
- 1/3 cup cold butter, cubed – Keep it chilly! This creates those perfect flaky layers
- 3/4 cup shredded sharp cheddar – The sharper the better in my book – it really shines through
- 1/4 cup melted butter – For that glorious garlicky bath we’ll brush on top
- 1 teaspoon dried parsley – The classic finishing touch
- 1/2 teaspoon Italian seasoning (optional) – My little twist that adds extra depth
See? Nothing crazy or hard-to-find here. Just simple ingredients coming together to create something truly special. Now let’s get mixing!
Ingredient Substitutions
Here’s the thing – while I absolutely love the original recipe, life happens, and sometimes you need to swap things out. The good news? These biscuits are pretty forgiving! Here are my tried-and-true substitutions that still deliver amazing results:
Flour: If you’re going gluten-free, a 1:1 gluten-free flour blend works beautifully. Just make sure it has xanthan gum included – it helps mimic that classic biscuit texture. You might need a touch more milk, so add it gradually.
Cheese: While sharp cheddar is the star, feel free to mix it up! I’ve had great success with:
- Pepper jack for a spicy kick
- Smoked gouda for a deeper, richer flavor
- Mozzarella for extra gooeyness (mix with a sharper cheese for balance)
Just keep the total amount about the same, and you’re golden.
Milk: Dairy-free? No problem! Unsweetened almond milk or oat milk work great. The flavor will be slightly different, but still delicious. Just steer clear of anything too sweet like vanilla-flavored options.
Butter: For the dough, I really recommend sticking with real butter for that perfect flakiness. But for the garlic butter topping, you can use a good quality vegan butter if needed. Just make sure it’s the stick kind, not the spreadable tub version.
Garlic Powder: Out of garlic powder? No worries! Use 1/4 teaspoon of garlic salt instead, but reduce the regular salt in the recipe by half. Or, if you’ve got fresh garlic handy, mince 2 cloves super fine and let them steep in the melted butter for the topping.
Remember, every substitution will change the final product a bit, but that’s part of the fun! The key is to keep the ratios similar and trust your instincts. These biscuits are all about making them work for you and your family. Happy experimenting!
How to Make Red Lobster Cheddar Bay Biscuits
Okay, friends – here’s where the magic happens! I’ll walk you through every step to biscuit perfection. Don’t let the restaurant-quality results fool you – this process is simpler than you think. Just follow along, and soon your kitchen will smell like a Red Lobster (in the best possible way).
Preparing the Dough
First things first – preheat that oven to 450°F (230°C). Hot oven = perfect rise. While it’s heating, grab a big bowl and whisk together your dry ingredients – that’s the flour, baking powder, sugar, garlic powder, baking soda, and salt. Get them nice and combined.
Now for my favorite part – the butter! Make sure it’s cold (I sometimes pop mine in the freezer for 5 minutes). Cut it into small cubes, then work it into the dry mix with your fingers or a pastry cutter. You want it to look like coarse crumbs with some pea-sized butter bits still visible – those will create those dreamy flaky layers.
Gently stir in your shredded cheddar. Then pour in the milk gradually, mixing just until the dough comes together. It should be sticky but manageable – add an extra splash of milk if it looks dry. Whatever you do, don’t overmix! Tough biscuits are sad biscuits.
Baking and Finishing Touches
Drop spoonfuls of dough onto your prepared baking sheet – I use about 1/4 cup per biscuit, spacing them about 2 inches apart. No need to shape them perfectly – those craggy edges get extra crispy and delicious!
Bake for 10-12 minutes until they’re golden brown and puffed up proudly. While they bake, mix up that glorious garlic butter – just stir together the melted butter, parsley, remaining garlic powder, and Italian seasoning if using.
The moment they come out of the oven, brush them generously with that garlic butter. Don’t be shy – this is what takes them from good to “oh my goodness!” Let them cool for just a minute (if you can wait that long), then serve warm while the cheese is still gooey and the butter is soaking in. Trust me – you’ll want to eat these straight off the baking sheet!
Print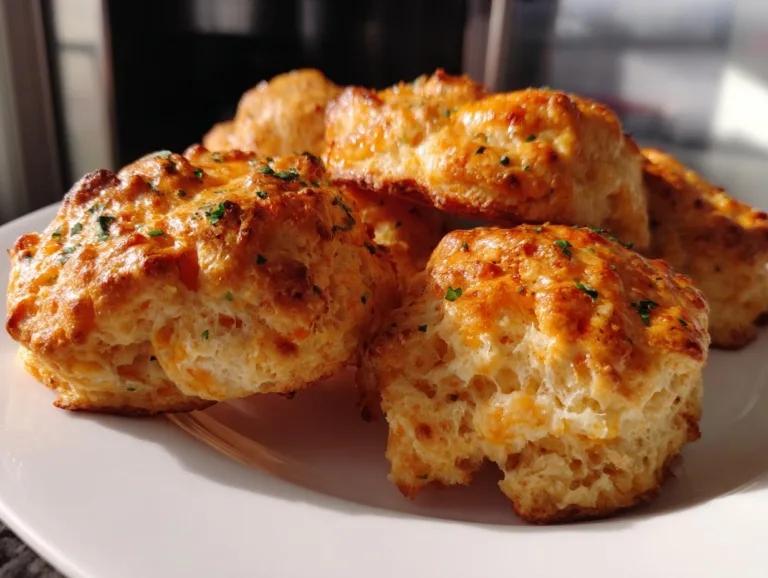
22-Minute Red Lobster Cheddar Bay Biscuits Recipe to Die For
Fluffy, cheesy biscuits with a garlic butter topping, inspired by Red Lobster’s famous Cheddar Bay Biscuits.
- Total Time: 22 mins
- Yield: 12 biscuits 1x
Ingredients
- 2 cups all-purpose flour
- 1 tablespoon baking powder
- 1 teaspoon granulated sugar
- 1/2 teaspoon garlic powder
- 1/4 teaspoon baking soda
- 1/4 teaspoon salt
- 1 cup milk (more if needed)
- 1/3 cup cold butter
- 3/4 cup shredded cheddar cheese
- 1/4 cup melted butter
- 1 teaspoon dried parsley
- 1/2 teaspoon garlic powder
- 1/2 teaspoon Italian seasoning (optional)
Instructions
- Preheat oven to 450°F (230°C) and line a baking sheet with parchment paper.
- In a large bowl, whisk together flour, baking powder, sugar, garlic powder, baking soda, and salt.
- Cut cold butter into small pieces and blend into the dry ingredients until the mixture resembles coarse crumbs.
- Stir in shredded cheddar cheese.
- Add milk gradually and mix until a soft dough forms. Add more milk if the dough is too dry.
- Drop spoonfuls of dough onto the prepared baking sheet, spacing them about 2 inches apart.
- Bake for 10-12 minutes, or until golden brown and cooked through.
- While biscuits bake, combine melted butter, dried parsley, garlic powder, and Italian seasoning (if using) in a small bowl.
- Remove biscuits from the oven and brush generously with the garlic butter mixture.
- Serve warm.
Notes
- For extra flavor, use sharp cheddar cheese.
- Store leftovers in an airtight container for up to 2 days.
- Reheat in the oven or toaster for best texture.
- Prep Time: 10 mins
- Cook Time: 12 mins
- Category: Side Dish
- Method: Baking
- Cuisine: American
- Diet: Vegetarian
Nutrition
- Serving Size: 1 biscuit
- Calories: 180
- Sugar: 1g
- Sodium: 240mg
- Fat: 10g
- Saturated Fat: 6g
- Unsaturated Fat: 3g
- Trans Fat: 0g
- Carbohydrates: 18g
- Fiber: 1g
- Protein: 4g
- Cholesterol: 25mg
Tips for Perfect Red Lobster Cheddar Bay Biscuits
After making roughly a zillion batches of these biscuits (okay, maybe not that many), I’ve learned all the little tricks that take them from good to “can I have the recipe?” amazing. Here are my absolute must-know tips:
Keep everything cold, cold, cold! I’m talking Arctic-level chilly butter and milk straight from the fridge. Those cold butter bits create steam pockets as they melt in the oven, giving you those irresistible flaky layers. If your kitchen’s warm, I even chill my mixing bowl for 10 minutes first.
Mix with a light touch. Overworking the dough is the #1 biscuit killer – it makes them tough instead of tender. Stir just until the ingredients come together, even if there are still some floury spots. Those will work themselves out.
Cheese matters! While sharp cheddar is classic, don’t be afraid to experiment. My favorite variations? Half cheddar and half pepper jack for a spicy kick, or swapping in smoked gouda when I’m feeling fancy. Just keep the total amount about the same.
The garlic butter bath is non-negotiable. Brush it on while the biscuits are piping hot – they’ll soak up all that garlicky goodness like little flavor sponges. And here’s my sneaky trick: I double the butter topping because… well, just trust me on this.
Bake at the right temp. That 450°F oven might seem hot, but it’s perfect for getting that golden crust while keeping the insides fluffy. If your oven runs hot, check them at 9 minutes – nothing sadder than overbaked biscuits!
One last pro tip? Always make a double batch. These disappear faster than you can say “more please!”
Storing and Reheating Red Lobster Cheddar Bay Biscuits
Let’s be real – the idea of having leftover Cheddar Bay Biscuits is almost laughable in my house. But just in case you miraculously end up with a few stragglers (or were smart enough to make a double batch), here’s how to keep them tasting fresh and delicious:
Storing fresh biscuits: Wait until they’re completely cool, then tuck them into an airtight container at room temperature. They’ll stay perfect for about 2 days this way. If you need to store them longer, pop them in the fridge – but honestly, they’re never quite as good as when they’re fresh. The fridge tends to dry them out a bit.
Freezing for later: Now this is my secret weapon! These biscuits freeze beautifully. Just wrap each one individually in plastic wrap, then pop them all in a freezer bag. They’ll keep for up to 3 months this way. When the craving hits, you can go straight from freezer to toaster oven – no thawing needed!
Reheating like a pro: Whatever you do, don’t microwave them unless you like soggy biscuits (and who does?). Instead, use one of these methods:
- Toaster oven or regular oven: 350°F for 5-8 minutes until warmed through. I like to brush with a little extra garlic butter when they come out!
- Air fryer: 320°F for 3-4 minutes – this gets them crispy on the outside while keeping them fluffy inside.
- Stovetop: Warm them gently in a dry skillet over low heat, flipping occasionally.
One last tip? If your stored biscuits seem a little dry, sprinkle them lightly with water before reheating – just a teaspoon or so. It creates steam to revive their softness without making them soggy. Now you’ve got no excuse not to enjoy that fresh-from-the-oven magic anytime the craving strikes!
Nutritional Information
Let’s talk numbers – but remember, these are just estimates! Nutritional values can vary depending on the specific ingredients you use. That said, here’s a rough breakdown per biscuit (based on the recipe making 12 biscuits):
- Calories: 180
- Total Fat: 10g (Saturated Fat: 6g, Unsaturated Fat: 3g)
- Cholesterol: 25mg
- Sodium: 240mg
- Total Carbohydrates: 18g (Fiber: 1g, Sugar: 1g)
- Protein: 4g
Keep in mind, if you go heavy on that garlic butter topping (like I always do), those numbers will shift a bit. And hey, sometimes you just have to treat yourself – these are totally worth it!
FAQs About Red Lobster Cheddar Bay Biscuits
I’ve gotten so many questions about these biscuits over the years – turns out I’m not the only one obsessed! Here are answers to the ones I hear most often:
“Can I really freeze these biscuits?”
Absolutely! In fact, I always keep a stash in my freezer. Just wrap them individually once cooled, then toss them in a freezer bag. When cravings hit, pop them straight into a 350°F oven for about 10 minutes or into the toaster oven. They’ll taste nearly fresh-baked!
“Why does the butter need to be so cold?”
Oh honey, this is the secret to flaky layers! Cold butter creates little steam pockets as it melts in the hot oven, giving you that perfect tender-crisp texture. Room temperature butter just gets absorbed into the dough – tasty, but not nearly as magical.
“My biscuits came out dense. What went wrong?”
Most likely culprit? Overmixing the dough. You want to handle it as little as possible – just until everything comes together. Also check your baking powder isn’t expired! That fluffy rise depends on it.
“Can I make these ahead?”
You sure can! Mix the dry ingredients and cut in the butter the night before, then store in the fridge. In the morning, just add the wet ingredients and bake. The dough itself doesn’t keep well once mixed though – bake it right away.
“Is there a way to make these spicier?”
My favorite variation! Try adding 1/4 teaspoon cayenne pepper to the dry ingredients, or swap half the cheddar for pepper jack cheese. Sometimes I’ll even add a pinch of red pepper flakes to the garlic butter topping – so good!
Got more questions? Drop them in the comments – I love chatting biscuits almost as much as I love eating them!
Enjoy Your Homemade Red Lobster Cheddar Bay Biscuits
Oh my goodness – you did it! Your kitchen smells incredible, and those golden, cheesy beauties are just begging to be devoured. I’m so proud of you for taking the leap and making these at home. Now comes the best part – gathering everyone around the table (or sneaking one straight from the baking sheet when no one’s looking – I won’t tell!).
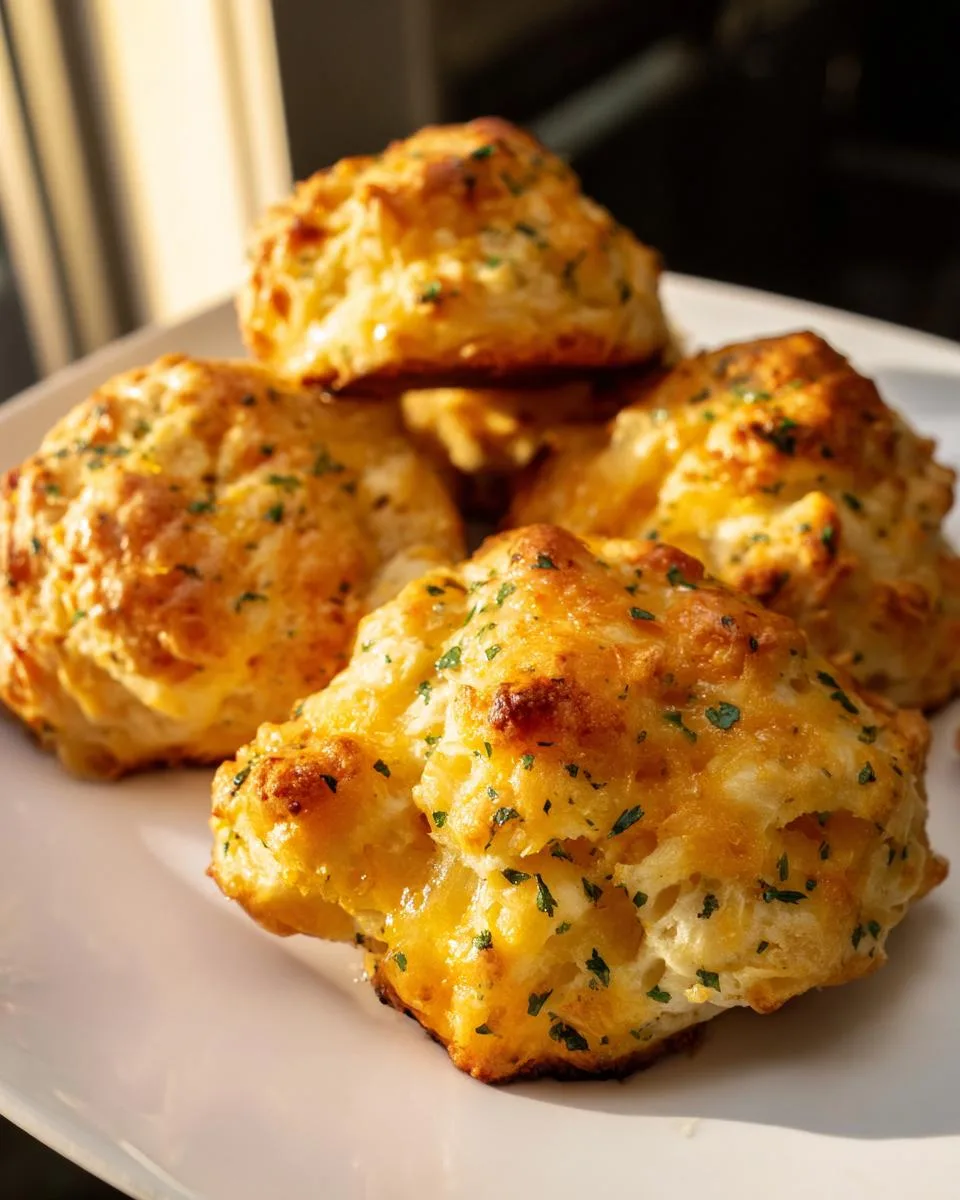
Take a moment to appreciate your handiwork – that perfect golden crust, the way the cheese pulls apart in strings, that garlic butter glistening on top. This is what happy tastes like, my friend. Serve them warm with your favorite meal, or honestly, just eat them by the fistful – I certainly won’t judge.
I’d love to see your biscuit masterpieces! Snap a photo and tag me @Dishivia – nothing makes me happier than seeing your kitchen wins. Did you add your own twist? Try a different cheese? Burn the first batch (we’ve all been there!)? Share your stories in the comments below. And if this recipe becomes your new go-to like it did for me, pass it along to someone who needs a little cheesy comfort in their life.
Now go enjoy those biscuits before they disappear – because trust me, they will!
For More recipes, Follow me on Facebook!