Oh my gosh, you guys – Halloween baking is my absolute favorite time of year! There’s just something magical about turning ordinary chocolate cupcakes into spooky little masterpieces that make both kids and adults squeal with delight. My Halloween cupcake box has become legendary at our neighborhood parties – it’s packed with rich, moist chocolate cupcakes topped with creepy-cute decorations that look almost too good to eat (almost!).

Table of Contents
Table of Contents
After years of trial and error (and more than a few frosting disasters), I’ve perfected this recipe that balances deep chocolate flavor with festive Halloween fun. The secret? A splash of strong coffee in the batter that makes the chocolate flavor sing, and buttercream so smooth it practically pipes itself. Trust me, once you see how these transform with just some food coloring and candy eyes, you’ll never look at Halloween desserts the same way again!
Why You’ll Love This Halloween Cupcake Box
Seriously, what’s not to love? This recipe is the perfect mix of delicious and spooky – here’s why it’s become my go-to Halloween treat:
- Deep chocolate flavor thanks to that secret splash of strong coffee – it makes the cocoa taste richer without any coffee flavor coming through (genius, right?)
- Super moist texture from the sour cream and buttermilk combo – no dry cupcakes here!
- Endless decorating fun with vibrant colored buttercream and candy toppings that let your creativity run wild
- Actually easy to make – the batter comes together in one bowl and the decorations are simple enough for kids to help with
Ingredients for Halloween Cupcake Box
Okay, let’s gather all the goodies we need for these spooktacular cupcakes! I promise, most of these are pantry staples – but I’ll point out the few special things that make all the difference. Here’s what you’ll need:
- For the cupcakes:
- 1/2 cup sour cream (120g) – full fat gives the best moisture
- 1 cup buttermilk (240mL) – shake the carton well before measuring
- 3 large eggs – straight from the fridge is fine
- 1 1/2 cups strong hot coffee (360mL) – I use my mocha pot for espresso-strength
- 3/4 cup vegetable oil (180mL) – any neutral oil works
- 1 tbsp pure vanilla extract (15mL) – the good stuff, none of that imitation!
- 3 cups all-purpose flour (360g) – spooned and leveled, please
- 2 2/3 cups granulated sugar (535g) – yes, it’s sweet – it’s Halloween!
- 1/2 cup dark cocoa powder (65g) – Dutch-processed if you have it
- 1 1/2 tsp baking powder (6g)
- 1 tbsp baking soda (18g) – yes, a whole tablespoon
- 1 tsp kosher salt (5g) – Diamond Crystal is my go-to
- For the buttercream & decorations:
- 1 lb confectioner’s sugar (450g) – sifted if lumpy
- 1 cup unsalted butter (250g) – must be room temperature!
- 3 tbsp heavy whipping cream (45mL) – cold is fine
- 3 tsp vanilla extract (15mL) – yes, more vanilla!
- Gel food coloring in green, orange, and black – liquid colors won’t give vibrant results
- Brown M&Ms (regular and peanut) – for creepy eyes and spiders
- 3/4 cup melted chocolate – I use semi-sweet for piping details
Ingredient Substitutions
Ran out of something? No worries – here’s how to pivot! Plain yogurt works beautifully instead of sour cream (Greek yogurt adds extra protein). No buttermilk? Mix 1 cup milk with 1 tbsp vinegar or lemon juice and let it sit 5 minutes. Dairy-free? Almond milk and vegan butter work surprisingly well in both batter and frosting – just add a touch more vanilla to balance flavors.
Equipment You’ll Need
Now, let’s talk tools! Don’t worry—you don’t need anything crazy fancy, but these essentials will make whipping up your Halloween cupcake box a breeze:
- Stand mixer (or handheld electric mixer)—for creaming butter and whipping that dreamy frosting
- Cupcake pan—standard 12-cup, please! Bonus points if it’s Halloween-themed
- Piping bags & tips—I love a large star tip for swirly ghosts and pumpkins
- Silicone spatula—for scraping every last bit of batter (no wasting chocolate!)
- Cupcake liners—go festive with orange and black!
That’s it! Simple, right? Now let’s get baking.
How to Make Halloween Cupcake Box
Alright, let’s dive into the fun part! I’ll walk you through each step to create these showstopping Halloween cupcakes. Don’t let the decorating intimidate you—I’ve broken it down so anyone can make these look professional. Just follow along and have fun with it!
Preparing the Cupcake Batter
First things first – preheat that oven to 350°F (175°C) and line your cupcake pans with those cute Halloween liners. Now, here’s where the magic starts:
In your stand mixer bowl (or large bowl if using a hand mixer), whisk together all the dry ingredients – flour, sugar, cocoa powder, baking powder, baking soda, and salt. Give it a good mix so everything’s evenly distributed. Pro tip: sift if your cocoa powder tends to be lumpy!
In another bowl, whisk together the wet ingredients – sour cream, buttermilk, eggs, coffee (yes, it should be hot!), vegetable oil, and vanilla. That hot coffee is the secret weapon here – it “blooms” the cocoa powder and gives us that deep, rich chocolate flavor without any coffee taste coming through.
Now, with the mixer on low, gradually pour the wet ingredients into the dry. Once combined, bump it up to medium speed for exactly 2 minutes – set a timer! This incorporates air and gives us the perfect cupcake texture.
Baking and Cooling the Cupcakes
Use an ice cream scoop to fill your cupcake liners about 2/3 full – no more, or you’ll have mushroom tops! Slide them into the oven and set your timer for 15 minutes.
At 15 minutes, do the toothpick test – if it comes out with a few moist crumbs, they’re perfect. If still wet, give them another 2-3 minutes. Trust me, overbaked cupcakes are the real Halloween horror!
Let them cool in the pan for 5 minutes, then transfer to a wire rack to cool completely. I know it’s hard to wait, but warm cupcakes will melt your frosting into a sad puddle. Go fold some laundry or check your Halloween playlist while you wait.
Making the Buttercream
While those beauties cool, let’s make the buttercream that’ll take them from “nice” to “nightmare before Christmas” levels of awesome.
Start with room temperature butter (press your finger in – it should leave an indent but not sink in). Whip it in your stand mixer with the paddle attachment for a full 5 minutes on medium-high until it’s pale and fluffy. This step is crucial – don’t rush it!
Gradually add the powdered sugar with the mixer on low (unless you want a sugar cloud in your kitchen). Once incorporated, add the heavy cream and vanilla, then whip on high for 2 minutes until light and airy.
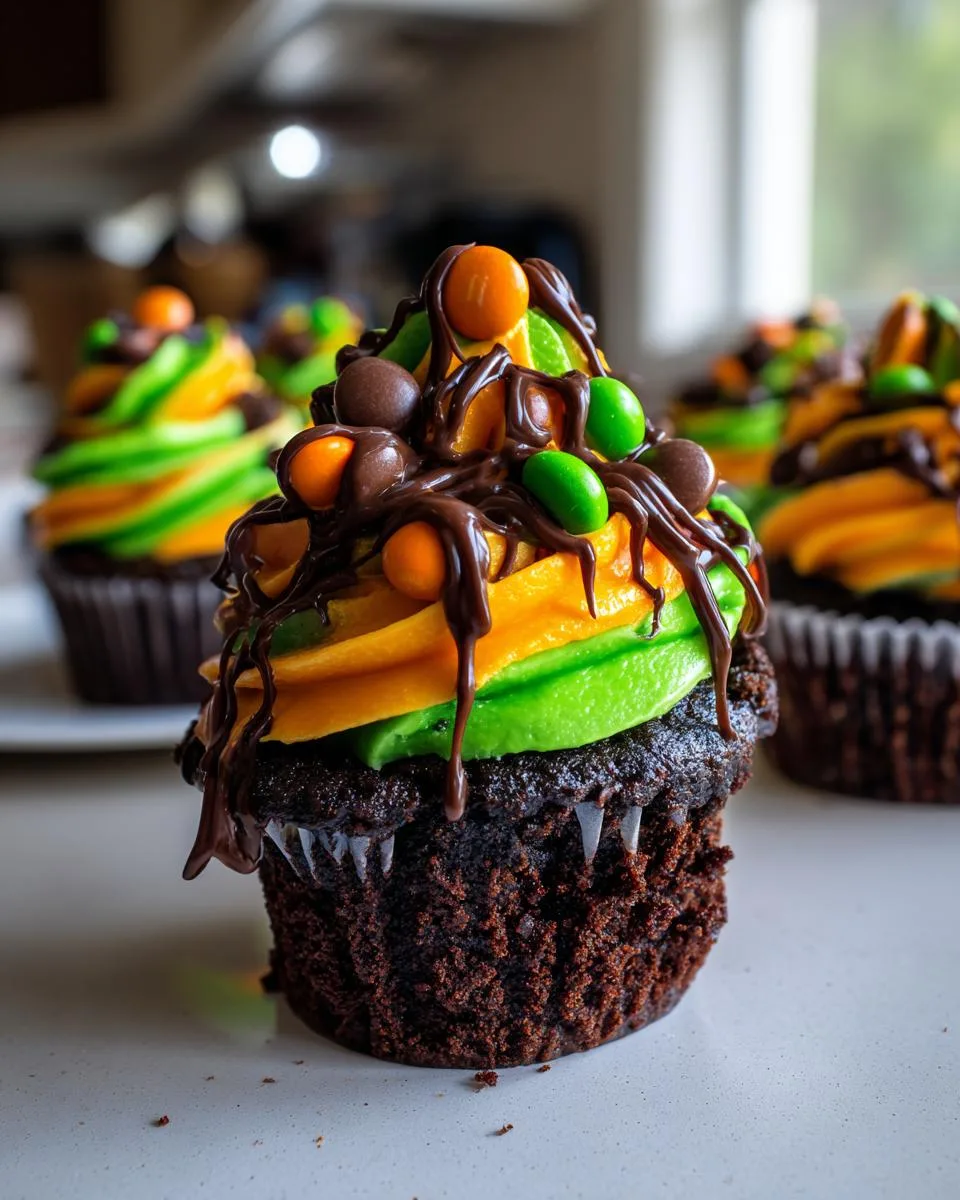
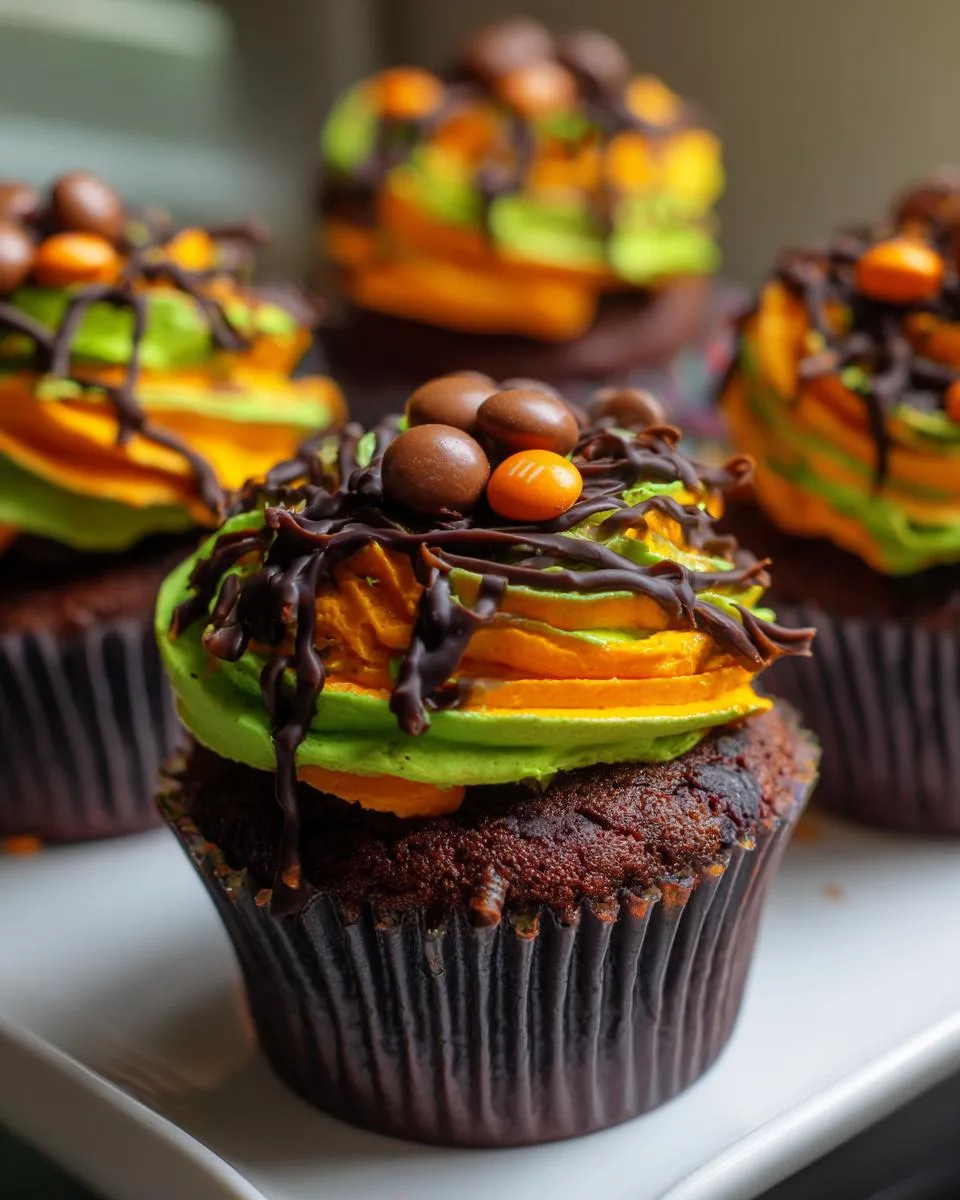
Now divide the buttercream into separate bowls for coloring. I usually do 1/3 orange (pumpkins!), 1/3 green (monsters!), and leave 1/3 white for ghosts. Gel colors work best – add a little at a time until you get those vibrant Halloween hues.
Decorating the Halloween Cupcake Box
Time for the most fun part! Fit piping bags with your favorite tips – I use a large star tip for swirly ghosts and pumpkins, and a round tip for spiderwebs.
Pipe your colored buttercream onto cooled cupcakes in whatever spooky designs you like – swirls for ghosts, little mounds for pumpkins, or get creative with monster faces! Use the melted chocolate to pipe spiderwebs or details, and place brown M&Ms as eyes or spider bodies.
Pro tip: If your kitchen is warm, pop the decorated cupcakes in the fridge for 10 minutes to set everything before serving or boxing them up.
Print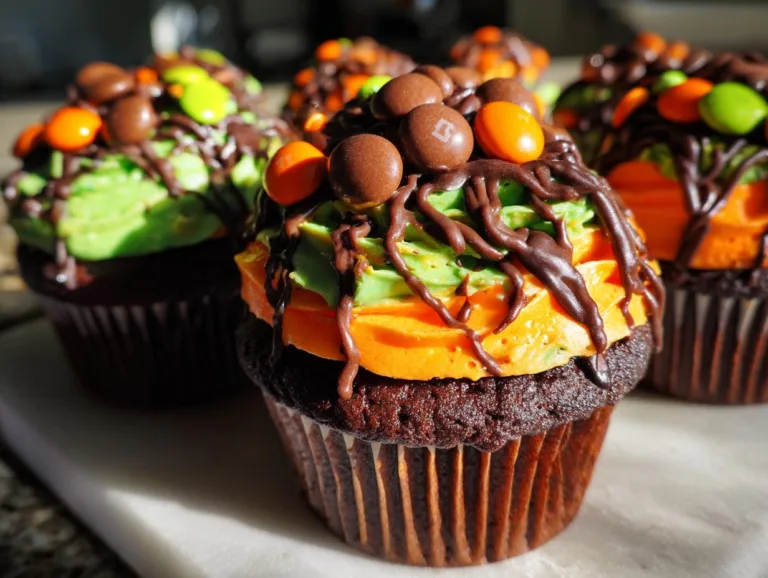
Spooky & Simple 12-Count Halloween Cupcake Box Recipe
Delicious Halloween cupcakes with rich chocolate flavor and festive decorations, perfect for Halloween parties.
- Total Time: 40 minutes
- Yield: 24 cupcakes 1x
Ingredients
- 1/2 cup sour cream (120g)
- 1 cup buttermilk (240mL)
- 3 eggs
- 1 1/2 cup hot coffee (360mL, strong, use a mocha pot so it’s basically espresso)
- 3/4 cup vegetable oil (180mL)
- 1 tbsp vanilla extract (15mL)
- 3 cup all-purpose flour (360g)
- 2 2/3 cup granulated sugar (535g)
- 1/2 cup cocoa powder (65g)
- 1 1/2 tsp baking powder (6g)
- 1 tbsp baking soda (18g)
- 1 tsp kosher salt (5g)
- 3 tsp vanilla (15mL, for buttercream)
- 1 lb confectioner’s sugar (450g, for buttercream)
- 1 cup unsalted butter (250g, room temperature, for buttercream)
- 3 tbsp heavy whipping cream (45mL, for buttercream)
- Green food coloring
- Orange food coloring
- Black gel food coloring
- Brown M&Ms (regular and peanut)
- 3/4 cup melted chocolate
Instructions
- Preheat oven to 350°F (175°C).
- Line a cupcake pan with paper liners.
- Sift together dry ingredients (flour, sugar, cocoa powder, baking powder, baking soda, salt) in a stand mixer bowl. Whisk to combine.
- In a separate bowl, whisk together wet ingredients (sour cream, buttermilk, eggs, coffee, vegetable oil, vanilla extract).
- Add wet ingredients to dry ingredients in the stand mixer bowl.
- Whisk to combine, then mix on level 2 for two minutes.
- Distribute batter evenly into cupcake liners.
- Bake for 15-20 minutes or until a toothpick inserted in the center comes out clean.
- Let cupcakes cool completely.
- For the buttercream: Whip butter for 5 minutes using a paddle attachment on the stand mixer.
- Gradually beat in confectioner’s sugar.
- Add heavy cream and vanilla. Beat until smooth and fluffy.
- Divide buttercream and color with green, orange, and black food coloring.
- Frost cooled cupcakes and decorate with brown M&Ms and melted chocolate for spooky Halloween designs.
Notes
- Use strong coffee for a deeper chocolate flavor.
- Room temperature butter whips better for buttercream.
- Cool cupcakes completely before frosting to prevent melting.
- Use gel food coloring for vibrant colors.
- Prep Time: 20 minutes
- Cook Time: 20 minutes
- Category: Dessert
- Method: Baking
- Cuisine: American
- Diet: Vegetarian
Nutrition
- Serving Size: 1 cupcake
- Calories: 280
- Sugar: 25g
- Sodium: 180mg
- Fat: 12g
- Saturated Fat: 4g
- Unsaturated Fat: 7g
- Trans Fat: 0g
- Carbohydrates: 40g
- Fiber: 1g
- Protein: 3g
- Cholesterol: 35mg
Tips for Perfect Halloween Cupcake Box
Want your Halloween cupcakes to be absolutely flawless? Here are my hard-earned secrets after years of spooky baking disasters (oh, the horror!):
- Room temp butter is non-negotiable – Cold butter won’t cream properly, leaving you with lumpy frosting. If you forgot to soften it, cube it and microwave in 5-second bursts until just pliable.
- Gel food coloring or bust – Liquid colors dilute your buttercream and won’t give those vibrant monster greens and pumpkin oranges we want. A little gel goes a long way!
- Cool completely before decorating – I know it’s tempting, but warm cupcakes = melty nightmare frosting. Wait at least an hour – test by touching the bottom.
- Prep decorations first – Melt chocolate and sort M&Ms before frosting so everything’s ready when inspiration strikes!
Follow these, and your Halloween cupcake box will be the talk of the party – promise!
Serving and Storing Halloween Cupcake Box
These Halloween cupcakes are best served at room temperature so the buttercream stays soft and dreamy. If you need to store them (though I doubt there will be leftovers!), keep them in an airtight container at room temp for up to 3 days. For longer storage, freeze undecorated cupcakes for up to 2 months – just thaw and decorate when ready to spook!

Pro tip: If your kitchen is warm, pop the frosted cupcakes in the fridge for 10 minutes before serving to keep those decorations picture-perfect. The melted chocolate details might weep a bit if left out too long – not that they’ll last that long at any Halloween party I’ve been to!
Nutritional Information
Okay, let’s be real—these Halloween cupcakes are a treat, not health food! But if you’re curious (or just tracking), here’s the scoop per cupcake (frosting and all): about 280 calories, 12g fat (4g saturated), 40g carbs, and 3g protein. Numbers might wiggle a bit based on your exact ingredients or how generously you frost—I won’t judge if you go heavy on the buttercream! Remember, Halloween’s all about balance… between sugar and more sugar.
Frequently Asked Questions
Oh, I get so many questions about these Halloween cupcakes – let me answer the ones that pop up most often!
Can I make these cupcakes ahead of time?
Absolutely! The unfrosted cupcakes freeze beautifully for up to 2 months (just wrap them tight). Make the buttercream up to 3 days ahead and keep it refrigerated – just rewhip before using. For the freshest taste, I recommend decorating the day of your party though!
How do I keep my frosting from melting?
Three words: cool, cool, cool! Make sure cupcakes are completely cooled (like, no warmth at all) before frosting. If your kitchen is warm, work in batches and keep frosted cupcakes in the fridge until serving. Using room temp butter (not too soft!) in your frosting helps too.
Can kids help decorate these?
Oh my gosh, yes – it’s half the fun! Little hands are perfect for placing M&M eyes and drizzling chocolate spiderwebs. I set up a “decorating station” with bowls of toppings and let them go wild. Just maybe keep the black food coloring away from white shirts!
What if I don’t have a piping bag?
No worries! A zip-top bag with the corner snipped off works in a pinch, or just spread the frosting with a knife and pile on decorations. Honestly, messy monster faces made with spoons often look even spookier!
Share Your Halloween Cupcake Box
I can’t wait to see your spooky creations! Snap a photo of your haunted cupcake masterpieces and tag me on Instagram—nothing makes me happier than seeing your Halloween baking adventures. Leave a comment below telling me your favorite decoration (ghosts? spiders? something totally wild?)—I read every single one!
For More recipes, Follow me on Facebook!