Let me tell you about my Ultimate Cheesy Ground Beef Melt – it’s the sandwich that saved dinner more times than I can count! Picture this: juicy ground beef, caramelized onions, melty cheese, and crispy buttery bread all hugging each other in perfect harmony. As a chef who’s made hundreds of these over the years (yes, I’m obsessed), I can promise you this is the quickest way to turn basic ingredients into something magical. It’s my go-to when the kids are hangry or when I need comfort food fast. The best part? You probably have everything you need right in your fridge right now. Let’s make some cheesy magic happen!
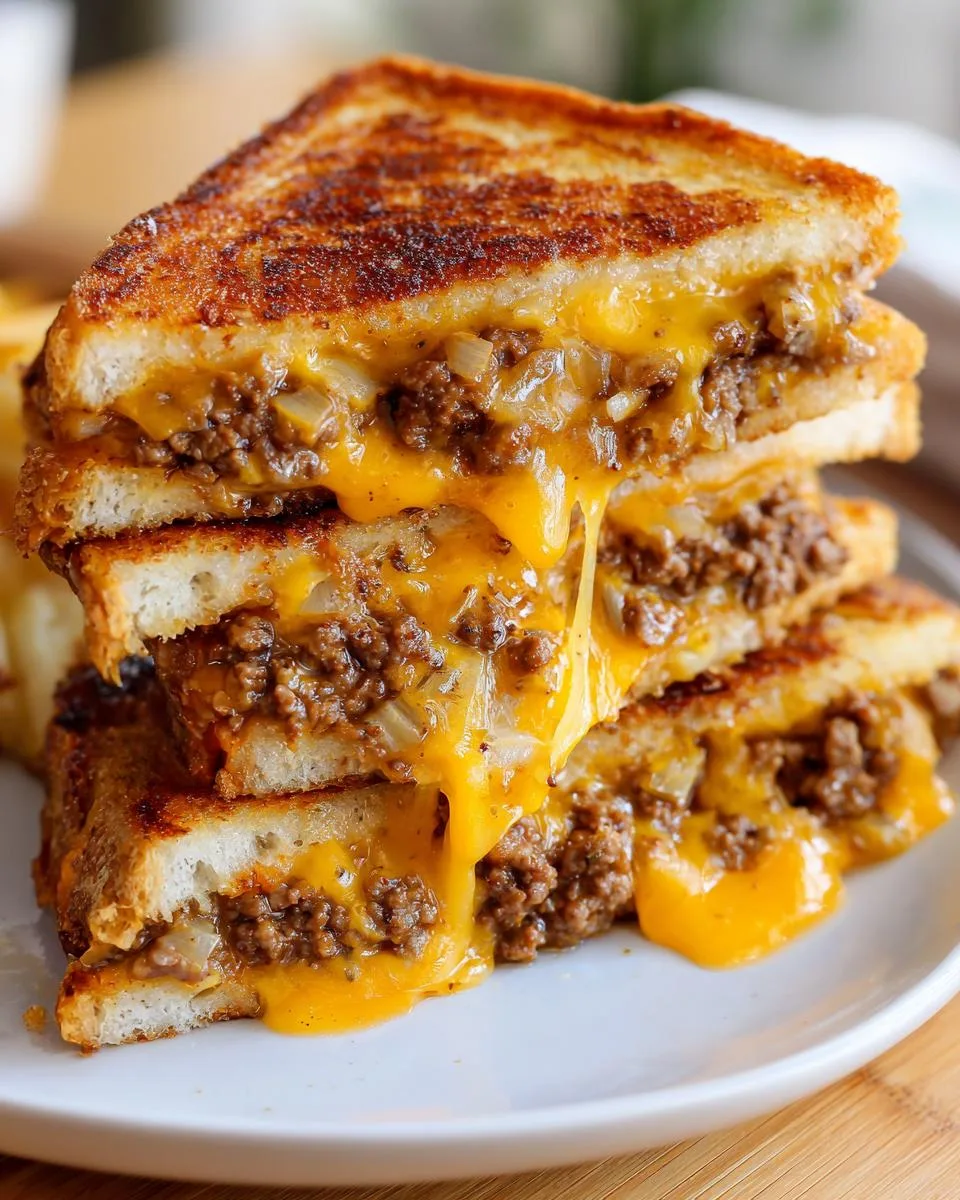
Table of Contents
Table of Contents
Why You’ll Love This Ultimate Cheesy Ground Beef Melt
This sandwich isn’t just delicious—it’s practically a lifesaver on busy nights. Here’s why it’s become my family’s favorite quick meal:
- Ready in a flash: From fridge to plate in under 25 minutes! The beef cooks while you butter the bread, and that golden grill happens fast.
- Cheese pull perfection: That moment when you slice into it and the cheese stretches? Pure happiness. I use thick-cut cheddar, but any melty cheese works wonders.
- Endlessly customizable: Swap in turkey instead of beef, add jalapeños for heat, or slather on barbecue sauce—it’s your kitchen, your rules!
- Kid-approved (and adult-loved): My picky eaters devour this, while my husband sneaks extra cheese on his. Win-win!
Trust me, once you taste that crispy-but-soft bread hugging the savory beef and gooey cheese, you’ll understand why I make this weekly. It’s the kind of recipe that feels like a warm hug!
Ingredients for the Ultimate Cheesy Ground Beef Melt
Gathering your ingredients is the first step to sandwich greatness! Here’s exactly what you’ll need to make two glorious Ultimate Cheesy Ground Beef Melts:
- 1 pound ground beef – 80/20 blend gives the best flavor, but leaner works too
- 1 medium onion, chopped (about 1 cup) – yellow or white, whatever’s in your pantry
- 2 cloves garlic, minced – fresh is best, but 1/2 tsp garlic powder works in a pinch
- Salt and pepper – to taste (I do about 1/2 tsp salt and 1/4 tsp pepper)
- 4 slices cheese – cheddar’s my go-to, but American melts beautifully too
- 4 slices bread – sourdough gives amazing crunch, but soft white works great
- 2 tbsp butter, softened – for that perfect golden crust
Pro tip: Have everything prepped and ready before you start cooking – chopped onion measured out, garlic minced, bread sliced. It makes the whole process smoother than melted cheese!
How to Make the Ultimate Cheesy Ground Beef Melt
Okay, let’s get cooking! This sandwich comes together fast, but there’s a method to the melty madness. Follow these steps, and you’ll have crispy, cheesy perfection in no time.
Sauté the Aromatics
First things first – grab your favorite skillet (I use my trusty cast iron) and set it over medium heat. Toss in those chopped onions and minced garlic with a little pat of butter or a drizzle of oil. Now here’s my secret: don’t rush this part! Let them cook gently for about 3-4 minutes until the onions turn translucent and smell sweet. That caramelization is flavor gold for your sandwich.
Brown the Ground Beef
Crank the heat up to medium-high and add your ground beef, breaking it up with a wooden spoon as it cooks. This is where the magic happens – get that beef nicely browned, not just gray! Season generously with salt and pepper (I’m talking at least 1/2 teaspoon salt here). Keep cooking until there’s absolutely no pink left – about 5-6 minutes total. Drain any excess grease if you want, but leave a little for flavor!
Assemble the Sandwich
While the beef’s cooking, butter one side of each bread slice – this is your crispy golden ticket! On the unbuttered side, pile that savory beef mixture high, then top with cheese (don’t be shy – I often use two slices per sandwich). Cap it with another slice of bread, buttered side facing out. Pro tip: press down gently so everything sticks together without squishing out the sides.
Grill to Perfection
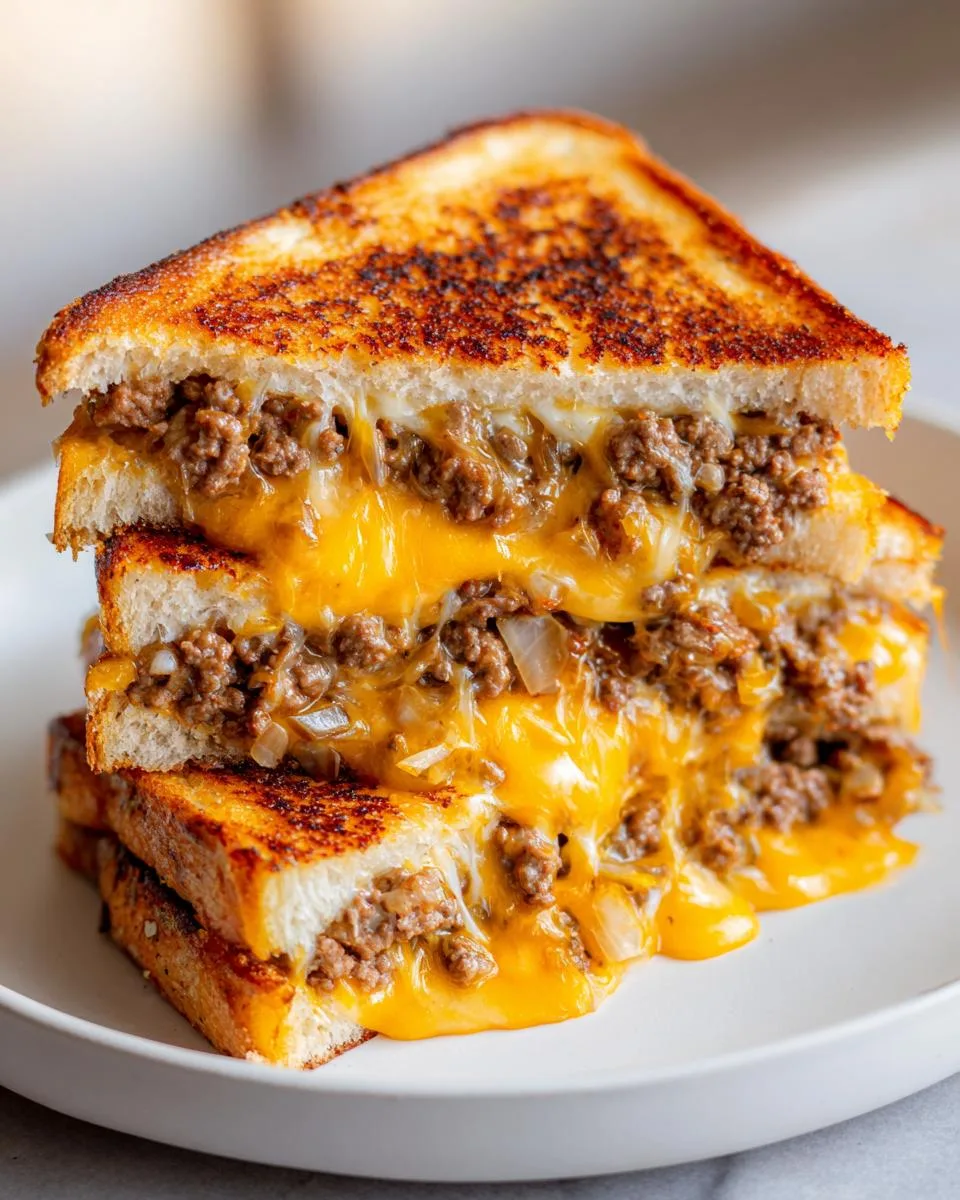
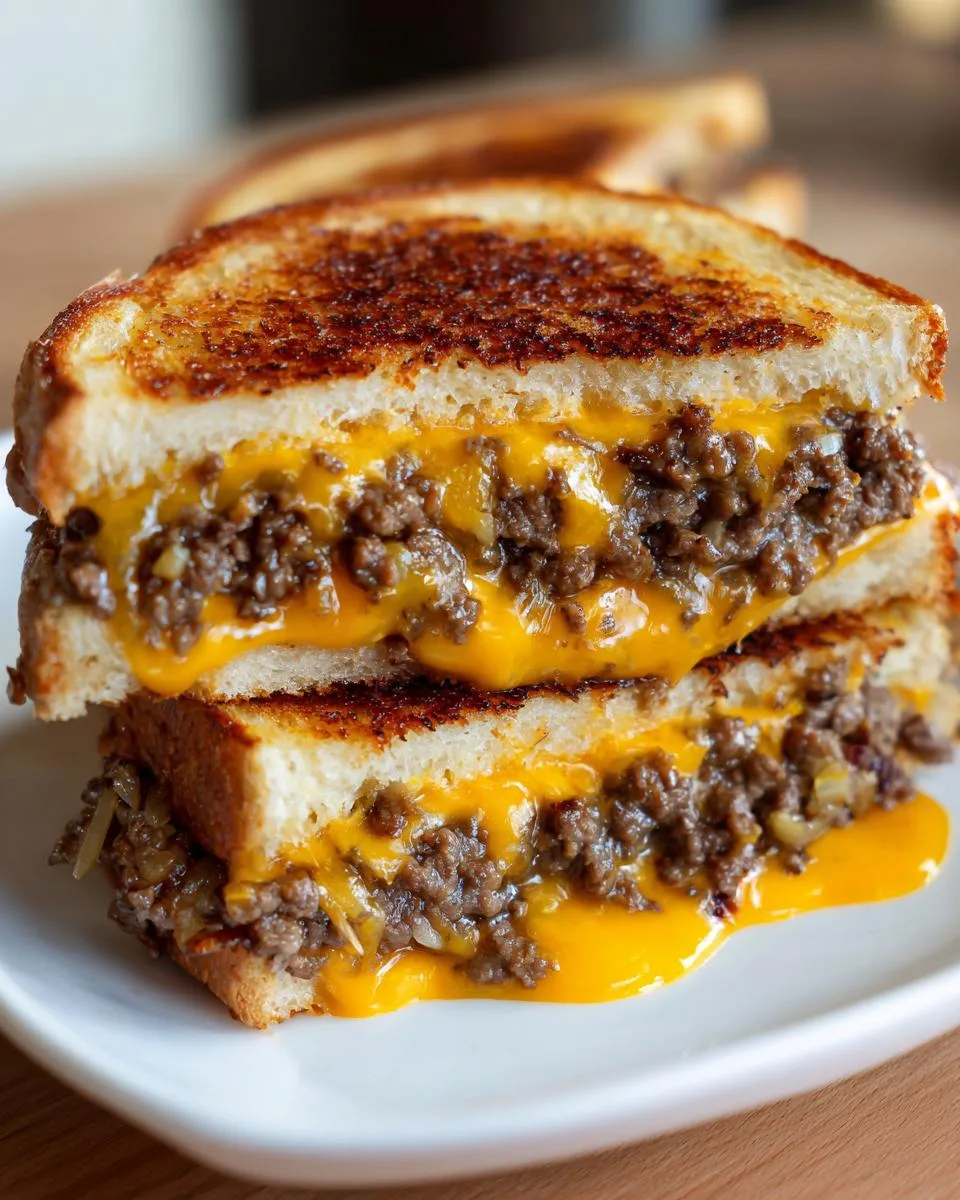
Heat your skillet back up to medium (no need to wash it – those browned bits add flavor!). Carefully place your assembled sandwich in the pan. Listen for that satisfying sizzle! Grill for about 3-4 minutes per side until the bread turns golden brown and the cheese starts oozing out the edges. Flip carefully using a spatula – that melty cheese wants to escape! When both sides are perfectly crisp and the cheese is molten, it’s time to eat.
Print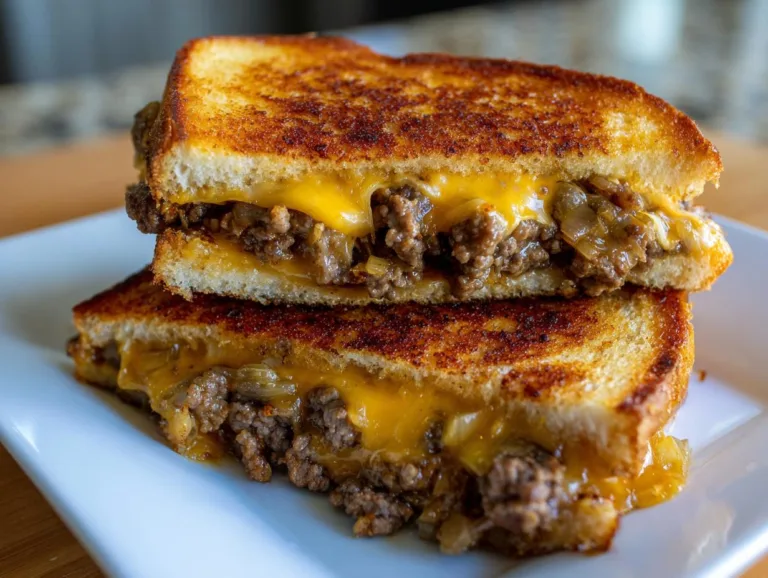
25-Minute Ultimate Cheesy Ground Beef Melt Magic
A delicious and easy-to-make cheesy ground beef melt sandwich that’s perfect for a quick meal.
- Total Time: 25 minutes
- Yield: 2 sandwiches 1x
Ingredients
- 1 pound ground beef
- 1 onion, chopped
- 2 cloves garlic, minced
- Salt and pepper, to taste
- 4 slices of your favorite cheese (cheddar, mozzarella, or American)
- 4 slices of bread (your choice)
- Butter, for spreading
- Optional toppings: sliced pickles, mustard, or ketchup
Instructions
- Sauté Aromatics: In a skillet over medium heat, add chopped onion and minced garlic. Cook until softened and fragrant, about 3-4 minutes.
- Brown the Beef: Increase the heat to medium-high and add the ground beef. Season it with salt and pepper. Cook until browned and fully cooked.
- Prepare the Bread: While the beef is cooking, spread butter on one side of each slice of bread.
- Assemble the Sandwich: On the unbuttered side, layer the beef mixture and top it with cheese. Place another slice of bread on top, buttered side facing out.
- Grill the Sandwich: Heat a pan over medium heat. Carefully place the assembled sandwich in the skillet. Grill each side for about 3-4 minutes until the bread is golden brown and the cheese has melted.
- Serve and Enjoy: Once ready, slice the melts in half and serve them hot with your choice of mustard, ketchup, or sliced pickles.
Notes
- Use any cheese you prefer for a personalized taste.
- Add optional toppings like pickles or mustard for extra flavor.
- Cook the beef thoroughly before assembling the sandwich.
- Prep Time: 10 minutes
- Cook Time: 15 minutes
- Category: Sandwich
- Method: Grilling
- Cuisine: American
- Diet: Low Lactose
Nutrition
- Serving Size: 1 sandwich
- Calories: 450
- Sugar: 5g
- Sodium: 600mg
- Fat: 25g
- Saturated Fat: 12g
- Unsaturated Fat: 10g
- Trans Fat: 1g
- Carbohydrates: 30g
- Fiber: 2g
- Protein: 25g
- Cholesterol: 80mg
Tips for the Best Ultimate Cheesy Ground Beef Melt
After making hundreds of these sandwiches (yes, I have a problem), I’ve learned a few tricks that take them from good to “can I have another?” levels of delicious. Here are my can’t-live-without tips:
Cheese matters more than you think
Not all cheeses melt equally! My golden rule? Use cheeses that actually want to get gooey. Sharp cheddar gives amazing flavor, but mix in some Monterey Jack or mozzarella for that Instagram-worthy stretch. Avoid pre-shredded bags – they contain anti-caking agents that make melting weird. Take 30 seconds to slice your own, and you’ll thank me later.
Don’t overstuff (no matter how tempting)
I know, I know – that beef smells amazing and you want to pile it sky-high. Resist! Too much filling makes the sandwich impossible to flip and leads to sad, breadless bites. Aim for about 1/2 cup of the beef mixture per sandwich – enough to taste, but not so much it becomes a mess. The cheese will hold everything together beautifully if you give it space to melt properly.
The press-and-wait secret
Here’s my favorite trick: after assembling, gently press the sandwich with your palm for about 10 seconds before grilling. This helps everything stick together so it doesn’t fall apart when flipping. Then – and this is crucial – let it sit undisturbed for the first 2 minutes of cooking. Peeking too early means losing that perfect golden crust. Trust the process!
Temperature is everything
Medium heat is your friend – too hot and the bread burns before the cheese melts; too low and you get soggy bread. Look for steady bubbles in the butter as it cooks – that’s the sweet spot. If your skillet starts smoking, take it off the heat for a minute. Burnt cheese smells great but tastes terrible!
Customizing Your Ultimate Cheesy Ground Beef Melt
The beauty of this sandwich is how easily you can make it your own! I’ve experimented with dozens of variations over the years – here are my favorite ways to shake up the classic recipe when I’m feeling creative (or just cleaning out the fridge).
Cheese swaps for every mood
While cheddar will always be my first love, sometimes I crave something different. Pepper jack gives a nice kick, Swiss adds nutty sophistication, and provolone melts like a dream. For serious decadence, try blue cheese crumbles mixed into the beef – sounds wild, tastes incredible! My kids adore American cheese’s ultra-melty texture, and honestly? No shame in that game.
Bread adventures
Sourdough’s my usual go-to for its sturdy crunch, but don’t be afraid to play with textures! Thick-cut Texas toast makes an indulgent base, while rye adds earthy depth. For something lighter, ciabatta’s holes catch all that cheesy goodness. Once I even used leftover garlic bread – life-changing decision right there.
Mix-in madness
This is where your personality shines! I always keep these add-ins handy:
- Pickles: Dill slices add perfect tangy crunch
- Jalapeños: Fresh for brightness or pickled for punch
- Mushrooms: Sautéed with the onions for umami boost
- BBQ sauce: A smear transforms it into a whole new sandwich
The best part? You can change it up every time based on what’s in your kitchen. Last week I threw in some caramelized peppers from taco night – absolute revelation! Whatever you choose, just remember: the cheesier, the better.
Serving Suggestions for the Ultimate Cheesy Ground Beef Melt
Now that you’ve made this glorious sandwich, let’s talk about how to serve it up right! The Ultimate Cheesy Ground Beef Melt stands strong on its own, but a few perfect pairings can turn it into a full meal that’ll have everyone begging for seconds.
Classic crunchy companions
Some nights call for simple, no-fuss sides – and that’s where these trusty options shine:
- Potato chips: The salty crunch is perfect against the melty cheese (I’m partial to ripple cuts for extra texture)
- Pickle spears: That vinegary bite cuts through the richness beautifully
- Carrot sticks: My sneaky way to add veggies – kids eat them without complaint!
Light and fresh pairings
When I want to balance out the indulgence, these are my go-tos:
- Simple green salad: Just toss some mixed greens with lemon vinaigrette – the brightness lifts the whole meal
- Tomato soup: Dunking is mandatory! The acidity plays off the beef perfectly
- Coleslaw: Creamy or vinegar-based – both add wonderful crunch and contrast
Condiment creativity
The sandwich is delicious plain, but sometimes I love setting out little bowls of extras for dipping and drizzling:
- Spicy mustard: Just a dab wakes up all the flavors
- Ketchup: Classic for a reason – my kids won’t eat theirs without it
- Ranch dressing: Sounds weird, tastes amazing (trust me!)
- Hot sauce: A few drops of Cholula takes it next-level
Pro tip: Serve these sandwiches straight from the skillet while the cheese is at its molten best. I usually slice them diagonally – not just for looks, but because those pointy ends are perfect for dipping! Whether you go simple with chips or fancy with soup, this sandwich makes any meal feel special. You can find more great dinner ideas over at our main recipes page!
Storing and Reheating Your Ultimate Cheesy Ground Beef Melt
Let’s be real – these sandwiches are usually gone before they hit the fridge! But if you somehow have leftovers (or made extras on purpose), here’s how to keep that cheesy goodness tasting fresh:
The fridge is your friend (for a short time)
Wrap any uneaten sandwiches tightly in foil or store them in an airtight container. They’ll keep happily in the fridge for up to 2 days – any longer and the bread starts getting sad. Pro tip: If you know you’ll have leftovers, pack the components separately and assemble fresh when ready to eat. Cold beef + cheese between bread just isn’t the same!
Reheating like a pro
Microwaving is tempting, but trust me – it turns your crispy masterpiece into a soggy mess. Instead, grab that skillet again! Heat it over medium-low, add the sandwich, and cover with a lid for about 2 minutes per side. This gently reheats the filling while bringing back that perfect crunch. No lid? No problem! Just add a few drops of water to the pan and cover with foil to create steam.
For extra credit: Unwrap the sandwich, butter the outsides again, and grill as if it were fresh. This takes more effort but gives you near-original results. My husband swears these “second-day sandwiches” taste even better!
Can you freeze them?
Technically yes, but honestly? The texture suffers. The cheese gets grainy when thawed, and the bread turns rubbery. If you must freeze, do it before grilling – wrap the assembled-but-uncooked sandwiches tightly in plastic, then foil. Cook from frozen (add 1-2 extra minutes per side) when cravings strike. But between us? This sandwich shines brightest when made fresh.
One last tip: If you’re packing these for lunch, let them cool completely before wrapping to prevent condensation sogginess. Toss in a ice pack if it’ll be a few hours – food safety first! Then reheat as above when ready to eat. That first bite of warm, melty goodness will make your coworkers jealous! If you want more quick dinner ideas, check out our dinner category.
Ultimate Cheesy Ground Beef Melt FAQs
After years of making these sandwiches (and fielding countless texts from friends asking for tips), I’ve gathered the most common questions about the Ultimate Cheesy Ground Beef Melt. Here’s everything you’ve been wondering – answered with all my messy-kitchen wisdom!
Can I use turkey or chicken instead of beef?
Absolutely! Ground turkey makes a fantastic lighter option – just add an extra pinch of salt since it’s leaner. My trick? Mix in 1 tbsp Worcestershire sauce or soy sauce to boost the umami flavor. Chicken works too, but chop it extra fine so it doesn’t dry out. Vegetarian? Try plant-based crumbles – they soak up flavors beautifully!
How do I prevent soggy bread?
Ah, the eternal sandwich struggle! Three secrets: 1) Let your cooked beef mixture cool slightly before assembling (steam = soggy), 2) Use thicker bread slices (sourdough’s my MVP), and 3) Don’t skimp on the butter – that golden barrier protects against moisture. If you’re really worried, toast the bread lightly before assembling!
What’s the best cheese for maximum meltiness?
Oh honey, let me count the ways! For that iconic cheese pull, combine cheeses with different melt points – like sharp cheddar for flavor and Monterey Jack for stretch. Avoid pre-shredded cheeses (those anti-caking agents ruin the texture). Pro tip: Grate your cheese slightly thicker than usual – it melts slower, giving you that perfect ooze without disappearing completely.
Can I make these ahead for a crowd?
You bet! Here’s my party trick: Cook the beef mixture up to 2 days ahead (it actually tastes better!). Keep it chilled, then reheat gently before assembling. Set up a “melt station” with bread, cheese, and toppings – let guests build their own, then grill sandwiches in batches. Just keep cooked ones warm in a 200°F oven until serving. Game day hero status achieved!
Help! My cheese keeps oozing out while cooking!
Welcome to the club – happens to me at least once a week! Two fixes: 1) Leave a 1/2-inch cheese-free border around the edges when assembling (it’ll melt inward), or 2) After flipping, use your spatula to gently push any escaped cheese back under the sandwich where it’ll crisp up into delicious “cheese lace.” Not gonna lie – that crispy cheese edge might become your favorite part!
Got more questions? Slide into my DMs anytime – I live for cheesy sandwich troubleshooting! Remember: even “failed” melts usually still taste amazing. Now go forth and melt some cheese with confidence!
Nutritional Information
Now, I’m no nutritionist, but I do believe in balance – and that includes enjoying delicious comfort food like our Ultimate Cheesy Ground Beef Melt! Keep in mind these numbers are rough estimates since ingredients vary so much by brand and personal touches. That extra slice of cheese you snuck in? Yeah, that counts!
This sandwich packs protein from the beef, calcium from the cheese, and energy from the bread – making it a satisfying meal. The exact nutrition changes based on your choices: whole grain bread adds fiber, lean beef cuts fat, and veggie add-ins boost vitamins. Even the type of butter makes a difference!
My philosophy? Focus on quality ingredients you can feel good about, enjoy reasonable portions (though I won’t judge if you eat two), and balance it with veggies throughout the day. Food should nourish both body and soul – and this sandwich definitely feeds the soul!
For More recipes, Follow me on Facebook!