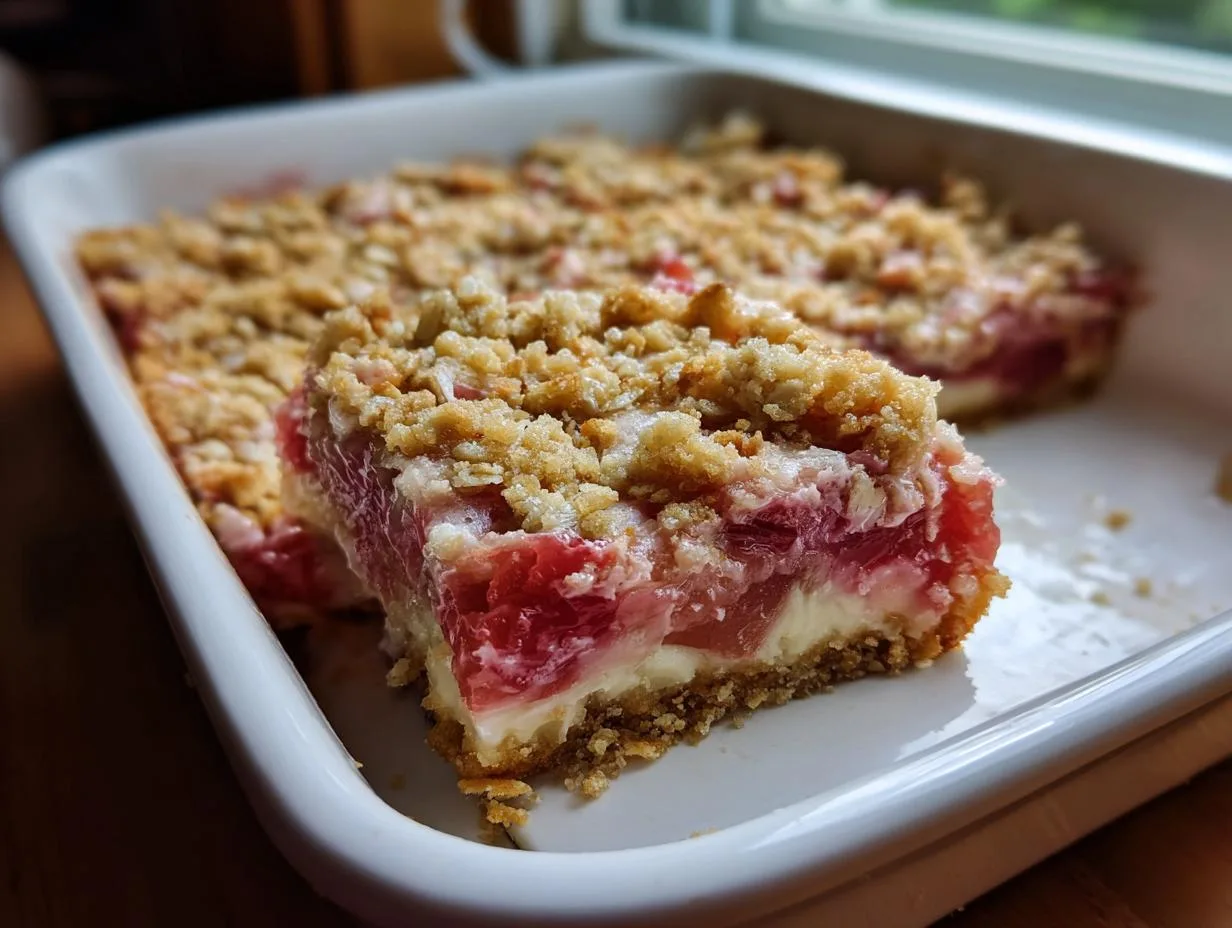
Oh, fall – that magical time when everything smells like cinnamon and pumpkin spice. I live for those cozy flavors, but sometimes, turning on the oven feels like too much work. That’s where these no bake pumpkin cheesecake bars come in – my secret weapon for when I’m craving that perfect pumpkin-cream cheese combo without the hassle. Last Thanksgiving, I was running late (as usual) and whipped these up in 20 minutes flat. The best part? My family couldn’t tell they weren’t baked! These bars give you all the rich, spiced goodness of traditional pumpkin cheesecake with none of the oven drama. Just layer, chill, and watch them disappear.
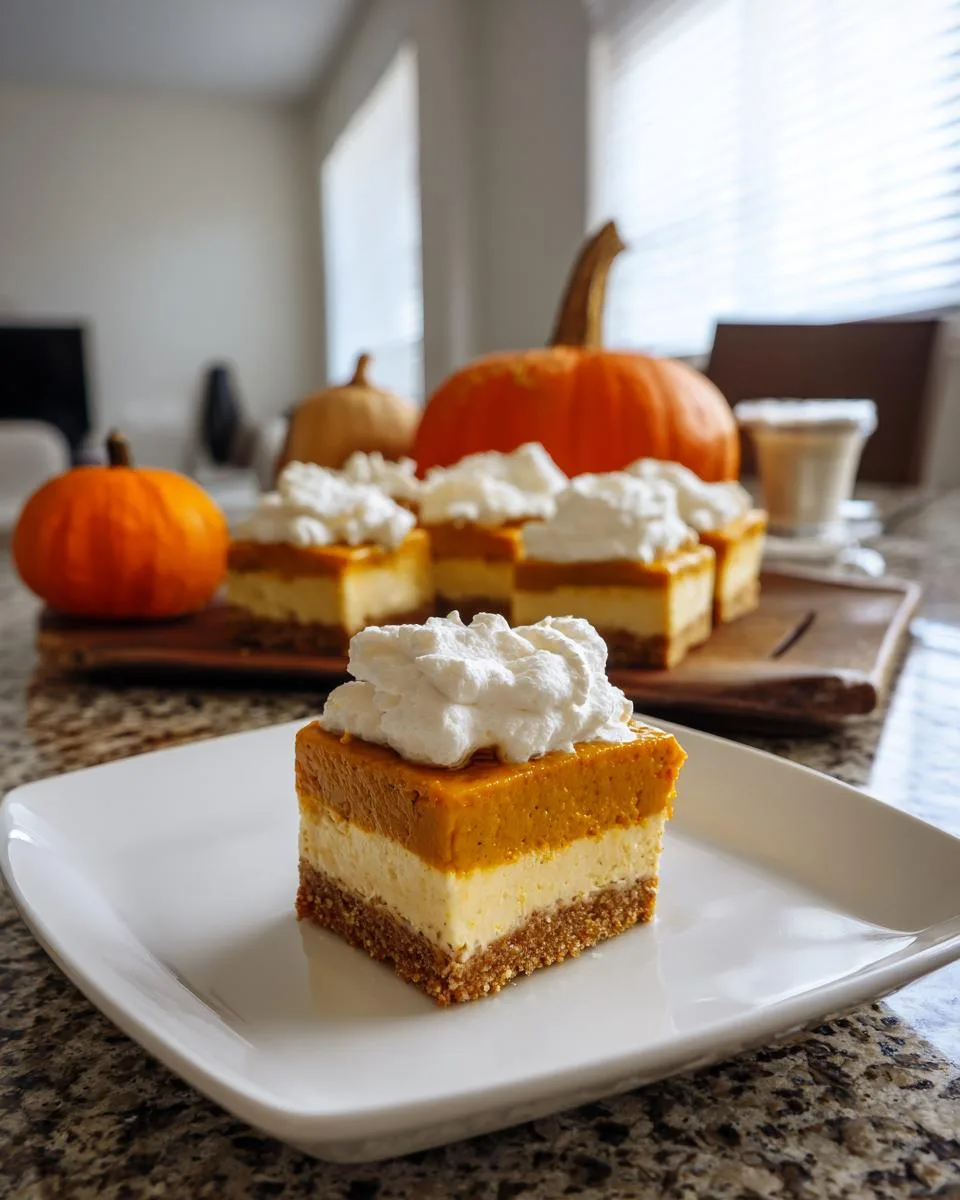
Table of Contents
Table of Contents
Why You’ll Love These No Bake Pumpkin Cheesecake Bars
These bars are my go-to for good reason—here’s why they’ll become yours too:
- No oven required—perfect for hot days or when you’re short on time (or patience!)
- Creamy dreamy texture—layers of spiced pumpkin and fluffy cheesecake melt in your mouth
- Party hero—they feed a crowd and look gorgeous on a dessert table
- Make-ahead magic—chill overnight and forget the last-minute stress
- Pumpkin spice bliss—all the cozy fall flavor without baking a whole pie
Trust me, one bite and you’ll be hooked. Even my “I don’t like pumpkin” cousin sneaks seconds!
Ingredients for No Bake Pumpkin Cheesecake Bars
Gather these simple ingredients—they come together like magic! I always measure everything before starting—trust me, it saves so much time when you’re layering. Here’s exactly what you’ll need:
For the Crust:
- 12 full sheets graham crackers (about 1 1/2 cups crushed)—I sometimes use cinnamon ones for extra warmth
- 8 tablespoons (1 stick) unsalted butter, melted—the kind that makes that glorious sizzle when you pour it
For the Cream Cheese Layer:
- 24 ounces cream cheese (three 8-oz packages), room temperature—this is KEY for no lumps!
- 3 tablespoons granulated sugar—just enough sweetness to balance the tang
- 3 tablespoons milk—whole milk makes it extra creamy
- 1 teaspoon vanilla extract—the good stuff if you have it
- 8 ounces frozen whipped topping (like Cool Whip), thawed—fluff factor incoming!
For the Pumpkin Layer:
- 30 ounces pumpkin puree (not pie filling!)—the star of the show
- 2 cups cold milk—helps the pudding set perfectly
- 10.2 ounces instant vanilla pudding mix (two 5.1-ounce boxes)—surprise MVP for texture
- 2 teaspoons ground cinnamon—hello, cozy
- 2 teaspoons pumpkin pie spice—I usually add an extra pinch because why not?
For the Topping:
- 8 ounces frozen whipped topping—reserved from the cheesecake layer
Psst—see those notes about room-temperature cream cheese and cold milk? Those little details make ALL the difference in getting those perfect, dreamy layers.
Ingredient Substitutions & Variations
Got dietary needs or just want to mix things up? No problem—these no bake pumpkin cheesecake bars are crazy adaptable! Here are my favorite swaps and twists:
- Gluten-free? Use gluten-free graham crackers or crushed gingersnaps for the crust—same buttery goodness.
- Dairy-free? Swap in vegan cream cheese and coconut whipped topping (that canned coconut milk trick works wonders!).
- Extra crunch: Stir chopped pecans or walnuts into the crust or sprinkle on top.
- Flavor boost: Add a tablespoon of bourbon or rum to the pumpkin layer—adults-only deliciousness!
- Chocolate lovers: Mix mini chocolate chips into the cream cheese layer or drizzle with melted chocolate.
See? Even my picky aunt can enjoy these—and she’s the toughest critic I know!
How to Make No Bake Pumpkin Cheesecake Bars
Okay, let’s get layering! These no bake pumpkin cheesecake bars come together in just 20 minutes of active time—the hardest part is waiting for them to chill. (Pro tip: Lick the bowl while you wait—I won’t tell!) Follow these steps for foolproof, creamy-spiced perfection.

Step 1: Prepare the Graham Cracker Crust
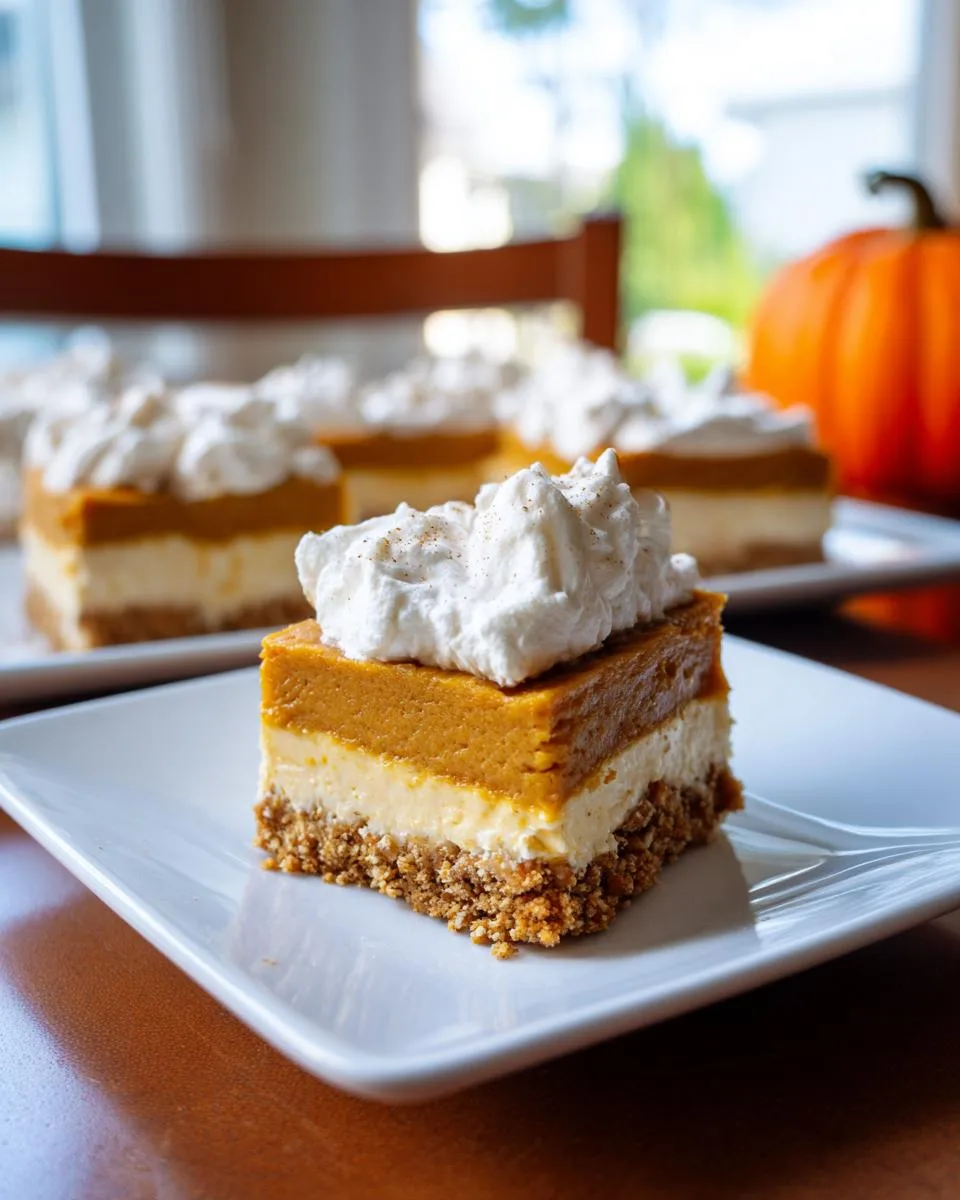
First, grab those graham crackers and turn them into crumbs—I use a food processor, but a zip-top bag and rolling pin work great too (and let you take out any stress!). Mix the crumbs with melted butter until it looks like wet sand. Now, here’s the secret: press it FIRMLY into your greased 9×13-inch pan. I mean really get in there with the back of a measuring cup—this keeps the crust from crumbling later. Pop it in the freezer for 15 minutes (set a timer!) while you make the next layer. That quick chill sets the stage for everything else.
Step 2: Make the Cream Cheese Layer
Time for the creamy dreamy part! In your stand mixer (or with a hand mixer and some elbow grease), beat the room-temperature cream cheese, sugar, milk, and vanilla until it’s completely smooth—no lumps allowed! This takes about 2 minutes. Now, gently fold in that whipped topping with a spatula. Don’t overmix—you want to keep all that fluffy lightness. Spread this over your chilled crust, smoothing the top like you’re frosting a cake. Already looks gorgeous, right?
Step 3: Assemble the Pumpkin Layer
Here’s where the magic happens! In a big bowl, whisk together the pumpkin puree, milk, pudding mix, cinnamon, and pumpkin pie spice. It’ll thicken fast—that’s the pudding working its no-bake wonders. Spread this spiced pumpkin goodness evenly over the cream cheese layer. I like to use an offset spatula for this—it glides so smoothly. Resist the urge to taste-test yet (okay, maybe just one spoonful…).
Step 4: Chill and Serve
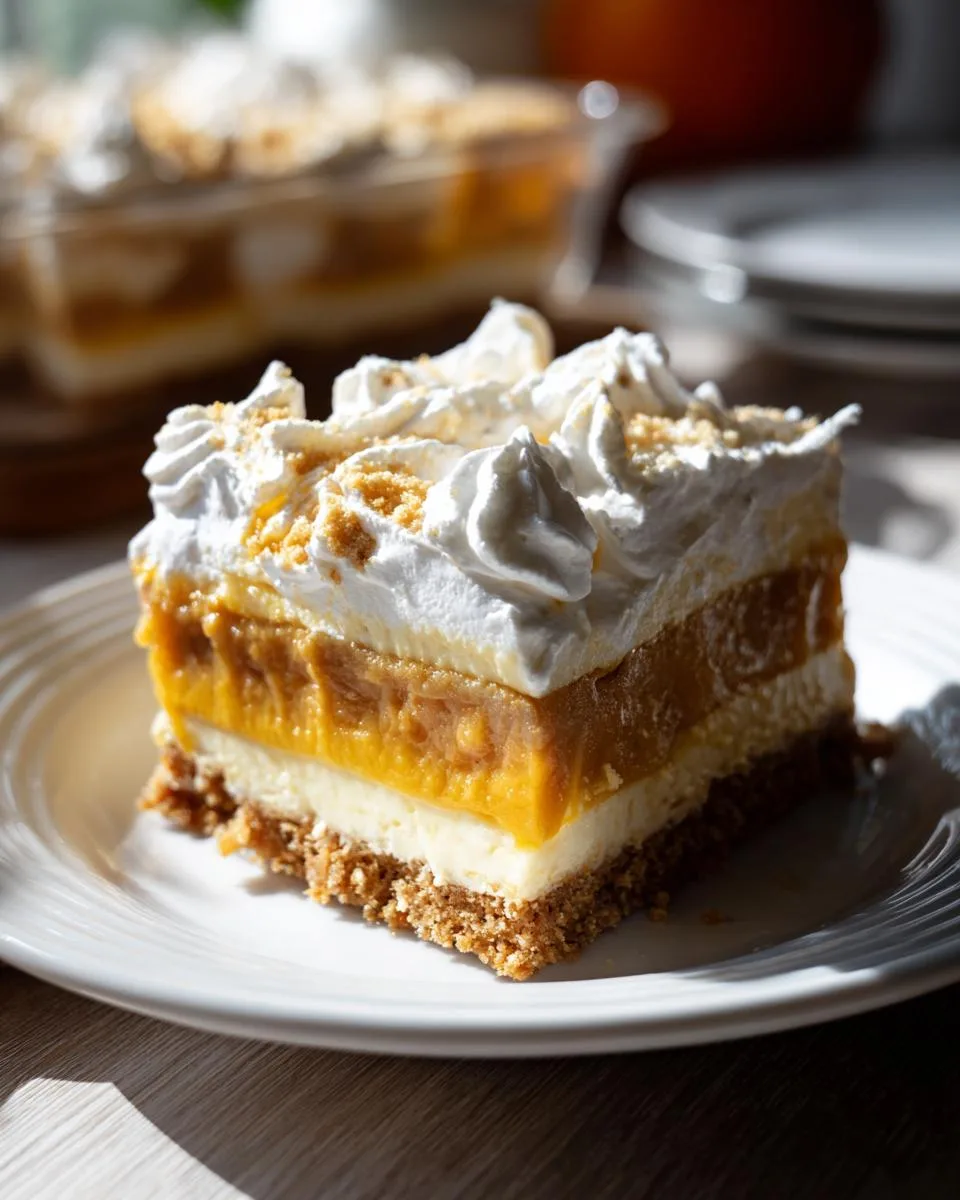
Almost there! Top with that last layer of whipped topping—spread it gently so you don’t disturb the pumpkin layer underneath. Now, the hardest part: refrigerate for at least 4 hours, but overnight is even better. This lets all the flavors cozy up together and the layers set properly. When you’re ready to serve, slice into squares (wipe the knife between cuts for clean edges) and watch everyone’s eyes light up. Optional but highly recommended: drizzle with caramel or sprinkle with extra cinnamon right before serving. You did it—no oven required!
Print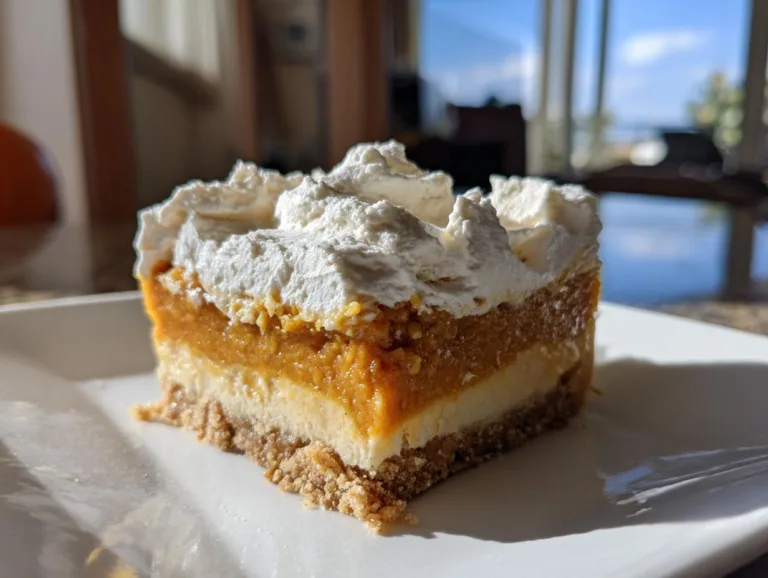
20-Min No Bake Pumpkin Cheesecake Bars – Irresistible Bliss
Easy no-bake pumpkin cheesecake bars with a graham cracker crust, creamy cheesecake layer, spiced pumpkin filling, and whipped topping. Perfect for fall or any special occasion.
- Total Time: 4 hours 20 minutes
- Yield: 12 bars 1x
Ingredients
- For the Crust:
- 12 full sheets graham cracker
- 8 tablespoons unsalted butter, melted (full stick)
- For Cream Cheese Layer:
- 24 ounces cream cheese (three 8-oz packages), room temperature
- 3 tablespoons sugar
- 3 tablespoons milk
- 1 teaspoon vanilla extract
- 8 ounces frozen whipped topping (like Cool Whip), thawed
- For Pumpkin Layer:
- 30 ounces pumpkin puree
- 2 cups milk
- 10.2 ounces instant vanilla pudding (two 5.1-ounce boxes)
- 2 teaspoons ground cinnamon
- 2 teaspoons pumpkin pie spice
- Topping:
- 8 ounces frozen whipped topping
Instructions
- In a medium bowl, mix graham cracker crumbs and melted butter. Press firmly into a greased 9×13-inch baking dish (or two 8×8-inch dishes). Chill in the freezer for 15 minutes.
- In a stand mixer, beat cream cheese, 3 tablespoons milk, sugar, and vanilla until smooth. Fold in 8 ounces of thawed whipped topping. Spread over the crust.
- In a large bowl, combine pumpkin puree, 2 cups milk, pudding mix, cinnamon, and pumpkin pie spice. Spread over the cream cheese layer.
- Top with remaining 8 ounces of whipped topping. Refrigerate for at least 4 hours before serving.
Notes
- Use room-temperature cream cheese for a smoother texture.
- Chill the crust before adding layers to prevent crumbling.
- For a stronger pumpkin flavor, add an extra teaspoon of pumpkin pie spice.
- Prep Time: 20 minutes
- Cook Time: 0 minutes
- Category: Dessert
- Method: No-Bake
- Cuisine: American
- Diet: Vegetarian
Nutrition
- Serving Size: 1 bar
- Calories: 320
- Sugar: 22g
- Sodium: 280mg
- Fat: 18g
- Saturated Fat: 11g
- Unsaturated Fat: 5g
- Trans Fat: 0g
- Carbohydrates: 35g
- Fiber: 2g
- Protein: 5g
- Cholesterol: 45mg
Serving and Storing No Bake Pumpkin Cheesecake Bars
These beauties deserve a little fanfare when serving! I love topping mine with a drizzle of caramel sauce—the sweet-salty combo is *chef’s kiss*. A sprinkle of cinnamon or crushed graham crackers adds pretty texture too. Leftovers (ha—as if!) keep beautifully in the fridge for up to 3 days—just cover tightly with plastic wrap. Pro tip: Let them sit at room temp for 5 minutes before serving—that cream cheese layer gets extra dreamy when it’s not ice-cold.
Nutritional Information
Okay, let’s be real—we’re not eating dessert for the nutritional benefits, but I know some of you like to keep track (or need to for dietary reasons). Here’s the scoop on what’s in each luscious bar:
- Serving Size: 1 bar (about 1/12 of the recipe)
- Calories: 320 – consider it fuel for pumpkin spice happiness
- Sugar: 22g – mostly from the pumpkin’s natural sweetness
- Sodium: 280mg – not bad for a dessert!
- Fat: 18g – that’s where all the creamy goodness lives
- Protein: 5g – surprise! Pumpkin and dairy team up here
Important note: These values are estimates—your actual numbers might vary depending on specific brands or if you tweak the recipe (like I do with that extra pinch of spice!). If you’re tracking closely, I recommend plugging your exact ingredients into a nutrition calculator. Now go enjoy your bar—you’ve earned it!
Frequently Asked Questions
I get asked about these no bake pumpkin cheesecake bars ALL the time—here are the answers to the questions popping up most in my kitchen (and inbox!):
Can I use fresh pumpkin instead of canned?
Oh honey, I’ve tried—and while homemade pumpkin puree works, canned is way easier (and more consistent!). The moisture content varies so much with fresh that you might end up with soggy bars. Libby’s puree is my ride-or-die for this recipe.
How long do these bars last in the fridge?
They’ll stay perfect for 3-4 days if you can resist eating them all at once! Just keep them covered—I press plastic wrap right against the surface to prevent drying. The crust might get slightly softer after day two, but the flavors actually deepen!
Can I freeze no bake pumpkin cheesecake bars?
You bet! Freeze them before adding the final whipped topping layer. Thaw overnight in the fridge, then add topping before serving. They’ll keep for 2 months—not that they’ve ever lasted that long in my house!
Why is my cream cheese layer lumpy?
Room temperature cream cheese is NON-NEGOTIABLE here, friends! Cold cream cheese = lump city. If you forgot to soften it, zap it in the microwave for 10-second bursts until it gives when pressed (but not melted!).
Can I make these into individual servings?
Absolutely! Use muffin tins lined with parchment squares—perfect for parties. Just reduce the chilling time to 2 hours since they’re smaller. Adorable AND practical!
Final Thoughts
Alright, pumpkin lovers—it’s your turn! Whip up these no bake pumpkin cheesecake bars and watch the magic happen. I want to hear all about your creations—did you add extra spice? Try the bourbon trick? Tag me @Dishivia so I can see your masterpieces. Now go grab that mixing bowl—your easiest, creamiest fall dessert awaits!
For More recipes, Follow me on Facebook!