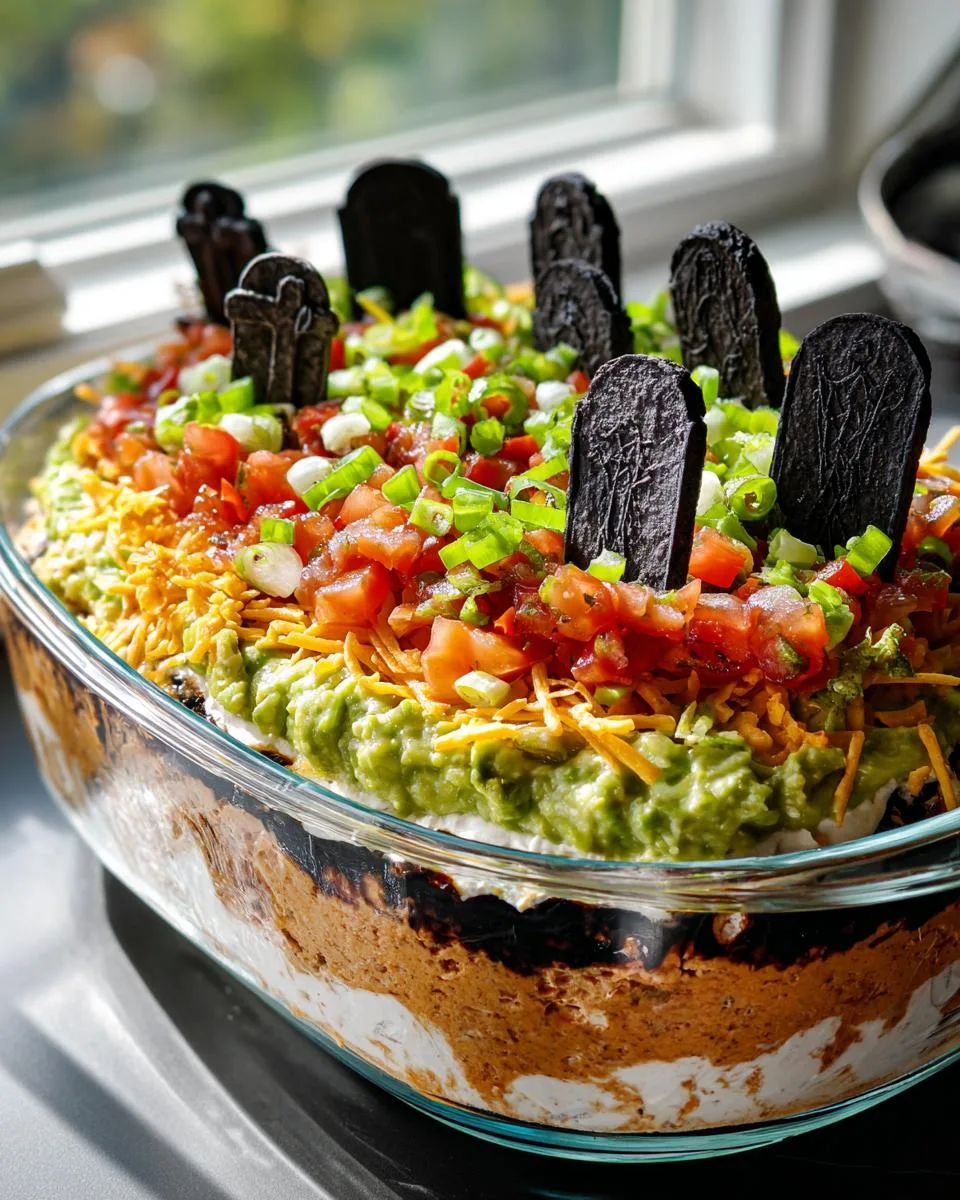
Halloween parties just got tastier – and spookier! Every year, my kitchen transforms into a haunted snack station, and this Graveyard Layered Taco Dip always steals the show. Picture this: creamy layers of seasoned sour cream, dreamy avocado, and zesty salsa piled high like a delicious ghostly mound, topped with edible tortilla tombstones that’ll make your guests howl with delight. I’ve been making this creepy creation for years – it’s foolproof, feeds a crowd, and disappears faster than a vampire at sunrise. The best part? You can whip it up in minutes while your cauldron… I mean, slow cooker… handles the main dish. Trust me, this dip will be the life (and death) of your Halloween bash!
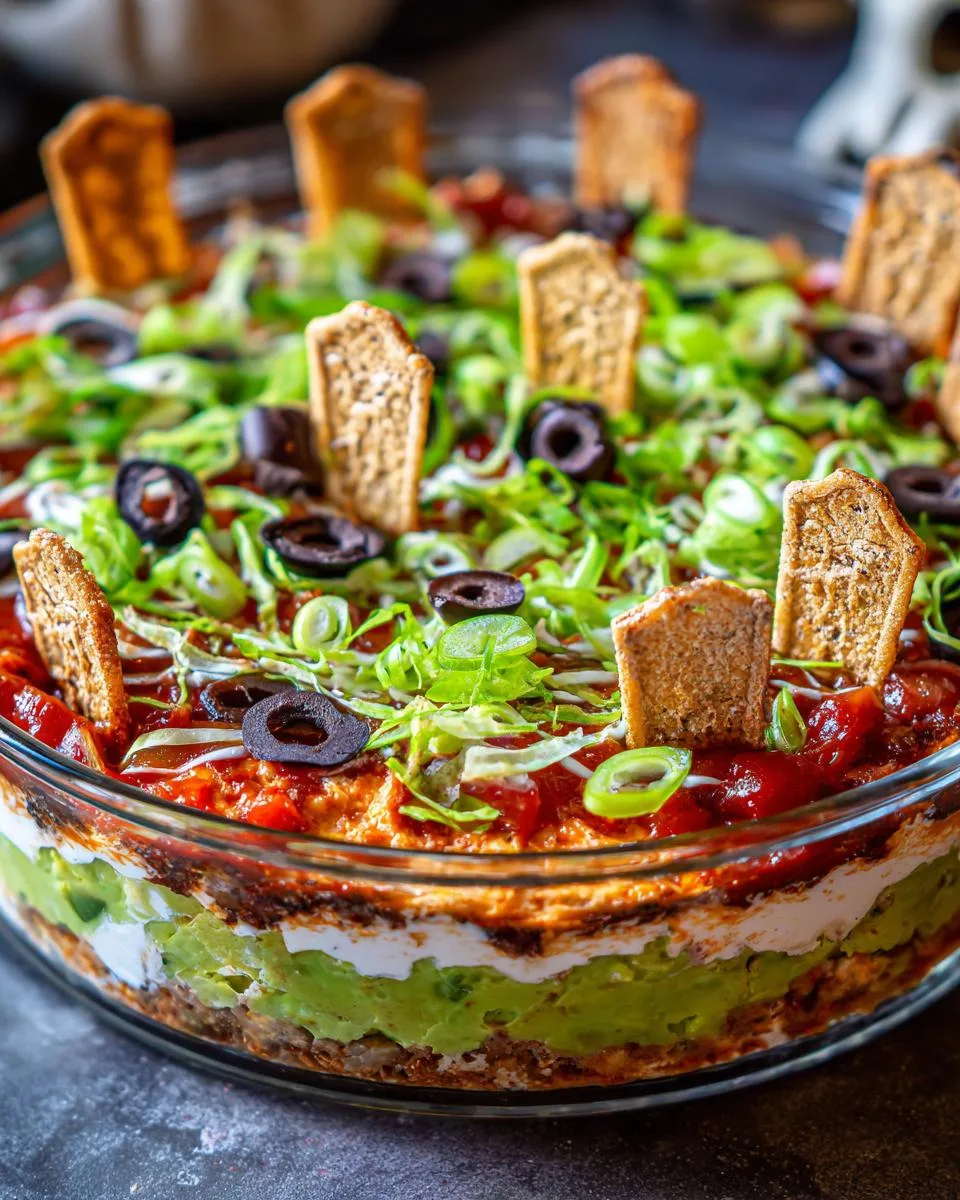
Table of Contents
Table of Contents
Why You’ll Love This Graveyard Layered Taco Dip
Oh, where do I even start? This dip is basically Halloween magic in a dish! Here’s why it’s become my go-to party staple:
- So easy – Seriously, if you can spread and stir, you’ve got this. No fancy skills needed!
- Total crowd-pleaser – I’ve never brought leftovers home. Ever. Even my picky nephew devours it.
- Customizable layers – Swap in black beans, add extra heat, or go wild with toppings. Make it your spooky masterpiece!
- Perfect make-ahead – Assemble it early so you can actually enjoy your own party for once.
- That wow factor – The edible tombstones? Pure genius. Watch your guests’ faces light up when they see it!
Trust me, this dip will haunt your recipe rotation long after Halloween’s over.
Ingredients for Graveyard Layered Taco Dip
Okay, let’s gather our “spooky supplies”! Here’s everything you’ll need to conjure up this hauntingly delicious dip:
- 1 can (16 oz) refried beans or refried black beans – I like the black beans for extra drama!
- 2 cups sour cream – The creamier base for our ghostly grounds
- 1 packet (about 2 Tbsp) taco seasoning – Your pick – mild or fiery!
- 2 ripe avocados, mashed – Look for ones that yield slightly when pressed
- 1 clove garlic, finely minced – Fresh is best here!
- 2 Tbsp mayonnaise – The secret to ultra-creamy avocado layer
- 1 cup salsa – Chunky works best so our layers don’t get soggy
- 1 bunch scallions (green onions), chopped – Both white and green parts!
- 2 large flour tortillas – For crafting our edible tombstones
See? Nothing too scary here – just good, simple ingredients waiting to transform into something magical. Now let’s turn up the Halloween spirit!
Equipment You’ll Need
No fancy cauldrons required! Just grab these everyday tools from your kitchen:
- 2 mixing bowls – One for the sour cream mixture, one for avocado
- A spatula or spoon – For spreading those perfect layers
- Baking sheet – For crisping up those tortilla tombstones
- 9×13″ serving dish – Clear glass shows off those spooky layers best!
That’s it – now let’s make some magic!
How to Make Graveyard Layered Taco Dip
Now for the fun part – let’s bring this spooky snack to life! Follow these simple steps, and you’ll have a dip that’s equal parts delicious and delightfully creepy.
Step 1: Prepare the Seasoned Sour Cream
First, let’s make the “haunted grounds” layer! Grab one of your mixing bowls and plop in that sour cream. Sprinkle in the taco seasoning and stir, stir, stir until it’s completely combined – no white streaks left behind! I like to taste a tiny bit at this point to check the seasoning. Need more kick? Add a pinch of cayenne. Want it milder? Go easy on the seasoning next time. Set this aside – our ghostly base is ready!
Step 2: Make the Avocado Layer
Time for the “graveyard moss”! In your second bowl, mash those avocados with the back of a fork until mostly smooth (I like leaving some small chunks for texture). Add the minced garlic and mayo, then mix until it’s all creamy and dreamy. Pro tip: squeeze a little lime juice in here if you’re making this ahead – it’ll keep the avocado from turning brown on you!
Step 3: Assemble the Layers
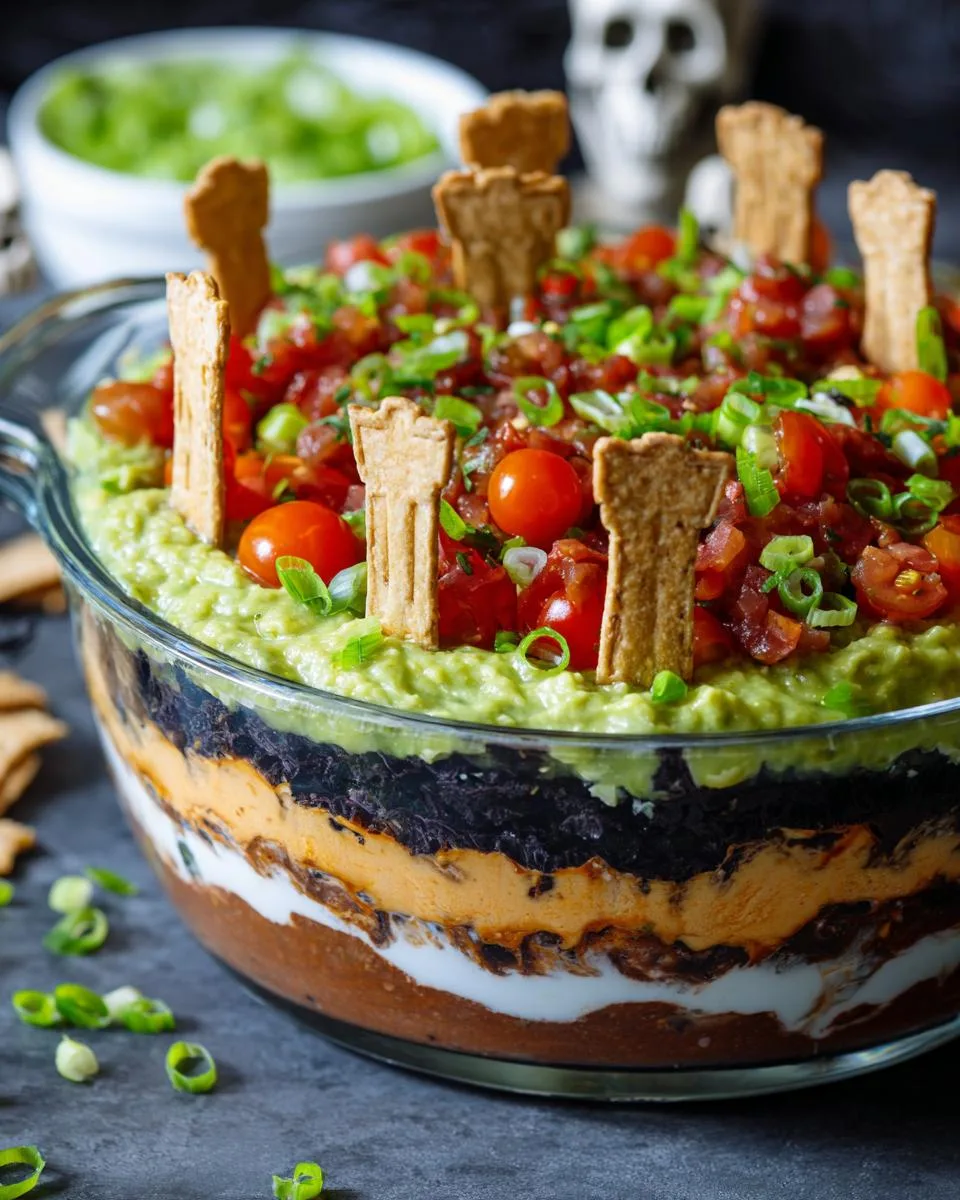
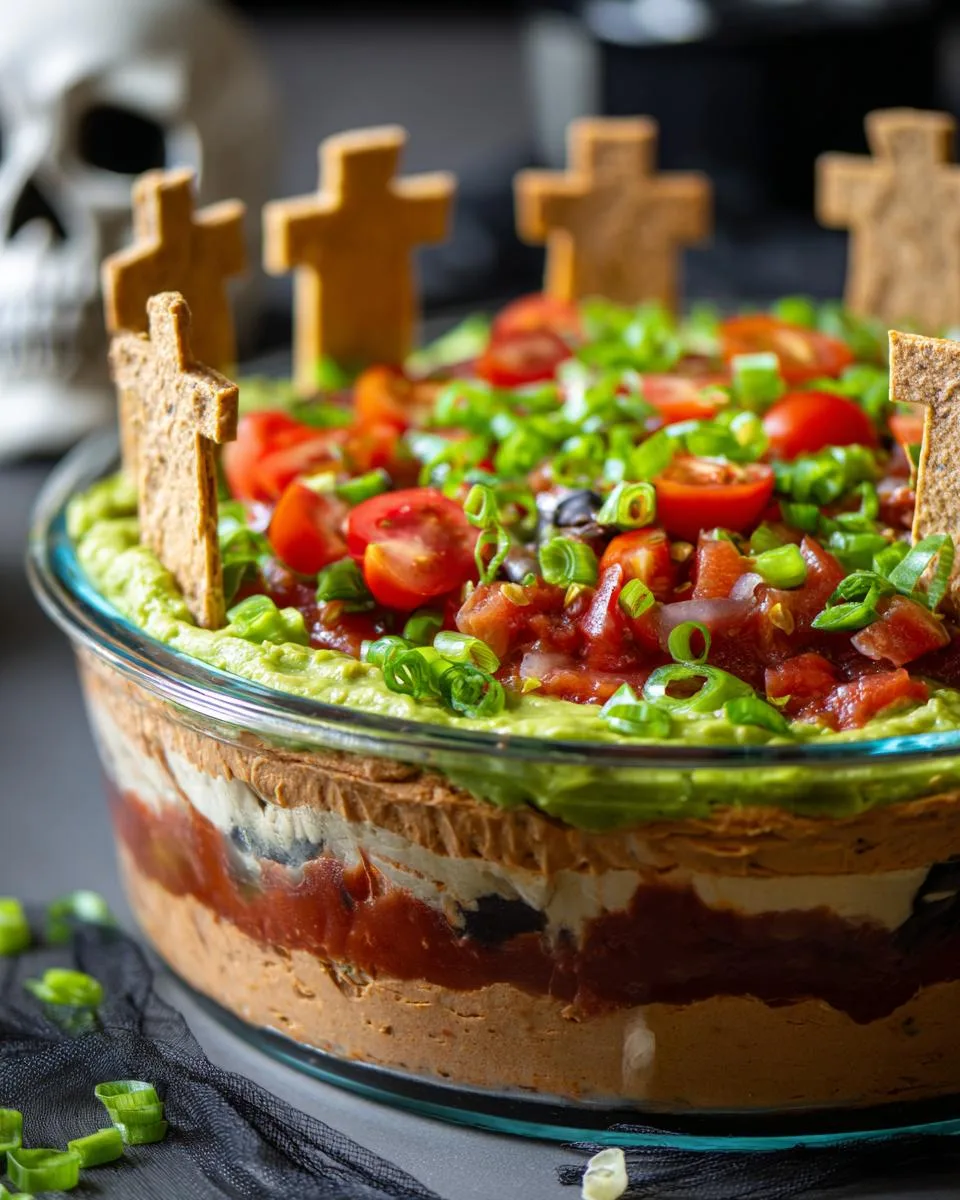
Here’s where the magic happens! Spread the refried beans evenly across the bottom of your dish – this is your “dirt layer.” Next comes the seasoned sour cream – dollop it on and gently spread it smooth. Then comes that gorgeous avocado mixture (careful not to mix the layers!). Top it all with salsa – but here’s my secret: drain the salsa first in a fine mesh strainer to prevent a watery dip disaster. Finish with a generous sprinkle of scallions. Cover and chill for at least an hour – this helps the flavors mingle and the layers set.
Step 4: Add the Tombstone Decorations
While the dip chills, let’s make our edible tombstones! Preheat your oven to 350°F. Cut tombstone shapes from tortillas – I use a knife, but cookie cutters work too. Bake for 8-10 minutes until golden and crisp. Let cool completely, then use a food-safe marker to write RIP or other spooky messages. Right before serving, stick them into the dip at a creepy angle. BOOM – instant graveyard vibes!
Print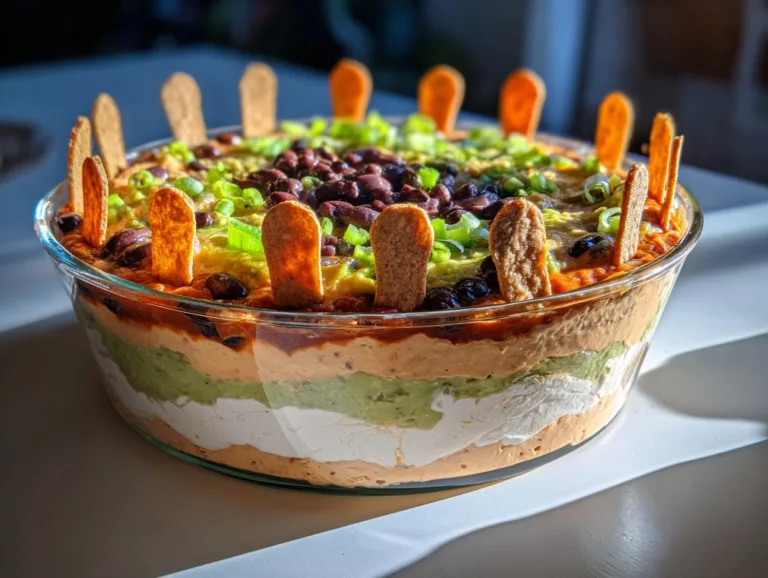
Spooky Graveyard Layered Taco Dip Haunts Halloween Parties
A fun and spooky layered taco dip perfect for Halloween parties. Features refried beans, seasoned sour cream, avocado, salsa, and scallions topped with edible tortilla tombstones.
- Total Time: 1 hour 30 mins
- Yield: 8 servings 1x
Ingredients
- 1 can refried beans or refried black beans
- 2 cups sour cream
- 1 pkg taco seasoning
- 2 avocados, mashed
- 1 clove garlic, minced
- 2 Tbsp mayonnaise
- 1 cup salsa
- 1 bunch scallions (green onions), chopped
- 2 large tortillas (for decoration)
Instructions
- Mix sour cream and taco seasoning in a bowl.
- In another bowl, combine mashed avocados, garlic, and mayonnaise.
- Layer beans, sour cream mixture, avocado mixture, and salsa in a dish.
- Sprinkle chopped scallions on top.
- Chill for at least 1 hour before serving.
- For decorations, cut tortillas into tombstone shapes and bake at 350°F until browned. Add text with food-safe marker.
- Insert tortilla decorations before serving.
Notes
- Can be made 1 day ahead and refrigerated.
- Serve with tortilla chips.
- Prep Time: 20 mins
- Cook Time: 10 mins
- Category: Appetizer
- Method: No-Cook
- Cuisine: Mexican-American
- Diet: Vegetarian
Nutrition
- Serving Size: 1/8 recipe
- Calories: 220
- Sugar: 3g
- Sodium: 480mg
- Fat: 16g
- Saturated Fat: 6g
- Unsaturated Fat: 9g
- Trans Fat: 0g
- Carbohydrates: 16g
- Fiber: 5g
- Protein: 5g
- Cholesterol: 20mg
Tips for the Perfect Graveyard Layered Taco Dip
Want your dip to be the talk of the haunted house? Here are my tried-and-true tricks:
- Chill it good – That hour in the fridge isn’t just for looks! It helps the flavors meld and makes slicing cleaner.
- Drain that salsa – A quick strain prevents watery layers. Your chips will thank you!
- Tombstone timing – Add tortilla decorations just before serving so they stay crispy.
- Spice to your fright level – Use mild, medium, or hot taco seasoning – your ghostly guests will appreciate the choice!
- Avocado armor – Press plastic wrap directly onto the avocado layer if making ahead to prevent browning.
Follow these, and your dip will be scarily good!
Serving Suggestions
Oh, the possibilities are endless! I love serving this graveyard dip with sturdy tortilla chips – they’re perfect for digging into those layers. Want something lighter? Veggie sticks or crispy crackers work too! For extra Halloween flair, arrange black olive “spiders” on top or surround your dish with glow-in-the-dark cocktail picks. Spooky and delicious!
Storage and Reheating
Here’s the scoop – this dip keeps beautifully in the fridge for up to 1 day (just press plastic wrap directly on the surface). But listen – don’t freeze it unless you want sad, brown avocado mush! And those cute tortilla tombstones? Always add them fresh right before serving to keep ’em crisp.
Graveyard Layered Taco Dip Variations
Listen, I love the classic version, but sometimes you’ve gotta switch things up! Here are my favorite ways to haunt this dip differently:
- Lighter ghost version – Swap sour cream for Greek yogurt, and mayo with mashed cottage cheese in the avocado layer. Still creamy, but less spooky on the waistline!
- Black magic beans – Use refried black beans instead of regular for a darker, more mysterious base layer.
- Fresh frights – Replace salsa with pico de gallo for extra crunch and fresh tomato flavor.
- Zombie heat – Mix in pickled jalapeños between layers or add hot sauce to the sour cream mixture.
- Ghastly greens – Top with shredded lettuce or cilantro for a pop of color against those tombstones!
See? Endless ways to make this dip your own little monster!
Nutritional Information
Now, I’m all about spooky fun, but let’s be real – we should know what we’re digging into! Keep in mind these numbers can vary based on your exact ingredients and brands (that store-brand vs. name-brand sour cream difference, you know?). Per serving (about 1/8 of this graveyard masterpiece), you’re looking at roughly:
- 220 calories – Perfect for when you’re burning calories screaming at jump scares!
- 16g fat – Mostly the good kind from avocados (but hey, it’s Halloween – live a little!)
- 5g protein – Who knew haunting could be this satisfying?
Want to lighten it up? Try my Greek yogurt swap from the variations section – shaves off some calories while keeping all the flavor. But remember – Halloween only comes once a year, so sometimes you’ve just gotta enjoy the full spooky experience!
FAQs About Graveyard Layered Taco Dip
Can I make this dip ahead of time?
Absolutely! In fact, I recommend making it at least an hour before serving – the flavors get better as they mingle. Just hold off on adding the tortilla tombstones until right before your Halloween party starts.
How do I prevent watery layers?
Here’s my ghost-busting trick: always drain your salsa in a fine mesh strainer for 5-10 minutes before layering. And pat those scallions dry with a paper towel too – nobody wants a soggy graveyard!
Can I use Greek yogurt instead of sour cream?
You bet! I do this all the time – just use full-fat Greek yogurt so it stays creamy. The taco seasoning masks any tanginess perfectly.
What’s the best way to store leftovers?
Cover tightly with plastic wrap pressed directly on the surface (avocado’s worst enemy is air!). It’ll keep for about 24 hours in the fridge – though I’ve never actually had leftovers to test this!
Can I make this vegan?
Easily! Swap the sour cream for vegan alternatives, use vegan mayo, and check your refried beans don’t contain lard. Voila – spooky plant-based perfection!
Final Thoughts
Well, my fellow Halloween enthusiasts, we’ve reached the end of our graveyard journey – but really, this is just the beginning! This layered taco dip has been haunting my parties for years, and I can’t wait for you to experience the joy (and delicious scares) it brings. Whether you’re hosting a full-blown haunted house bash or just craving a spooky snack night, this recipe is guaranteed to be the life – or should I say afterlife? – of the party.
I want to see your creepy creations! Snap a photo of your graveyard masterpieces and tag me – I love nothing more than seeing all the creative tombstone messages and spooky garnishes you brilliant cooks come up with. And hey, if this becomes your new Halloween tradition like it has for me? Well, that’s the best compliment a ghost chef could ask for.
Now go forth and dip responsibly – may your layers be perfectly even, your tortilla tombstones stay crispy, and your Halloween be filled with more treats than tricks! BOO-n appétit!
For More recipes, Follow me on Facebook!