Oh my gosh, you guys – Halloween baking is my absolute favorite time of year! There’s something magical about turning ordinary desserts into spooky masterpieces, and these Graveyard Halloween Brownies are my go-to every October. I still remember the first time I made them – my niece’s eyes got SO wide when she saw the little cookie tombstones poking out of the brownie “dirt.”
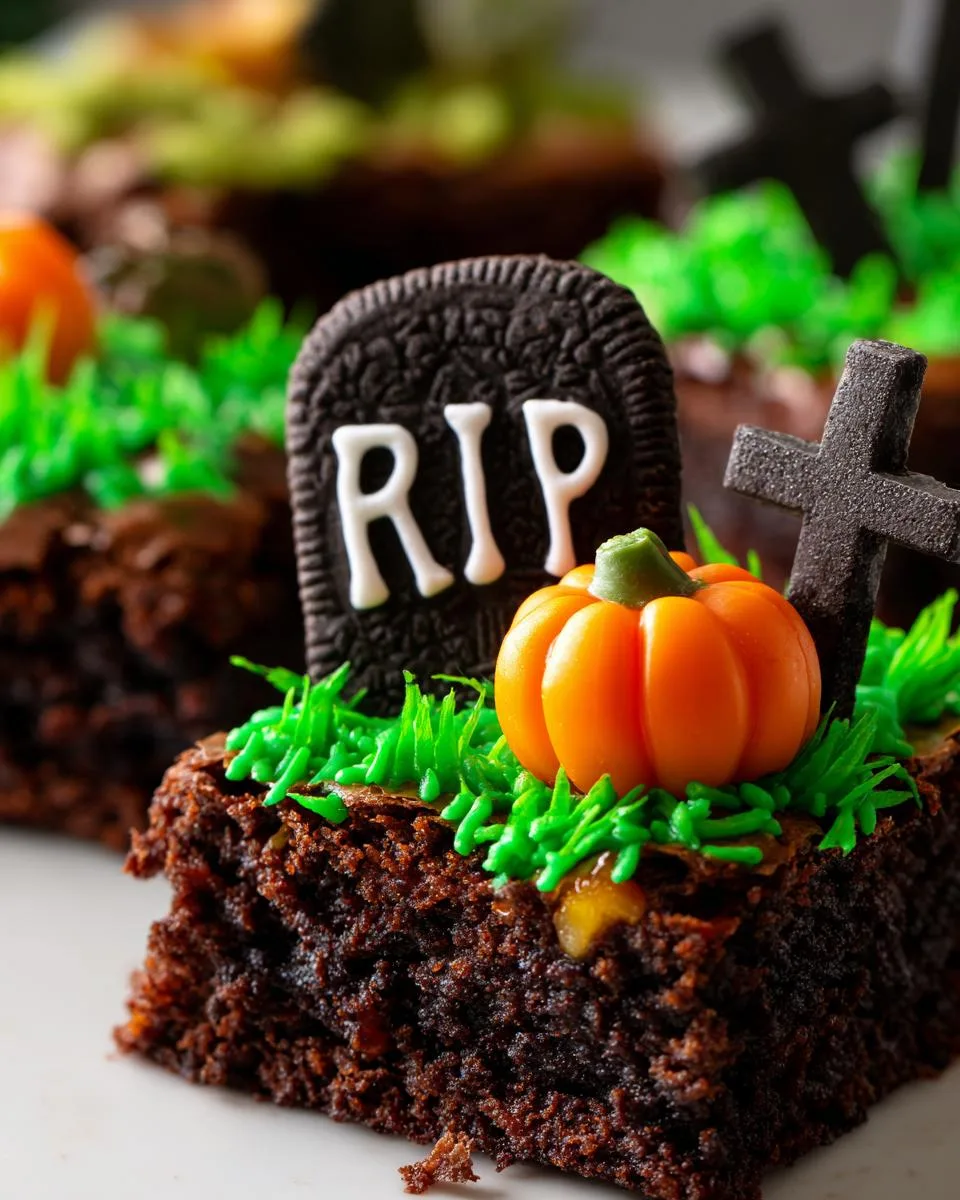
Table of Contents
Table of Contents
Every year, these disappear faster than ghosts at sunrise at our Halloween parties. Kids love decorating their own tombstones with silly RIP messages, and adults? Well, let’s just say I’ve caught more than one “mature” guest sneaking seconds when they think no one’s looking!
The best part? They’re ridiculously easy to throw together. Whether you’re using your favorite homemade brownie recipe (mine’s the fudgy one with extra chocolate chips) or grabbing a box mix when you’re short on time, these come together in a flash. Just wait till you see how the green frosting “grass” and candy pumpkins transform basic brownies into the cutest little edible graveyard!
Why You’ll Love These Graveyard Halloween Brownies
Listen, I know Halloween treats can get complicated—but these brownies? Pure magic without the stress. Here’s why they’re a must-make:
- Instant party hit: The tombstones and pumpkins make everyone gasp (in a good way!). Kids adore them, and adults secretly sneak extras when they think no one’s looking.
- No fancy skills needed: If you can spread frosting and press cookies into brownies, you’re already a Halloween baking pro.
- Customizable spookiness: Write funny RIP messages on the tombstones, swap candy pumpkins for gummy worms—make it your own!
- Quick cleanup: Unlike some elaborate desserts, these leave you with just one pan and a bowl to wash. (More time for costume contests!)
Seriously, these disappear faster than a vampire at sunrise. You’ll be the hero of any Halloween bash! You can find more of my recipes on my recent posts page.
Ingredients for Graveyard Halloween Brownies
Okay, let’s raid the pantry! Here’s everything you’ll need to bring this spooky graveyard to life. Trust me – I’ve made these enough times to know these ingredients work like a charm:
- 1 batch brownie batter – Enough for an 8″ pan (use your favorite recipe or a box mix – no judgment here!)
- 12 Milano cookies – These make the perfect little tombstones
- Black decorating gel – For writing those classic “RIP” messages
- 12 candy pumpkins – The cutest edible decorations
- 1 cup powdered sugar – Sifted if you’re fancy, straight from the bag if you’re me
- 1/4 cup softened butter – Left out for about 30 minutes to get perfectly spreadable
- 2 teaspoons milk – Just enough to bring the frosting together
- Green food coloring – A few drops for that perfect “haunted graveyard grass” look
See? Nothing too crazy – just simple ingredients that transform into something magical. Now let’s make some graveyard magic!
Equipment You’ll Need
Don’t worry—you probably have most of this already! Here’s what you’ll grab:
- 8-inch baking pan – Square or rectangular both work
- Parchment paper – Lifesaver for easy brownie removal
- Mixing bowl – For that vibrant green frosting
- Hand mixer or whisk – Your arm might thank you for the mixer
- Small knife or cookie cutter – To trim tombstones if you’re feeling fancy
That’s it! No specialty tools—just kitchen basics to create something spooktacular. For more baking tips, check out my about page.
How to Make Graveyard Halloween Brownies
Alright, let’s dive into the fun part—turning ordinary brownies into a spooky graveyard masterpiece! Don’t let the tombstones fool you—this is seriously easy. Just follow these steps, and you’ll have Halloween treats that’ll make your guests do a double-take.
Baking the Brownies
First things first—let’s bake those brownies! Line your 8-inch pan with parchment paper, leaving some overhang on the sides (this is your future self’s lifesaver for easy removal). Pour in your brownie batter—homemade or store-bought, no shame here—and smooth it into an even layer. Pop it in the oven according to your recipe’s instructions (usually around 25 minutes).
Here’s my golden rule: Let them cool completely. I know, I know—the temptation to dig in is real. But cutting warm brownies leads to crumbly disasters (trust me, I’ve learned the hard way). Once cooled, lift them out using the parchment handles and slide them onto a cutting board. Now, slice into rectangles—I do 4×3 for 12 perfect little graves.
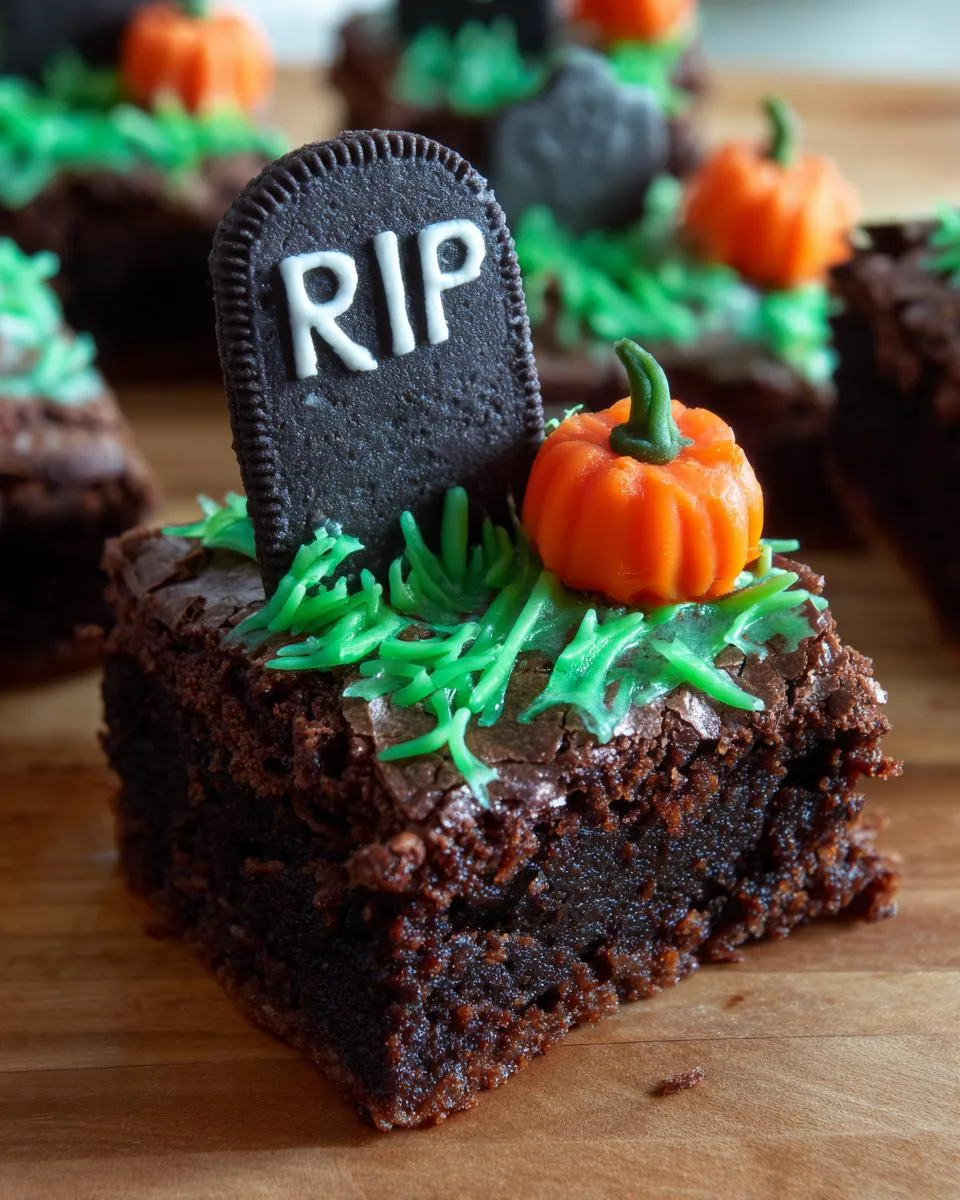
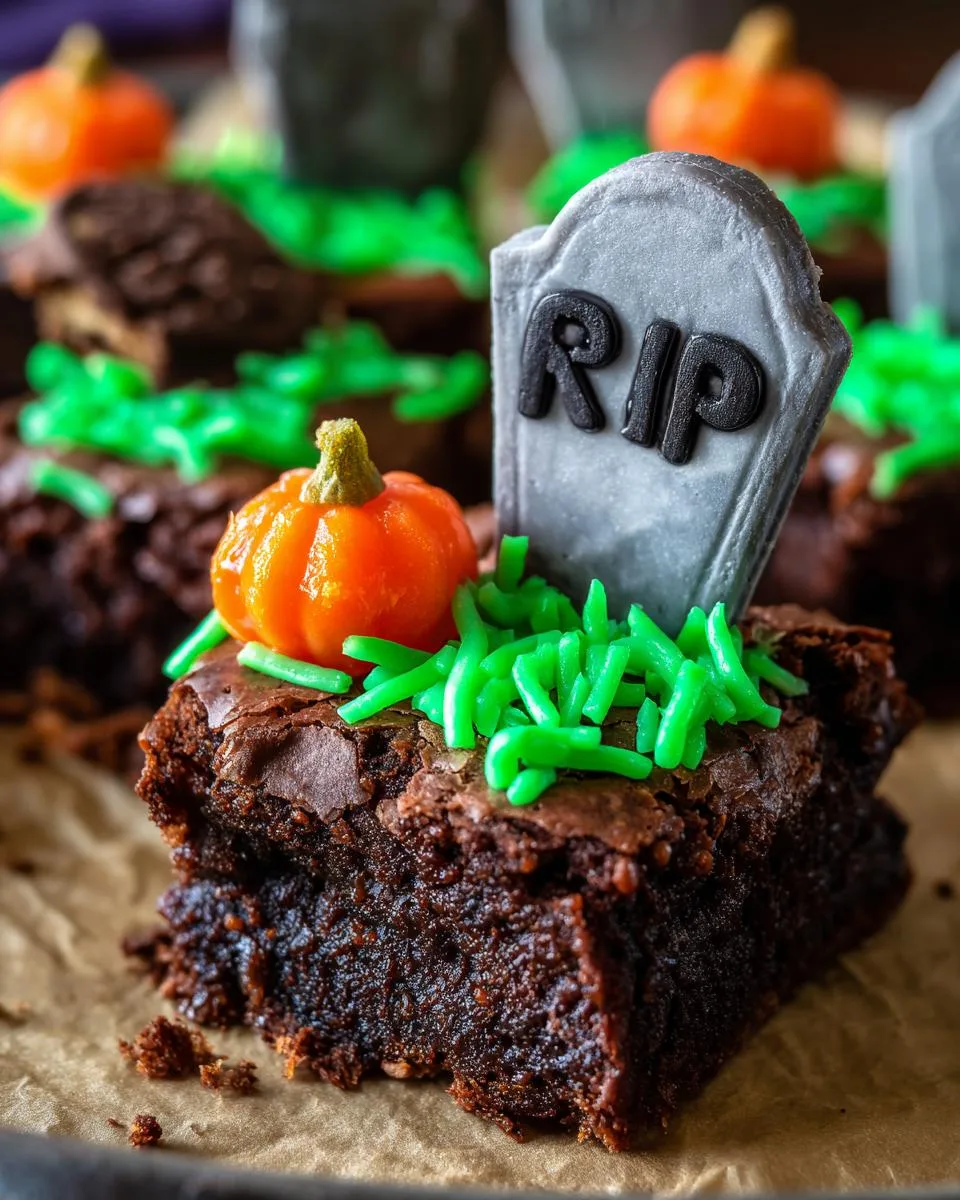
Decorating the Tombstones
Time to make those Milano cookies look properly haunted! Grab your black gel—this stuff is like edible Sharpie—and write “R-I-P” on each cookie. Get creative here! Add funny names (“Here Lies My Diet”) or spooky dates. Want shorter tombstones? Trim the bottoms slightly with a knife—just don’t go too wild, or they’ll topple!
While those set, whip up your “graveyard grass” frosting. Beat powdered sugar, softened butter, milk, and green food coloring until fluffy (about 2 minutes). Pro tip: Start with fewer drops of coloring—you can always add more!
Assembling the Graveyard
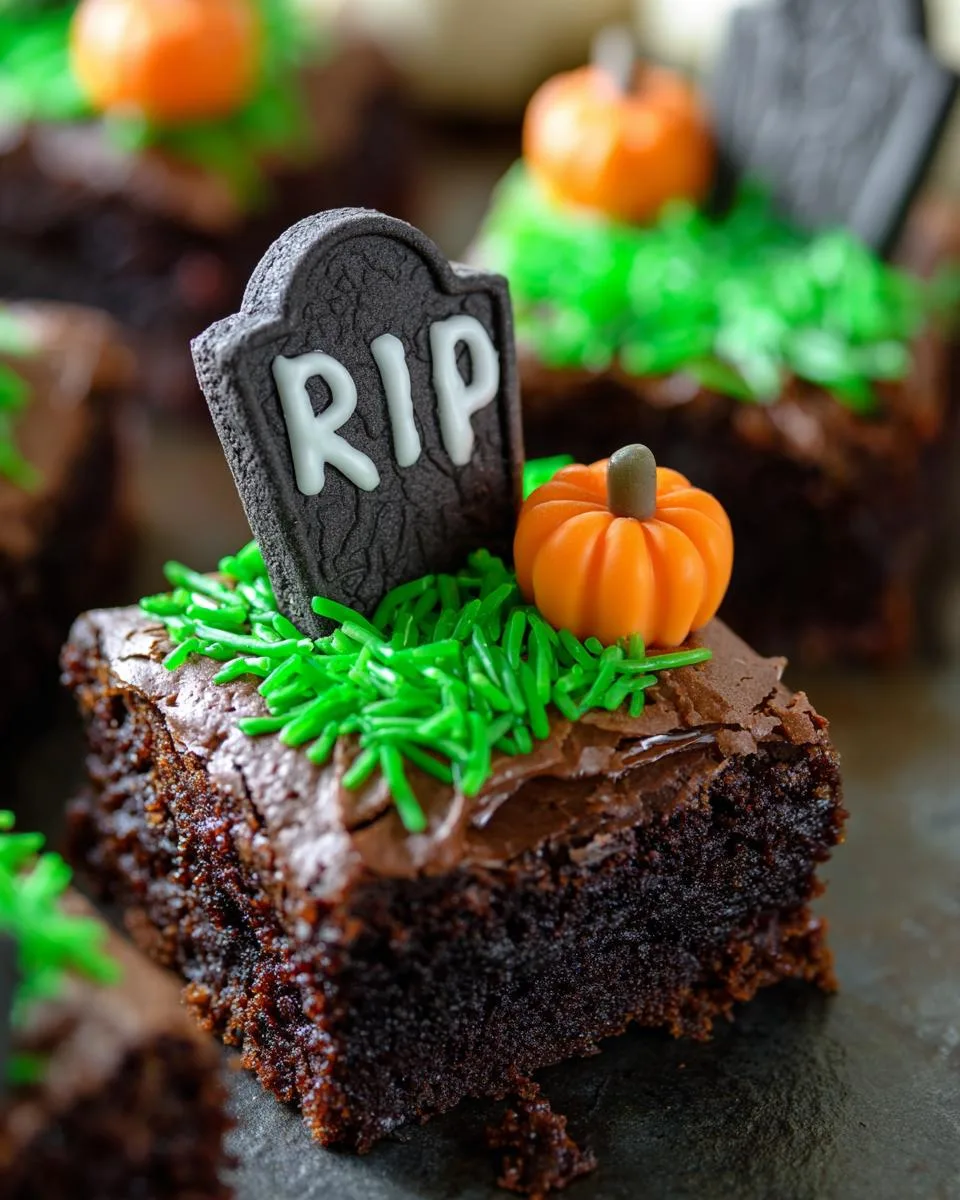
Now for the grand finale! Press a decorated tombstone into each brownie—about halfway down so it stands proud. Spoon a dollop of green frosting near the base—swipe it a little messy for that “overgrown” look. Finally, crown your creation with a candy pumpkin nestled against the tombstone.
Step back and admire your handiwork! You’ve just created edible Halloween magic—spooky, silly, and totally irresistible. You can follow my baking adventures on Facebook!
Print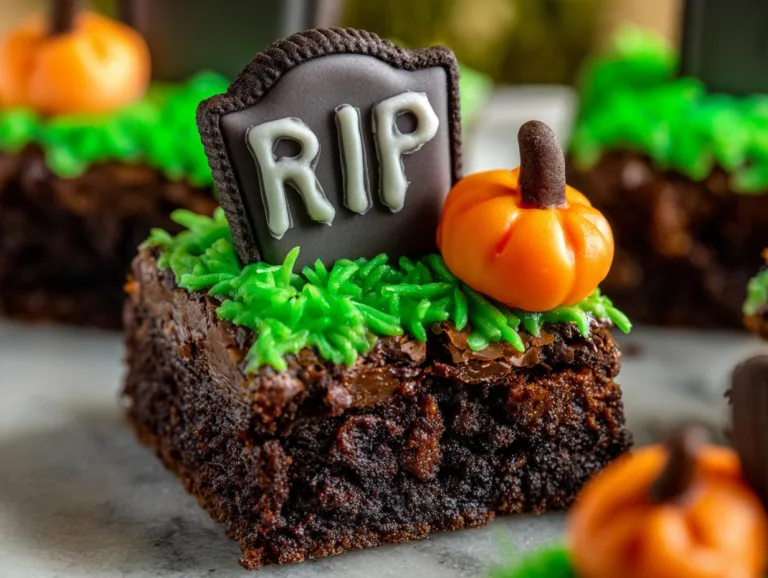
Spooky Graveyard Halloween Brownies That’ll Haunt You
Spooky Graveyard Halloween Brownies are a fun and festive treat perfect for Halloween parties. These brownies are topped with edible tombstones and candy pumpkins for a creepy yet delicious dessert.
- Total Time: 40 minutes
- Yield: 12 brownies 1x
Ingredients
- Prepared brownie batter for an 8” pan
- 12 milano cookies
- Black decorating gel
- 12 candy pumpkins
- 1 cup powdered sugar
- 1/4 cup butter (salted or unsalted), softened
- 2 teaspoons milk
- Green food coloring (a few drops, to reach your desired color)
Instructions
- Line an 8” baking pan with parchment paper, leaving a little overhang on the sides.
- Pour brownie batter into the pan and smooth into an even layer. Bake according to recipe instructions.
- Let brownies cool completely. Lift them out using the parchment paper and transfer to a flat surface.
- Cut the brownies into rectangles (4×3 for 12 pieces).
- Mix powdered sugar, butter, milk, and green food coloring in a bowl for 2 minutes until light and fluffy. Adjust thickness with more powdered sugar or milk as needed.
- Use black gel to write “R-I-P” on each milano cookie. Optionally, trim the bottom edge for shorter “headstones.”
- Press each cookie into a brownie as a tombstone.
- Spoon green frosting near the headstone and place a candy pumpkin on top.
Notes
- Use store-bought brownie mix for convenience or homemade batter.
- Adjust frosting color intensity with more or less food coloring.
- Serve immediately or store in an airtight container for up to 2 days.
- Prep Time: 15 minutes
- Cook Time: 25 minutes
- Category: Dessert
- Method: Baking
- Cuisine: American
- Diet: Vegetarian
Nutrition
- Serving Size: 1 brownie
- Calories: 220
- Sugar: 18g
- Sodium: 120mg
- Fat: 10g
- Saturated Fat: 4g
- Unsaturated Fat: 5g
- Trans Fat: 0g
- Carbohydrates: 30g
- Fiber: 1g
- Protein: 2g
- Cholesterol: 20mg
Tips for Perfect Graveyard Halloween Brownies
Okay, let me spill my secrets after making these way too many times! First – if your frosting feels too thick, add milk a teensy drop at a time. Too thin? More powdered sugar will save the day. And here’s my golden rule: store these bad boys in an airtight container with parchment between layers – the tombstones stay crisp that way!
Oh! And if your gel writing smudges? Pop the cookies in the freezer for 5 minutes first – the gel sets like magic. Trust me, I learned all these tricks the messy way so you don’t have to!
Ingredient Substitutions & Variations
Listen, I’m all about making recipes work with what you’ve got! Out of Milano cookies? Pepperidge Farm Pirouettes make great twisted tombstones. No candy pumpkins? Gummy worms crawling out of the “dirt” are equally creepy-cool.
Want to mix it up? Try these easy swaps:
- Brownie base: Gluten-free mix works perfectly – just check baking times
- Frosting: Swap butter for cream cheese if you want tangy “grass”
- Candy: Chocolate bats or skeleton bones make fun alternatives
The beauty? However you tweak it, these brownies stay deliciously spooky! For more information, please see our disclaimer.
Serving and Storing Graveyard Halloween Brownies
Here’s the best part – these brownies are ready to devour right away! The tombstones stay crisp, the frosting holds its shape, and the candy pumpkins? Well, let’s just say they never last long in my house. If you must store them (who has leftovers?!), pop them in an airtight container with parchment between layers – they’ll stay fresh for up to 2 days.
Pro tip from my many Halloween fails: Don’t refrigerate! The cookies get soggy faster than a ghost in the rain. Room temp keeps everything perfect for your spooky snacking.
Nutritional Information
Just between us – we both know these are treats, not health food! But for those curious, here’s the scoop per brownie (based on my recipe): about 220 calories, 10g fat, and 30g carbs. Remember: Nutrition varies based on ingredients and brands – these are just estimates! You can learn more about our policies on the terms and conditions page.
Frequently Asked Questions
Let me guess – you’ve got questions bubbling up like a witch’s cauldron! Here are the answers to the ones I get asked most about these graveyard brownies:
Can I use gluten-free brownie mix?
Absolutely! Just grab your favorite GF mix and follow the package directions. The decorations are naturally gluten-free, so you’re all set for spooky success.
How far in advance can I decorate these?
I like decorating day-of for the freshest look, but you can bake the brownies a day ahead. Keep them covered at room temp, then add tombstones and frosting 2-3 hours before serving. Just don’t assemble too early or the cookies soften!
My frosting is too runny – help!
No panic! Stir in powdered sugar a tablespoon at a time until it thickens up. Too thick? Add milk drop by drop. I’ve rescued many batches this way!
Can kids help decorate?
Oh my gosh, YES! Let them write silly tombstone messages or place pumpkins. It’s the best part – just have extra napkins ready for those green-frosted fingers!
For More recipes, Follow me on Facebook!