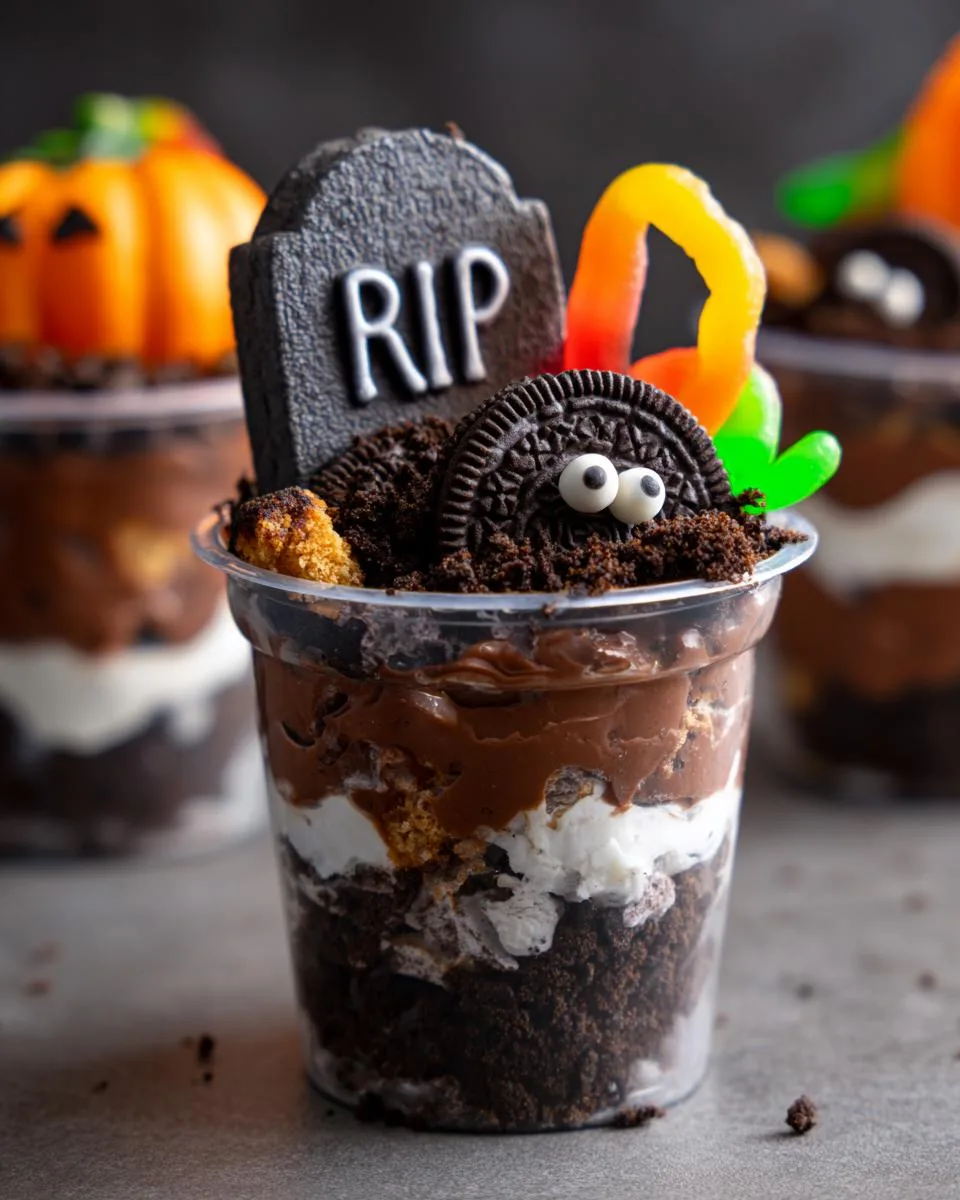
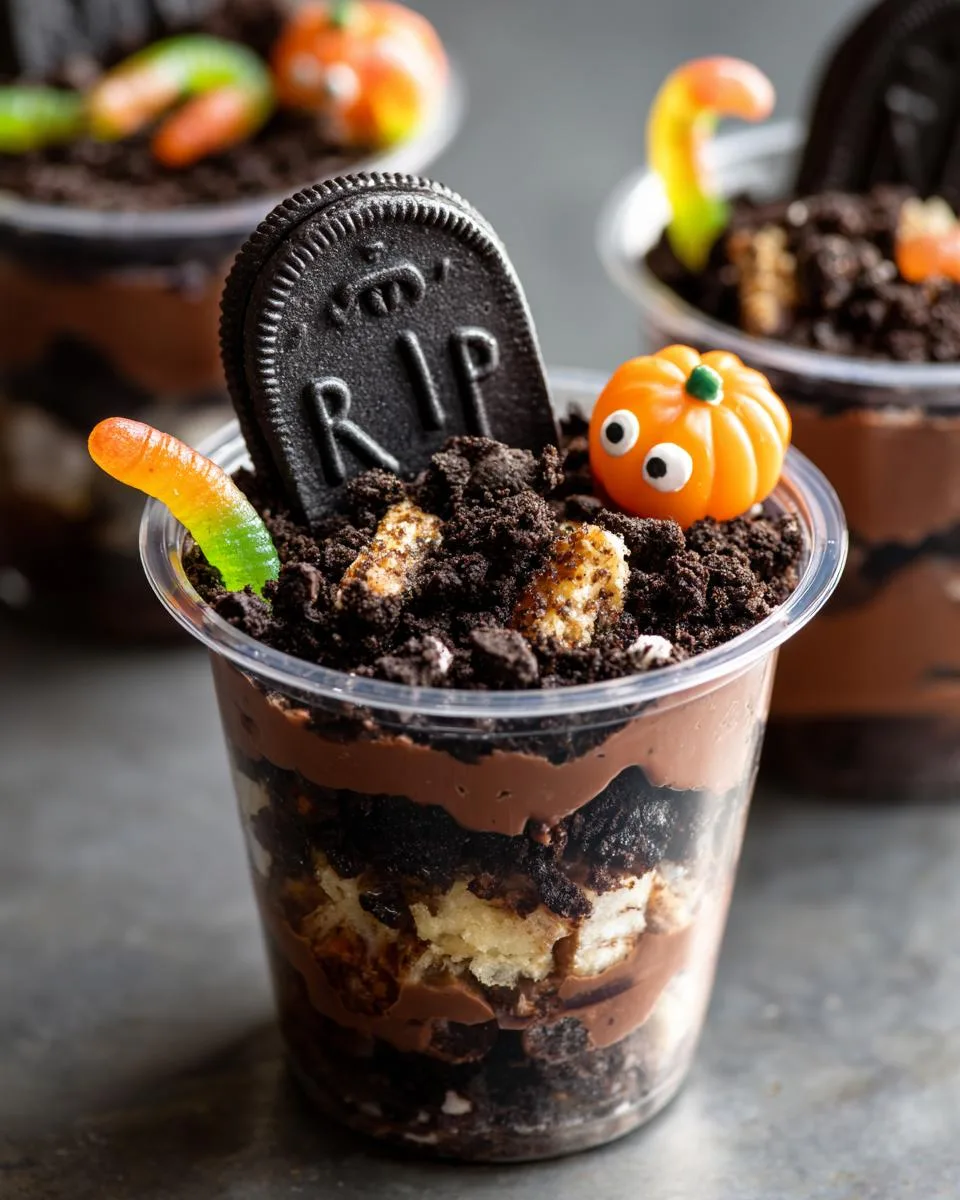
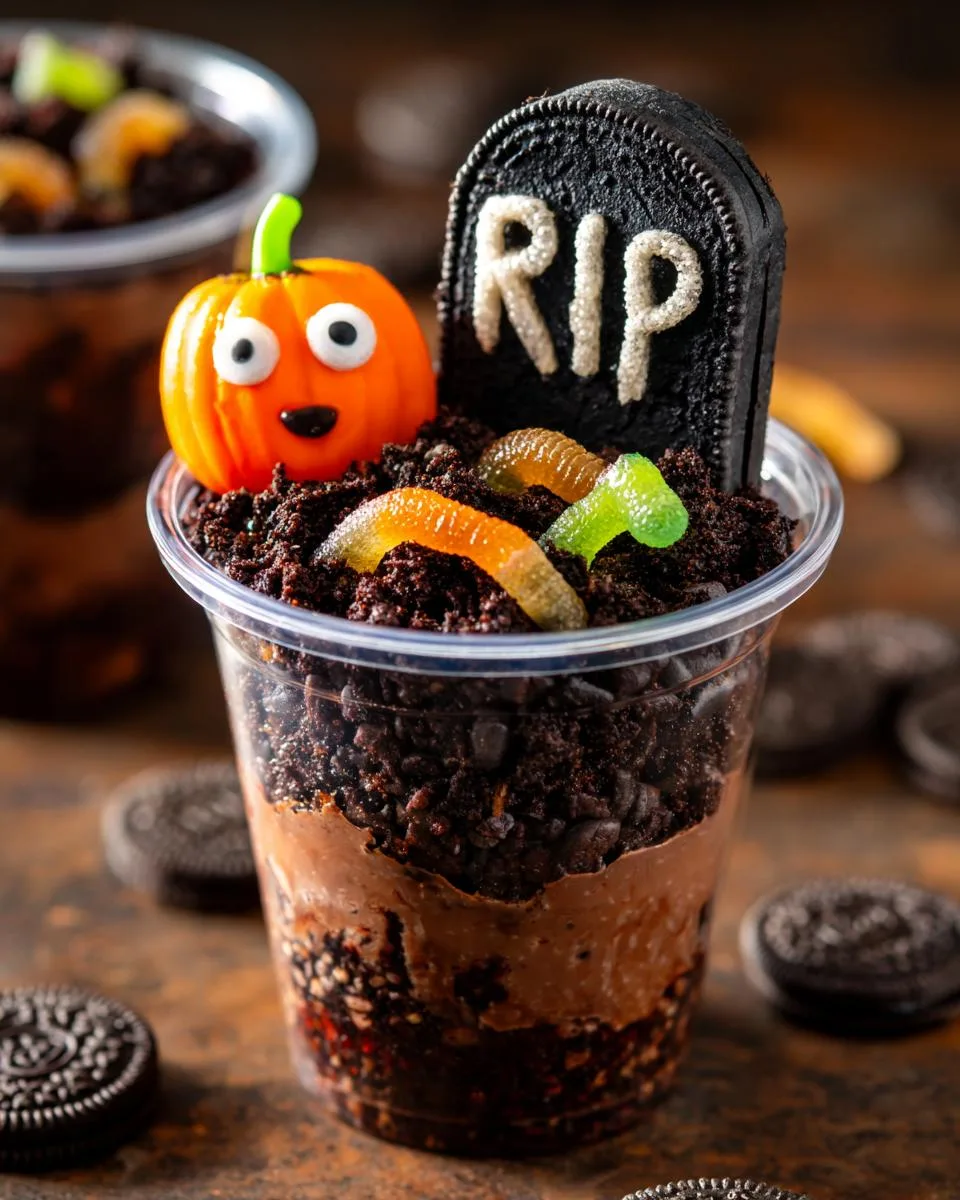
Halloween just isn’t complete without something delightfully creepy to snack on, right? I’ve been making these Graveyard Chocolate Pudding Cups for years—they’re the perfect mix of spooky and sweet, and my kids (okay, and me) go absolutely wild for them. Picture this: layers of rich chocolate pudding, Oreo “dirt,” cookie tombstones, and gummy worms peeking out like they’re rising from the grave. It’s a dessert that’s as fun to make as it is to eat, and the best part? No baking required. Just mix, layer, and watch the magic happen. Trust me, these little cups disappear faster than a ghost in the night at any Halloween party!
I love recipes that bring people together, and this one’s a total crowd-pleaser—whether you’re hosting a haunted house bash or just want to surprise the family with a festive treat. Over the years, I’ve tweaked the recipe to make it foolproof (because who has time for fussy desserts when there are costumes to perfect?), and I’m sharing all my secrets below. The secret weapon? Those Milano cookie tombstones—they’re ridiculously easy but look like you spent hours crafting them. Let’s dig in!
Table of Contents
Table of Contents
Why You’ll Love These Graveyard Chocolate Pudding Cups
Listen, I know Halloween can get hectic—between costumes, decorations, and sugar-fueled kids running around, the last thing you need is a complicated dessert. That’s why these pudding cups are my go-to every single year. Here’s why they’ll become your new favorite too:
- No-bake magic: From start to finish, you’re looking at about 20 minutes of hands-on time—no oven required! Just whisk, layer, and chill while you focus on more important things (like perfecting your zombie makeup).
- Kid-approved fun: My little monsters love helping press the googley eyes into place and arranging the gummy worms. It’s like an edible craft project that doesn’t leave glitter everywhere (hallelujah!).
- Party-perfect presentation: Those clear cups show off all the spooky layers, making them look way fancier than they actually are. Pro tip—line them up on a tray with some dry ice for instant haunted graveyard vibes.
- Customizable creepiness: Swap out candy pumpkins for skeleton heads, use different cookie tombstones, or even make it mint-chocolate with Andes candies as “ghost mummies.” The possibilities are endless!
Seriously, these cups check all the boxes—easy, adorable, and downright delicious. The only scary part? Trying not to eat them all yourself before the party starts!
Ingredients for Graveyard Chocolate Pudding Cups
Gather these simple ingredients – you probably have most of them already! The beauty of this recipe is how everyday items transform into something delightfully creepy.
Here’s what you’ll need:
- 5.1 oz chocolate instant pudding mix (that’s 1 standard box – I always grab Jell-O brand for perfect consistency)
- 3 cups cold milk (whole or 2% makes it extra creamy, but any milk works)
- 8 oz Cool Whip (thawed in the fridge overnight – no one wants lumpy pudding!)
- 24 Oreo cookies (you’ll crush these into fine “dirt” crumbs – more on that below)
- 6 Milano Double Chocolate Cookies (our tombstones – the double chocolate ones look extra spooky)
- Black frosting OR black edible marker (I use Wilton icing when I’m feeling fancy, but a food-safe marker is perfect for quick “RIP” writing)
- 6 candy pumpkins (the little orange ones – they’re the perfect graveyard accent)
- Googley eyes (the edible kind! About 12-18, depending on how “haunted” you want your cups)
- Gummy worms (optional, but so fun peeking out of the “dirt”)
Ingredient Substitutions & Notes
No stress if you need to swap things out – I’ve made about a million variations of these over the years:
- Pudding: Sugar-free works great if needed, and you can even use vanilla pudding for a “ghostly” white version (just add black food coloring to the crumbs).
- Cool Whip: Homemade whipped cream is fabulous – just whip 1 cup heavy cream with 2 tbsp sugar until stiff peaks form.
- Cookies: Gluten-free Oreos or any chocolate sandwich cookie will do. For tombstones, try Pepperidge Farm Chessmen or even rectangular graham crackers.
- The “Dirt”: Oreo crumbs are non-negotiable for me – they give that perfect graveyard texture. Pro tip: toss in some crushed chocolate graham crackers if you’re short on Oreos.
- Candy: No pumpkins? Use candy corn, chocolate bones, or even jelly beans as “eyeballs” instead of googley eyes for a different creepy effect.
Remember, the magic is in the layers – the pudding needs to be creamy, the crumbs need to be fine, and those tombstones should stand tall (slightly tilted for extra drama, obviously). Now let’s get spooky!
How to Make Graveyard Chocolate Pudding Cups
Alright, let’s get our hands dirty—literally! This is where the magic happens, and I promise it’s way easier than it looks. The key is taking it step by step while having fun with it. My kids always beg to help with this part, especially when the gummy worms come out!
Prepping the Tombstones
First things first—let’s make those iconic cookie tombstones. Grab your Milano cookies and either black frosting or an edible marker. I like to lay them all out on a cutting board like little soldiers waiting for their inscriptions.
Write “RIP” on each one with wobbly letters (perfect handwriting is overrated in a graveyard, right?). Sometimes I’ll add little crosses or cobwebs if I’m feeling extra creative. Pro tip: If using frosting, let these dry for about 5 minutes so they don’t smudge when we stick them in later.
Whipping Up the Pudding
While those tombstones set, let’s make the pudding base. In your stand mixer (or a big bowl with a hand mixer), whisk together the chocolate pudding mix and cold milk on medium speed for a full 2 minutes. Don’t skimp on the time—this ensures it’ll set up nice and thick.
Now gently fold in the thawed Cool Whip until you’ve got this dreamy, fluffy chocolate cloud. The mixture should be smooth with no white streaks. Let it sit for about 5 minutes—this gives it time to thicken just enough so our layers stay distinct when we assemble everything.
Crushing the “Dirt”
Time to make the Oreo crumbs! Dump those cookies into a food processor and pulse until they’re fine crumbs. No processor? No problem—toss them in a ziplock bag and crush with a rolling pin (this is a GREAT job for kids, by the way). You want the texture to resemble dark, damp graveyard soil—not powder, but no big chunks either.
Assembling the Layers
Now for the fun part—building our edible graveyards! Grab your clear cups and let’s create some magic:
- Sprinkle 3-4 tablespoons of Oreo crumbs into the bottom of each cup. Press them down firmly with the back of a spoon—this creates that packed-earth look.
- Press 2-3 googley eyes against the sides of the cup, nestled right where the pudding will meet the crumbs. Angle them so they’ll peek out creepily when viewed from the side.
- Spoon a generous layer of pudding over the crumbs, covering the eyes but leaving them visible through the cup.
- Repeat! More crumbs, more eyes (positioned slightly higher this time), then another pudding layer.
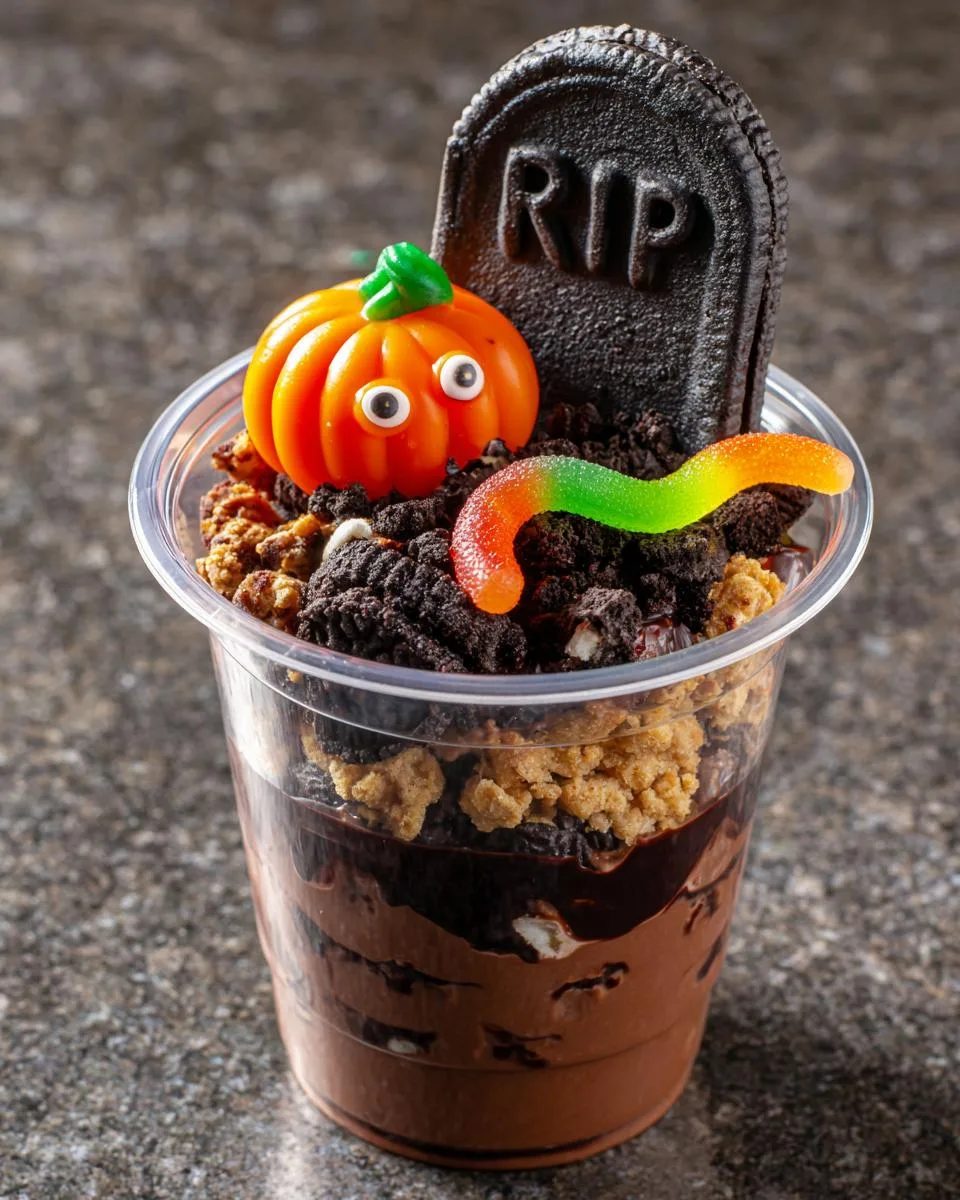
- Top with a final sprinkling of crumbs—go nearly to the rim for that freshly-dug grave effect.
See how the layers look through the clear sides? That’s what makes these so special—you can see every spooky detail!
Finishing Touches
Time to bring our graveyard to life! Take your prepped tombstones and gently insert one into the center of each cup at a slight angle—like it’s been there for centuries. The pudding should hold it perfectly.
Add a candy pumpkin beside each tombstone, maybe a gummy worm or two crawling out of the “dirt.” Sometimes I’ll break a cookie tombstone in half and bury part of it for an “ancient ruin” vibe. The more uneven and haphazard, the better—real graveyards aren’t perfectly manicured!
Pop them in the fridge for at least 30 minutes to set completely. The waiting is the hardest part, but trust me—they’re worth it when you see everyone’s faces light up at first sight!
Print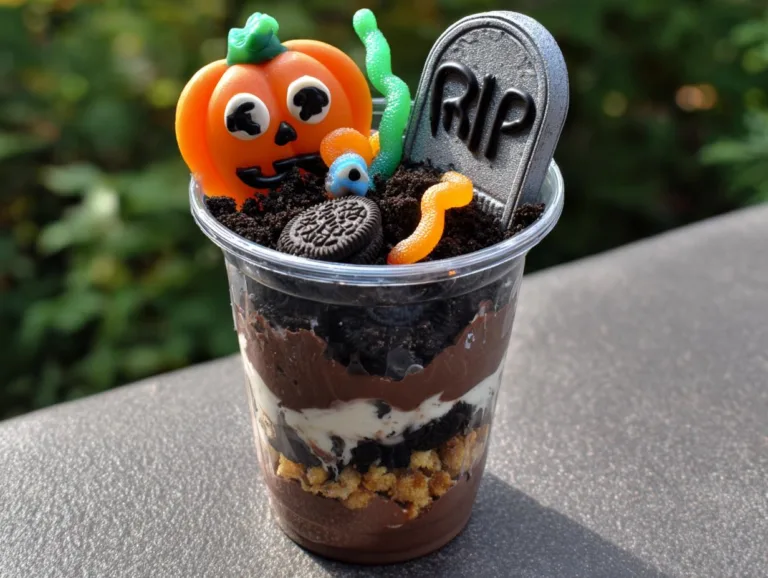
Spooky Graveyard Chocolate Pudding Cups in 20 Minutes
A fun and spooky dessert perfect for Halloween, featuring chocolate pudding, Oreo crumbs, and cookie tombstones.
- Total Time: 22 minutes
- Yield: 6 servings 1x
Ingredients
- 5.1 oz Chocolate Instant Pudding Mix
- 3 Cups Milk
- 8 oz Cool Whip
- 24 Oreo Cookies
- 6 Milano Double Chocolate Cookies
- Black Frosting or Black Edible Marker
- 6 Candy Pumpkins
- Googley Eyes
- Gummy Worms
Instructions
- With black frosting or an edible marker, write ‘RIP’ on each Milano cookie to create tombstones. Set aside.
- In a stand mixer, whisk pudding mix and milk on medium speed for 2 minutes.
- Fold in Cool Whip until well blended.
- Crush Oreos into fine crumbs using a food processor.
- Sprinkle 3-4 tbsp of crumbs into the bottom of 6 clear 9 oz. plastic cups.
- Press googley eyes around the edges between the crumbs and the cup.
- Spoon a layer of pudding evenly on top.
- Repeat the crumb, eyes, and pudding layers once more.
- Top with more crumbs, nearly reaching the lip of the cup.
- Insert one cookie tombstone into the center of each pudding cup.
- Press a candy pumpkin beside each tombstone.
- Add gummy worms if desired.
Notes
- Use clear cups for the best visual effect.
- Adjust pudding thickness by adding more or less milk.
- Store in the fridge until ready to serve.
- Prep Time: 20 minutes
- Cook Time: 2 minutes
- Category: Dessert
- Method: No-Bake
- Cuisine: American
- Diet: Vegetarian
Nutrition
- Serving Size: 1 cup
- Calories: 350
- Sugar: 25g
- Sodium: 300mg
- Fat: 12g
- Saturated Fat: 5g
- Unsaturated Fat: 4g
- Trans Fat: 0g
- Carbohydrates: 50g
- Fiber: 2g
- Protein: 4g
- Cholesterol: 10mg
Tips for Perfect Graveyard Chocolate Pudding Cups
After making these spooky treats more times than I can count, I’ve picked up some tricks that take them from “cute” to “showstopper.”
Here are my must-know tips for graveyard pudding cup success:
- Clear cups are non-negotiable – Those creepy layers are half the fun! I use 9 oz plastic cups so you can really see the eyes peeking through. Dollar store finds work great.
- Chill your pudding mixture for 10 minutes before layering – This extra time lets it thicken just enough so the layers stay distinct instead of blending together. No mushy graveyards here!
- Write tombstone messages before assembly – Trying to decorate cookies once they’re stuck in pudding? Disaster waiting to happen. Ask me how I know…
- Press googley eyes at different heights – Some near the bottom, some midway up—it creates that “something’s watching you” vibe when people rotate the cups.
Oh! And here’s my secret weapon—lightly spray the inside cups with cooking spray before adding crumbs. It helps the “dirt” stick to the sides for better visibility. Just don’t overdo it or you’ll get greasy pudding (yuck). Happy haunting!
Storing and Serving Suggestions
Okay, let’s talk about keeping these spooky little cups looking their best until showtime! The good news? They’re super easy to store—just pop them in the fridge. But here’s what I’ve learned after one too many “soggy tombstone” incidents:
- Fridge life: These babies hold up beautifully for about 24 hours when covered with plastic wrap. Any longer and the Oreo crumbs start losing their crunch (and nobody wants mushy graveyard dirt).
- Condensation alert: If your fridge runs humid (like mine does), you might get some moisture droplets inside the cups. Easy fix—right before serving, gently dab the insides with a paper towel. Or lean into it and call it “graveyard mist!”
- Make-ahead magic: Prep everything separately—keep pudding in one container, crumbs in another, tombstones in a bag—then assemble 1-2 hours before serving. The layers stay picture-perfect this way!
Now for the fun part—serving these bad boys! Here’s how I make them the star of any Halloween spread:
- Dry ice drama: Place the cups on a tray with a small bowl of dry ice nearby (never touching the food!). The fog rolling through your “graveyard” is pure magic—just supervise kids closely.
- Lighting matters: Dim the lights and add some battery-operated tea lights around the tray. The shadows make those googley eyes look like they’re moving… spooky!
- Themed labels: I sometimes stick little signs in the crumbs saying “Beware!” or “Rest in Pudding.” Dollar store mini tombstone decorations work great for this.
Pro tip: If you’re transporting these to a party, pack them in a cupcake carrier with parchment between layers. Those tombstones are fragile—ask me about the Great Tombstone Collapse of 2018… *shudder*. But done right? These cups will vanish faster than a ghost at sunrise!
I’ve made lighter versions using sugar-free pudding and light Cool Whip that shave off about 100 calories, but let’s be honest—Halloween comes once a year. Splurge a little and enjoy those melty chocolate layers and crunchy cookie dirt!
Graveyard Chocolate Pudding Cups FAQs
I get asked the same questions every Halloween when I bust out these pudding cups—so let me save you some trouble with my hard-earned answers! After years of trial and error (and a few graveyard disasters), here’s everything you need to know:
Can I make these ahead?
Absolutely! But here’s the trick—store components separately until about 2 hours before serving. The pudding stays perfect in an airtight container for 24 hours, same with the crumbs in a ziplock. But if you assemble too early, those tombstones start looking more like soggy headstones (not the vibe we want). I usually write my “RIP”s and stick the googley eyes on the cups the night before, then do the final assembly while the kids are at school.
How do I keep the Oreo crumbs crunchy?
Oh, this is my pet peeve—nothing ruins a graveyard like mushy “dirt”! Here’s what works: press those crumbs firmly into each layer (I use the back of a tablespoon), and don’t overdo the pudding moisture. If I’m really prepping ahead, I’ll toss the crumbs with a teaspoon of melted butter before assembling—it helps them hold up like a dream. And whatever you do, don’t cover them with plastic wrap—that trapped steam is the enemy! A loose tent of foil works much better.
What can I use instead of candy pumpkins?
Get creative! Some of my favorite swaps over the years:
- Chocolate bones (those Halloween-themed ones—they look amazing half-buried)
- Candy corn arranged like little grave flowers
- Mini marshmallows with black marker faces drawn on for ghosts
- Gummy frogs (because what’s spookier than things crawling out of graves?)
- Redhots candies as “blood droplets” for an R-rated version
The key is keeping that pop of color—those orange pumpkins aren’t just cute, they help the tombstones stand out visually. So whatever you use, make sure it contrasts with all that delicious chocolate darkness!
Nutritional Information
Okay, let’s be real—these graveyard cups aren’t exactly health food, but hey, it’s Halloween! Here’s the nutritional breakdown per serving (that’s one gloriously spooky cup with all the fixings). Just remember—estimates vary based on brands, so take this as a general guide, not gospel:
- Calories: 350 (worth every single one when you see the kids’ faces)
- Fat: 12g (5g saturated – blame the Oreos and Cool Whip)
- Carbs: 50g (25g sugar – it’s a holiday, don’t sweat it!)
- Protein: 4g (milk and pudding doing the heavy lifting)
- Sodium: 300mg (less than a bag of chips, at least)
For More recipes, Follow me on Facebook!