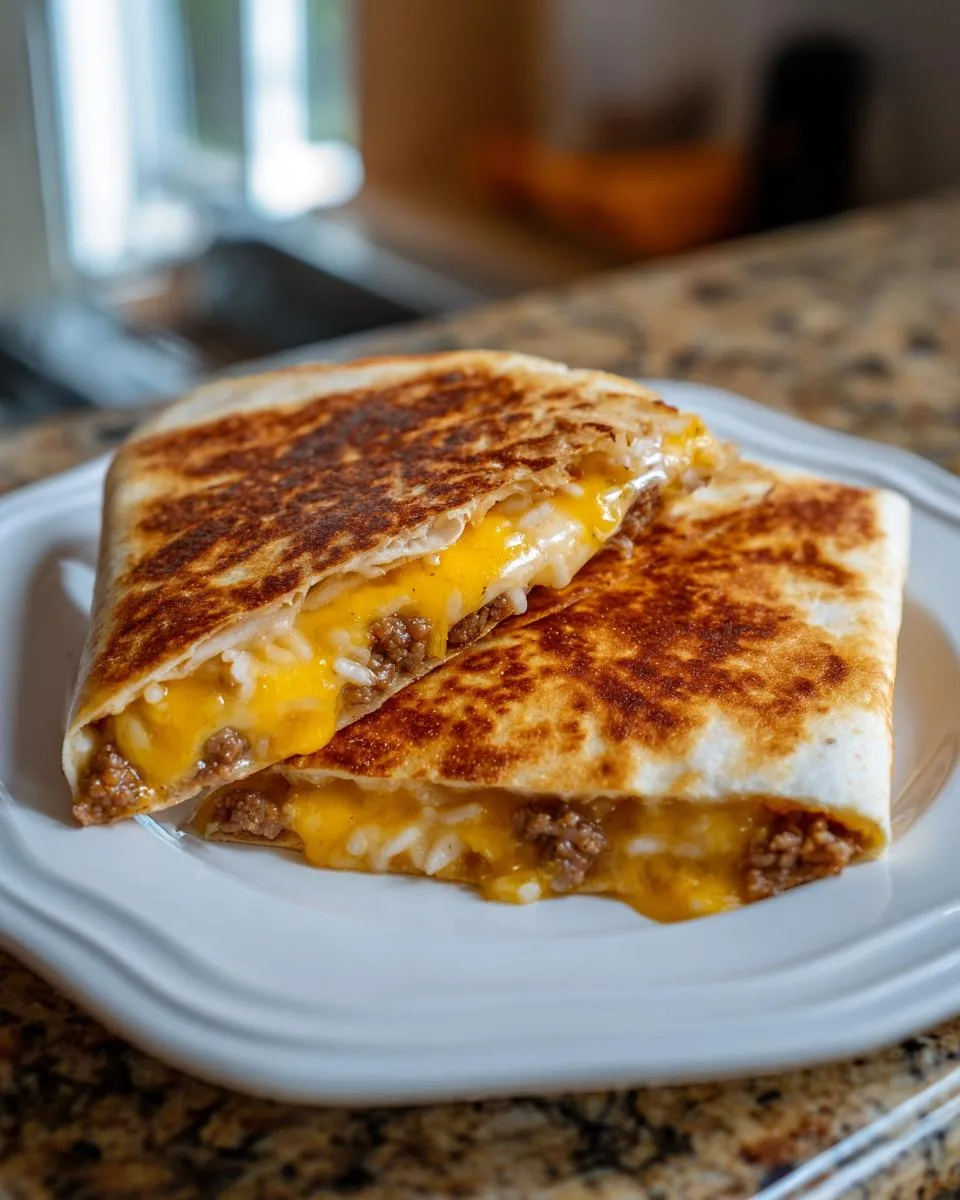
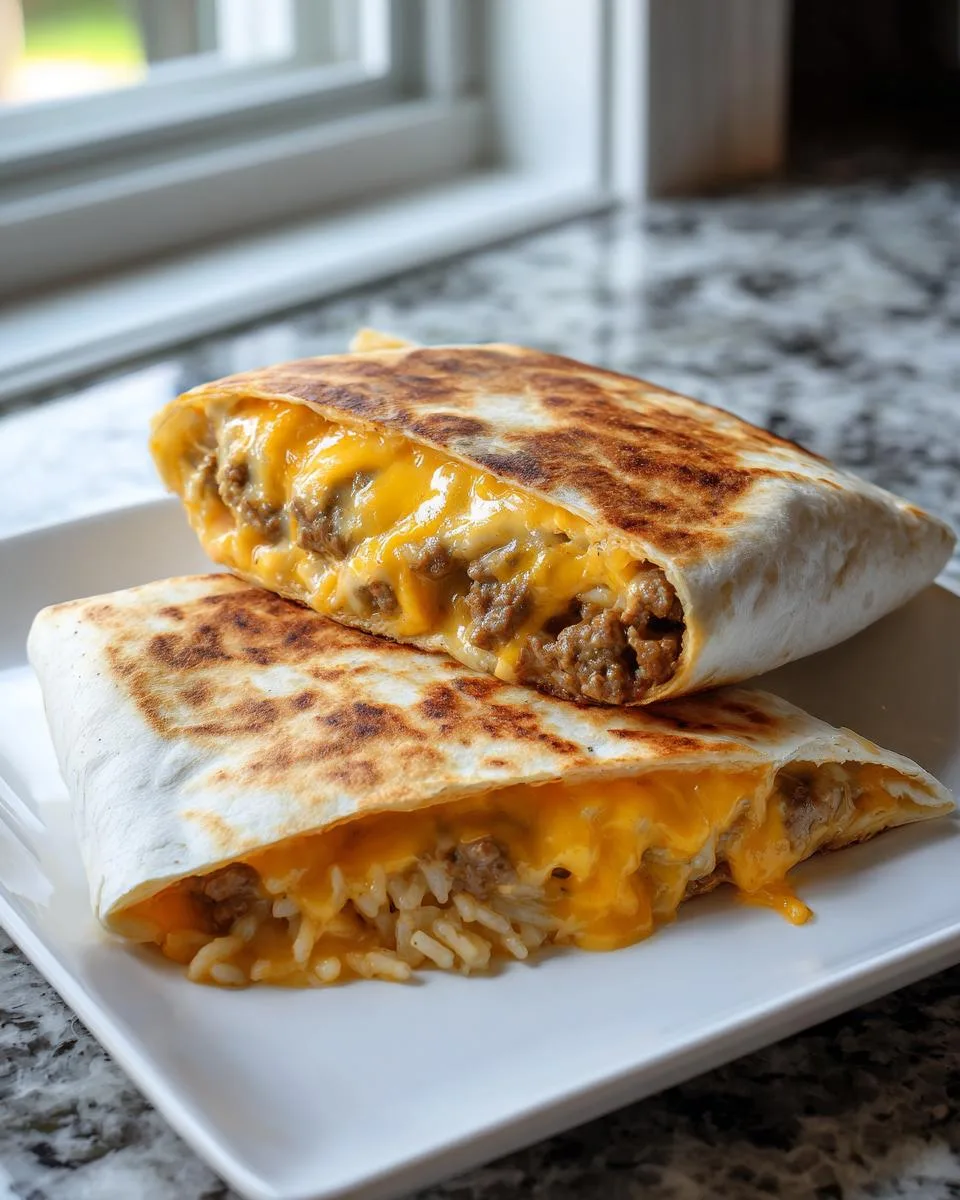
You know those nights when you want something cheesy, comforting, and ridiculously easy? That’s exactly why I created this Easy Grilled Cheese Burrito—it’s become my go-to weeknight lifesaver. Picture this: melty cheese hugging seasoned beef and fluffy rice, all wrapped in a crispy tortilla with just the right kick of chipotle. I’ve been making variations of this recipe for years in my professional kitchens, but this version? It’s the one my family begs for. The best part? You can customize it endlessly—swap proteins, adjust the heat, or go dairy-free. In about 35 minutes flat, you’ll have a meal that tastes like you spent hours in the kitchen.

Table of Contents
Table of Contents
Why You’ll Love This Easy Grilled Cheese Burrito
Listen, this isn’t just any burrito—it’s the kind of meal that makes you do a little happy dance while eating. Here’s why it’s about to become your new obsession:
- Weeknight magic: From fridge to plate in 35 minutes flat (yes, I’ve timed it while chasing my toddler around the kitchen).
- Crispy-cheesy perfection: That golden-brown tortilla crackle gives way to rivers of melted cheese—it’s like a grilled cheese sandwich and burrito had the best baby ever.
- Your rules: Swap beef for chicken, skip the chipotle if you’re spice-shy, or go wild with extra toppings—it’s impossible to mess this up.
- Kid-approved: My picky eater actually asks for these (and that’s saying something).
Ingredients for Easy Grilled Cheese Burrito
Here’s everything you’ll need to make these beauties—I’ve included all my favorite swaps too, because I know we all cook with what we’ve got!
- 1 pound ground beef (drain the excess fat after browning—trust me, this makes all the difference)
- 1 packet taco seasoning (or 2 tablespoons of my homemade blend: chili powder, cumin, garlic powder, and a pinch of cinnamon)
- 2 cups cooked white rice (leftovers work perfectly here—just fluff it with a fork first)
- 1 cup sour cream (Greek yogurt works in a pinch, or skip it entirely if you’re not a fan)
- 1 cup nacho cheese sauce (the jarred stuff is fine, but I’ll whisper my easy homemade version below)
- 1 cup shredded cheddar cheese (pack it lightly—I like to mix in some Monterey Jack for extra meltiness)
- 1 tablespoon chipotle sauce (start with half if you’re nervous about heat—you can always add more)
- 4 large flour tortillas (burrito-sized, about 10 inches—warm them slightly so they don’t crack when folding)
- 2 tablespoons butter (or olive oil for dairy-free—just enough to get that perfect golden crisp)
Ingredient Notes & Substitutions
Okay, let’s talk swaps! I’ve tested this recipe every which way, so here’s what works:
Protein: Ground turkey? Perfect. Plant-based crumbles? Absolutely—just add an extra pinch of smoked paprika for depth.
Tortillas: Gluten-free wraps hold up surprisingly well here—just don’t overfill them. Corn tortillas? Not ideal for folding, but you could make mini versions!
Cheese sauce secret: Melt 1 cup shredded cheese with 1/4 cup milk and a dash of hot sauce over low heat—way better than store-bought and takes 3 minutes.
Spice control: That chipotle sauce packs heat—swap in mild salsa or skip it entirely for kid-friendly versions. (But really, try it—the smoky flavor is magic!)
How to Make Easy Grilled Cheese Burrito
Alright, let’s get cooking! I’ll walk you through each step—it’s simple, but I’ve learned a few tricks over the years that make all the difference between a good burrito and a knock-your-socks-off grilled cheese burrito.
Step 1: Cook the Beef Filling
Heat a large skillet over medium-high and add your ground beef. Break it up with a wooden spoon—you want nice little crumbles, not big chunks. Cook for about 8 minutes until it’s no longer pink, stirring occasionally. Here’s my pro tip: tilt the skillet and spoon out the excess grease (trust me, your burrito will thank you).
Now sprinkle that taco seasoning over the beef—I like to add about 1/4 cup water too. It helps the spices cling to every bite and keeps everything juicy. Let it simmer for 5 minutes while you prep everything else. The smell alone will have your family hovering in the kitchen!
Step 2: Warm the Tortillas
Don’t skip this step! Cold tortillas crack when you fold them, and nobody wants a burrito explosion. I usually microwave them for 20 seconds wrapped in a damp paper towel, or warm them one by one in a dry skillet for about 15 seconds per side. As soon as they’re warm, stack them under a clean kitchen towel—this keeps them soft and pliable while you assemble.
Step 3: Assemble the Burrito
Here’s where the magic happens. Lay a tortilla flat and start with about 1/2 cup rice—spread it slightly off-center toward the bottom edge. The rice acts as a moisture barrier to keep your tortilla from getting soggy. Next, add your beef mixture, then drizzle on the nacho cheese sauce and sour cream. Sprinkle generously with shredded cheese—this is where I always add “just a little more” because, well, cheese.
Now fold like a pro: fold the sides in first, then roll tightly from the bottom up. If filling tries to escape, tuck it back in gently. Pro tip: Don’t overstuff! Leave about 2 inches at the top—the first time I made these, I learned that lesson the messy way.
Step 4: Grill to Perfection
Heat your skillet over medium heat and add a pat of butter or drizzle of oil. Place your burrito seam-side down first—this seals it shut so all that cheesy goodness stays inside. Grill for about 3-4 minutes until golden brown, then carefully flip using a spatula. Grill the other side until equally gorgeous.
You’ll know it’s ready when the cheese starts oozing out the sides (the best part!). Let it rest for a minute before slicing—I know it’s hard to wait, but this keeps everything from spilling out when you cut it.
Print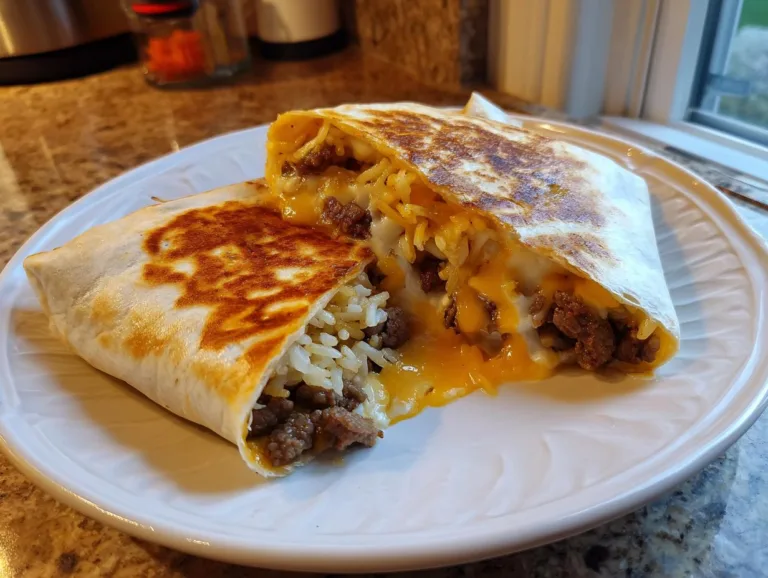
35-Minute Easy Grilled Cheese Burrito: Mouthwatering Comfort
A delicious and easy-to-make grilled cheese burrito filled with seasoned beef, rice, cheese, and a hint of chipotle for a spicy kick.
- Total Time: 35 minutes
- Yield: 4 burritos 1x
Ingredients
- 1 pound Ground Beef (Can substitute with turkey or plant-based)
- 1 packet Taco Seasoning (Make your own for healthier option)
- 2 cups Cooked White Rice (Substitute with brown rice or quinoa if desired)
- 1 cup Sour Cream (Try yogurt or dairy-free alternatives)
- 1 cup Nacho Cheese Sauce (Homemade or vegan cheese can be used)
- 1 cup Shredded Cheddar Cheese (Mix in mozzarella or Mexican blend for flavor)
- 1 cup Shredded Mozzarella Cheese (Can be omitted or replaced with lower-fat cheese)
- 1 tablespoon Chipotle Sauce (Adjust based on spice preference)
- 4 large Flour Tortillas (Whole wheat or gluten-free are good alternatives)
- 2 tablespoons Butter or Oil (Olive oil or non-stick spray for healthier option)
Instructions
- In a skillet over medium heat, brown the ground beef for about 8–10 minutes until no longer pink. Drain excess grease, add taco seasoning and a splash of water, and simmer for 5 minutes.
- Warm the flour tortillas in a dry skillet over low heat or microwave them for about 20 seconds. Keep them covered with a clean towel to retain warmth.
- On each warmed tortilla, layer cooked white rice, seasoned beef, nacho cheese sauce, sour cream, and chipotle sauce. Top with shredded cheeses before wrapping.
- Heat a skillet over medium heat and add butter or oil. Place the assembled burrito seam-side down and grill for 3–4 minutes until golden, then flip and grill for another 3–4 minutes.
- Remove from the skillet, let cool for a minute, slice in half, and serve with chipotle sauce or guacamole.
Notes
- Customize the fillings to your taste.
- Use dairy-free alternatives for a vegan version.
- Adjust the spice level by varying the amount of chipotle sauce.
- Prep Time: 15 minutes
- Cook Time: 20 minutes
- Category: Main Dish
- Method: Grilling
- Cuisine: Mexican
- Diet: Low Lactose
Nutrition
- Serving Size: 1 burrito
- Calories: 650
- Sugar: 5g
- Sodium: 1200mg
- Fat: 35g
- Saturated Fat: 15g
- Unsaturated Fat: 12g
- Trans Fat: 0.5g
- Carbohydrates: 55g
- Fiber: 3g
- Protein: 30g
- Cholesterol: 90mg
Tips for the Best Easy Grilled Cheese Burrito
After making these burritos more times than I can count (my family’s obsession is real), I’ve picked up some game-changing tricks that’ll take yours from good to oh-my-goodness amazing:
- Cheese temperature matters: Take your shredded cheese out of the fridge 15 minutes before assembling—room temp cheese melts into creamy perfection instead of clumping.
- The gentle press: After flipping your burrito, lightly press down with the spatula for even browning. But don’t smash it—you want to keep all that cheesy filling inside!
- Rice hack: If using leftover rice, sprinkle a few drops of water over it before microwaving—steamy rice makes the burrito extra comforting.
- Crisp control: Not golden enough? Add another tiny pat of butter to the skillet. Getting too dark? Lower the heat slightly—burritos are like pancakes, the second batch always cooks faster!
Oh! And one more thing—always make an extra burrito. Trust me, someone will inevitably wander into the kitchen wanting “just one bite” of yours.
Variations of Easy Grilled Cheese Burrito
One of my favorite things about this recipe is how easily it adapts to whatever I’m craving—or whatever’s about to go bad in my fridge! Here are the variations I make most often (and trust me, they’re all winners):
- Chicken fiesta: Swap the beef for shredded rotisserie chicken mixed with taco seasoning—it’s lighter but still packed with flavor. Bonus: leftovers work great here!
- Bean boost: Stir a can of rinsed black beans into the beef mixture (or go all-vegetarian with beans and sautéed peppers). The extra fiber keeps you full for hours.
- Breakfast twist: Scrambled eggs, crispy bacon, and hash browns instead of rice—top with cheese sauce and thank me later. My Sunday morning special.
- Spicy upgrade: Add pickled jalapeños or diced fresh chiles to the filling. For serious heat lovers, mix some hot sauce right into the cheese sauce.
- Southwest style: Corn kernels, diced avocado, and a squeeze of lime juice take this in a totally fresh direction—perfect for summer nights.
The possibilities are endless—sometimes I’ll even do a “clean out the fridge” version with whatever veggies need using up. As long as you’ve got that crispy-cheesy tortilla magic happening, you really can’t go wrong.
Serving Suggestions
Okay, let’s talk about taking your Easy Grilled Cheese Burrito from “yum” to “WOW” with the perfect sides and dips. I’ve served these at everything from casual weeknight dinners to game day gatherings—here’s what always disappears first:
The must-have dippers:
- Chipotle crema: Just mix equal parts sour cream and that amazing chipotle sauce—it’s creamy with just the right smoky kick.
- Chunky guacamole: The cool avocado balances the warm, cheesy burrito perfectly. My quick version? Mash 1 avocado with lime juice, salt, and diced tomato.
- Warm queso: Because more cheese is never wrong. Keep that homemade cheese sauce warm in a small crockpot for dipping.
Light & fresh sides:
- Simple slaw: Shredded cabbage with lime vinaigrette cuts through the richness—I toss mine with cilantro and thin jalapeño slices.
- Charred corn salad: Frozen corn kernels sautéed until slightly blackened, then tossed with cotija cheese and chili powder.
- Pico de gallo: Diced tomatoes, onions, and cilantro—the freshness balances the indulgent burrito beautifully.
For heartier meals:
- Mexican street corn: Grilled corn slathered with mayo, chili powder, and cheese—messy but worth every napkin.
- Black bean soup: Serve small cups alongside for dipping—the flavors complement each other perfectly.
- Crispy potato wedges: Because sometimes you just need extra carbs. Toss with smoked paprika before baking.
Pro tip: Set up a “burrito bar” with all the dips and sides—it lets everyone customize their perfect bite. And don’t forget napkins—these burritos are gloriously messy in the best possible way!
Storage & Reheating
Okay, confession time—I rarely have leftovers because these burritos disappear fast in my house. But when I do manage to save some (usually by hiding one in the back of the fridge), here’s how I keep them tasting just-made:
Fridge magic: Wrap each cooled burrito tightly in foil—the foil keeps moisture out better than plastic wrap. They’ll stay fresh for about 3 days this way. Pro tip: Write the date on the foil so you don’t play “mystery burrito” later!
Freezer-friendly: These freeze beautifully! Wrap in foil, then slide into a freezer bag with as much air squeezed out as possible. They’ll keep for 2 months—just thaw overnight in the fridge before reheating.
Reheating secrets:
- Skillet method: My absolute favorite—unwrap and reheat in a dry skillet over medium-low for about 5 minutes per side. That brings back the crispy magic!
- Oven revival: At 350°F, wrap in foil and bake for 15 minutes, then unwrap and bake 5 more minutes to crisp up.
- Emergency microwave: Only if you’re desperate—30 seconds wrapped in a damp paper towel prevents rubberiness, but you’ll lose the crisp.
One warning: The cheese sauce might separate slightly when reheated—just give it a quick stir inside the burrito before eating. And whatever you do, don’t reheat these in the microwave straight from frozen—you’ll end up with a sad, soggy mess (learned that one the hard way!).
Nutritional Information
Okay, let’s talk numbers—but remember, these are estimates based on my exact ingredients. Your burrito might be slightly different depending on substitutions or how generously you stuff that tortilla! (We don’t judge cheese quantities here.) Here’s the breakdown per burrito when made exactly as written:
- Calories: 650 (Worth every single one when that cheese pulls!)
- Protein: 30g (Thanks to that beef and cheese combo—it’s practically a muscle-building meal)
- Carbs: 55g (Mostly from the tortilla and rice—swap to low-carb wraps if needed)
- Fat: 35g (Hey, flavor lives here—15g saturated from all that glorious cheese)
- Fiber: 3g (Add black beans if you want to bump this up)
- Sugar: 5g (Mostly from the natural lactose in dairy—not added sugars)
- Sodium: 1200mg (The taco seasoning packs most of this—use low-sodium versions if watching intake)
Important note: These values can swing wildly based on your choices—using turkey instead of beef saves about 100 calories, while vegan cheese might lower the saturated fat. I calculated this with standard supermarket ingredients, but homemade versions (like that cheese sauce we talked about) will change the numbers. The moral? Enjoy your burrito without stressing—life’s too short to count every gram when there’s melted cheese involved!
FAQ About Easy Grilled Cheese Burrito
I get asked about these burritos all the time—here are the questions that pop up most often (along with my tested-in-the-trenches answers!):
Can I freeze these burritos?
Absolutely! These freeze like a dream—just wrap each cooled burrito tightly in foil, then pop them in a freezer bag. They’ll keep for up to 2 months. When you’re ready, thaw overnight in the fridge and reheat in a skillet for that fresh-off-the-griddle crispness. Pro tip: Skip freezing any with fresh toppings like guac or sour cream inside.
How do I make this recipe vegan?
Easy peasy! Swap the beef for plant-based crumbles or black beans, use dairy-free cheese shreds, and make a quick vegan nacho cheese sauce (blend soaked cashews with nutritional yeast and spices). For the sour cream, coconut yogurt works surprisingly well. Just be sure to get the large gluten-free tortillas—they hold up best to all that yummy filling!
Why does my burrito keep falling apart?
Ah, the dreaded burrito blowout! Three quick fixes: 1) Don’t overstuff—leave a 2-inch border at the top. 2) Warm your tortillas first so they’re pliable. 3) Start grilling seam-side down to seal it shut. If all else fails? Call it a “burrito bowl” and eat with a fork—no shame in that game!
Can I make these ahead for meal prep?
You bet! Assemble (but don’t grill) up to a day ahead—wrap tightly in plastic and refrigerate. When ready, grill straight from the fridge, adding an extra minute per side. They also reheat beautifully—just crisp them up in a dry skillet for that fresh-made texture.
What’s the best way to reheat leftovers?
Hands down, the skillet method wins! A few minutes per side brings back that magical crisp-chewy texture. The microwave works in a pinch (wrap in a damp paper towel), but you’ll sacrifice the crunch. Whatever you do, don’t nuke them straight from frozen—we want melty cheese, not rubbery disappointment!
Rate This Recipe
Alright, my fellow burrito lovers—now it’s your turn! Did you make this Easy Grilled Cheese Burrito? I want to hear all about your kitchen adventures (the triumphs and the “oops” moments—we’ve all been there!). Drop a comment below and let me know:
- Did you stick to the classic version or try any fun twists?
- How did your family react? (Bonus points if you got any “wow” faces!)
- Any brilliant discoveries or hilarious mishaps along the way?
Your feedback helps me create even better recipes for everyone—plus, I love hearing how you make these dishes your own. And hey, if you snapped a cheesy, crispy photo, I’d absolutely love to see it! Nothing makes me happier than knowing my recipes are bringing joy to your kitchen tables.
So go ahead—tell me all about your grilled cheese burrito experience below. Did it earn a spot in your regular meal rotation? Would you change anything next time? The comment section is all yours!
For More recipes, Follow me on Facebook!