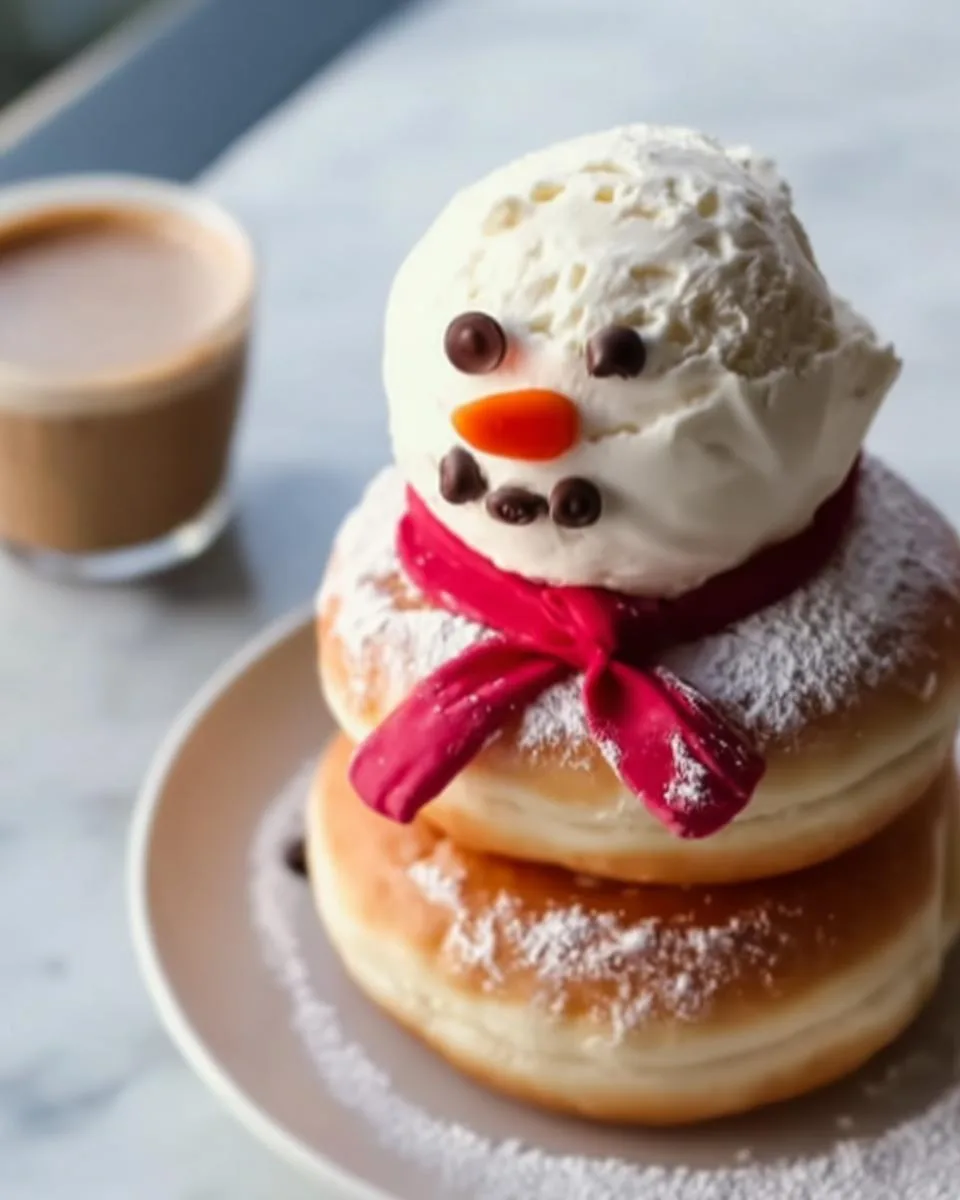
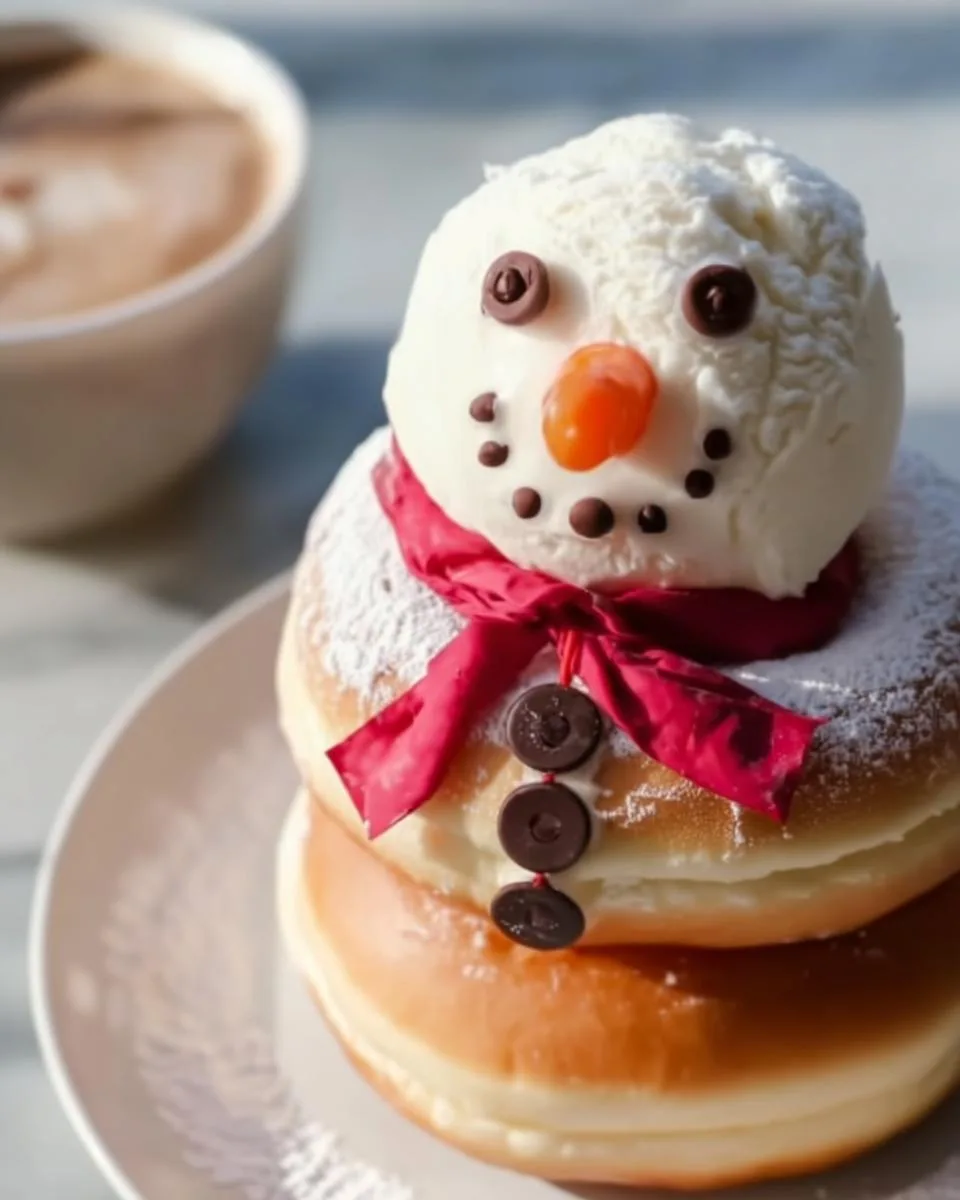
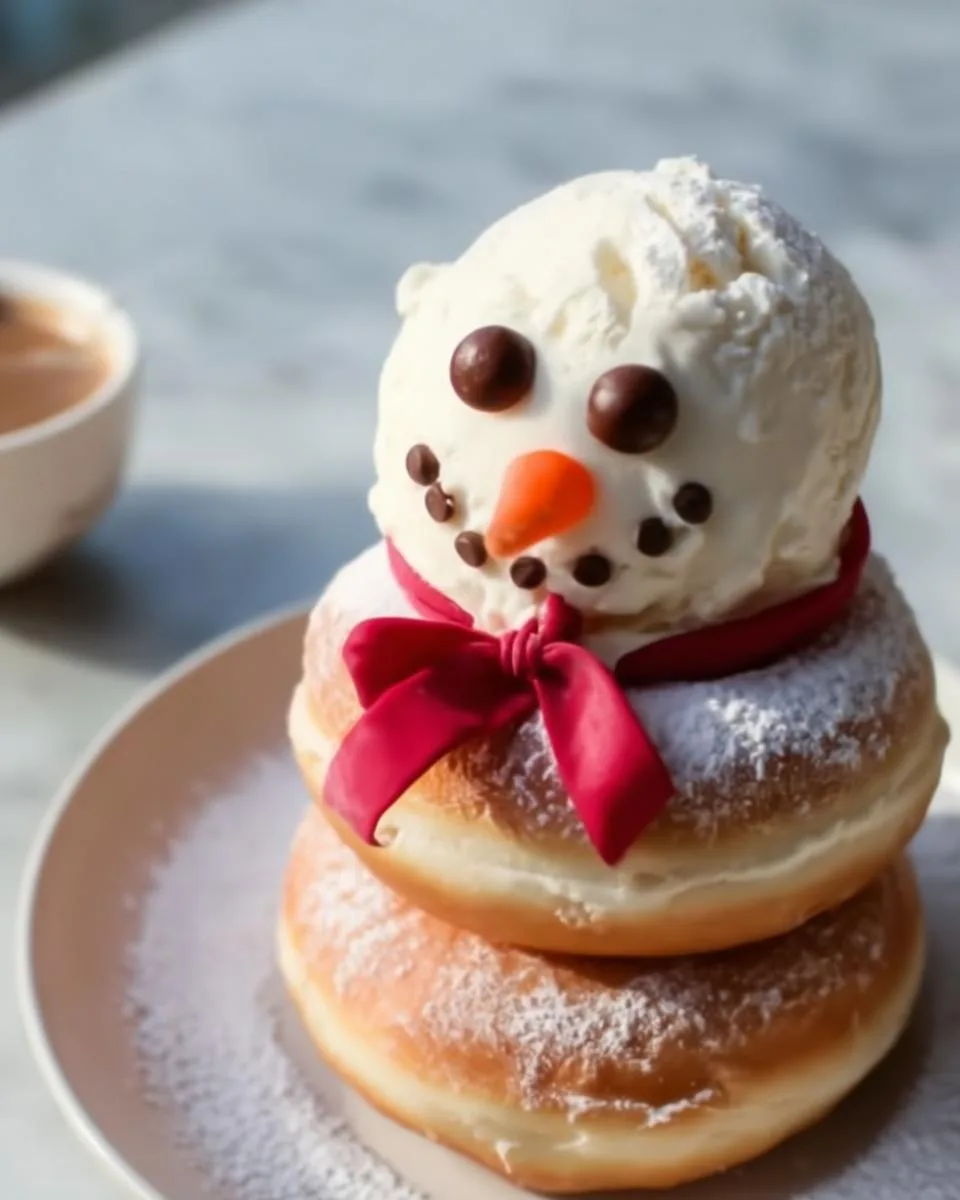
Oh my goodness, if there’s one thing that makes me giddy during the holidays, it’s turning everyday treats into something magical—like this adorable Donut Snowman! Picture this: fluffy donuts stacked high, topped with a creamy ice cream head, and dressed up with the cutest little face. It’s the kind of dessert that makes kids (and let’s be honest, grown-ups too) squeal with delight. I first made these for my niece’s winter party, and let me tell you—they disappeared faster than snowflakes on a warm palm. The best part? You don’t need fancy skills, just a little creativity and a sweet tooth. Trust me, this Donut Snowman is the easiest way to spread holiday cheer—no mittens required!
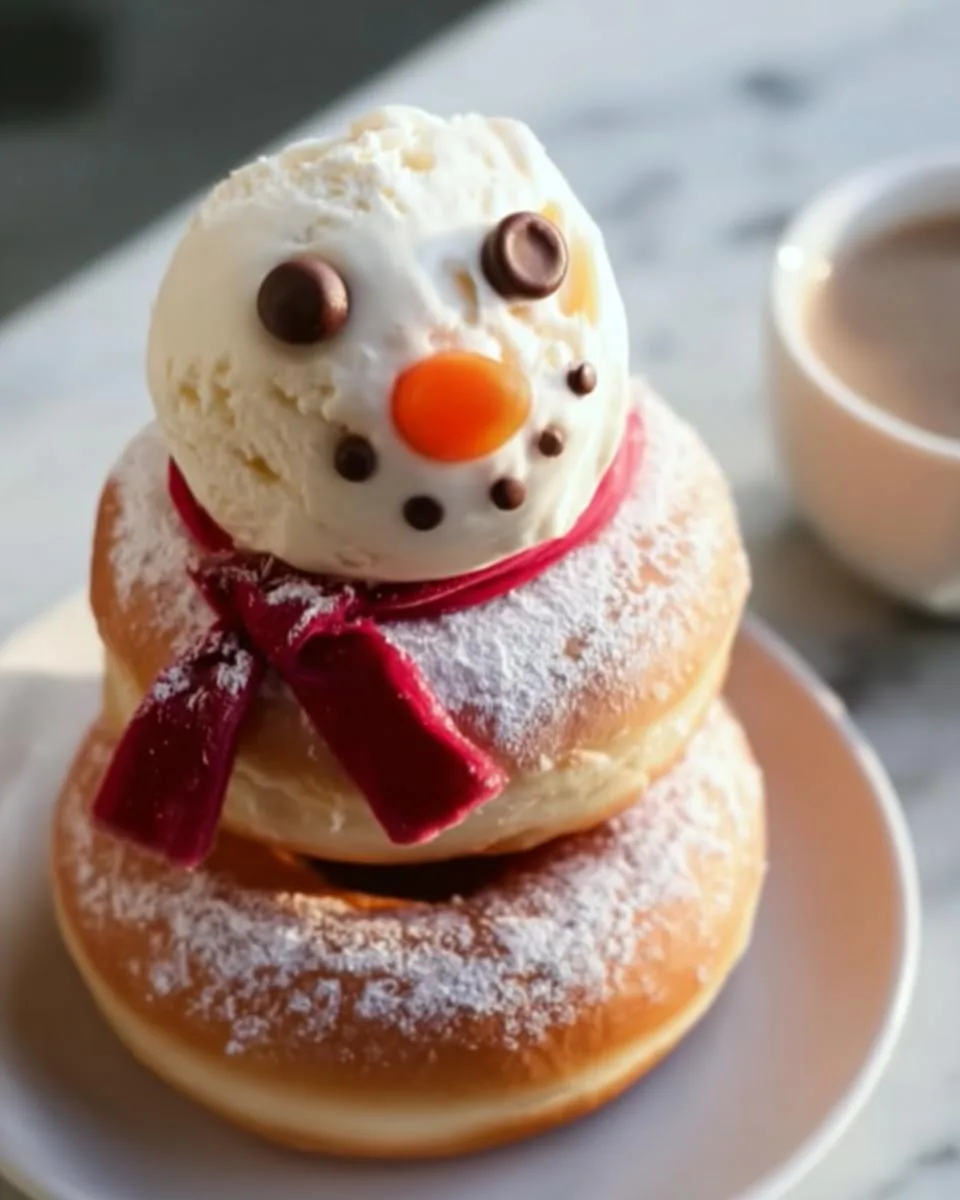
Table of Contents
Table of Contents
Donut Snowman Ingredients
Grab these simple ingredients, and let’s bring this sweet little snowman to life! The magic is in the details, so don’t skip the prep notes—they make all the difference. Here’s what you’ll need:
- 2 sugar-dusted round donuts (go for yeast donuts—they hold their shape like champs!)
- 1 scoop vanilla ice cream, pre-scooped and frozen solid (trust me, this step saves a melty disaster)
- 2 mini chocolate chips (for those twinkly coal eyes)
- 1 mini orange jelly bean or candy-coated sunflower seed (the perfect carrot nose—just like Frosty’s!)
- 1 red licorice string or thin strip of fruit leather (for a scarf that’s equal parts cute and edible)
- 1 small dab of chocolate or chocolate frosting (to draw that classic snowman smile)
- Powdered sugar (optional, but oh-so-pretty for a snowy dusting)
- Toothpick or short skewer (optional, but handy for keeping Mr. Snowman’s head from taking a tumble)
Equipment You’ll Need for Your Donut Snowman
No fancy gadgets here—just a few basics to make your Donut Snowman assembly a breeze! You’ll want:
- A small serving plate (bonus points if it’s festive!)
- Parchment paper for freezing the ice cream scoop
- A toothpick or skewer (for securing that ice cream head—wobbly snowmen are no fun!)
- A butter knife (to smooth frosting or dab on chocolate details)
That’s it—now let’s build some snowmen!
How to Make a Donut Snowman
Ready to create the most adorable winter treat? Follow these simple steps, and you’ll have a Donut Snowman that’s almost too cute to eat—almost! The key is working quickly and having fun with it. Let’s get stacking!
Step 1: Prepare the Ice Cream
First things first—that ice cream head needs to be rock-solid! Scoop your vanilla ice cream into a perfect round ball (I use an ice cream scoop for consistency). Place it on a parchment-lined tray and pop it in the freezer for at least 30 minutes. This waiting game is crucial—you want it firm enough to handle without melting everywhere when you assemble your snowman.
Step 2: Stack the Donuts
Now for the base! Take your two sugar-dusted donuts and place one flat on your serving plate. Gently press the second donut right on top—like building a tiny snowman body. If you want that fresh-snow look, lightly dust the top donut with powdered sugar. Just a little shake goes a long way!
Step 3: Add the Ice Cream Head
Time for the star of the show! Grab your frozen ice cream scoop from the freezer and carefully place it on top of the donuts. If your snowman seems wobbly (we’ve all been there), insert a toothpick or skewer down through the center for extra stability. Just remember to warn anyone eating it about the hidden pick!
Step 4: Decorate the Face
Let’s give this guy some personality! Press two mini chocolate chips into the ice cream for eyes—space them wide for extra cuteness. Add your orange jelly bean or sunflower seed as the classic carrot nose. For the mouth, dip a toothpick in melted chocolate or frosting and draw a simple smile or surprised “O” shape. My niece loves when I make hers wink with one eye slightly higher!
Step 5: Wrap the Scarf
No snowman is complete without winter accessories! Take your red licorice or fruit leather and wrap it loosely around the base of the ice cream head. Let the ends drape naturally—you can even curl them slightly with your fingers for that breezy, just-tied-it-in-the-cold look. This step always makes me feel like I’m dressing up a tiny frozen friend!
Step 6: Serve Immediately
Here’s the deal—ice cream waits for no one! Present your Donut Snowman right away before Mr. Frosty starts melting. If you’re making several for a party, assemble them in batches just before serving. Trust me, the “oohs” and “aahs” when you bring these out are totally worth the last-minute hustle!
Print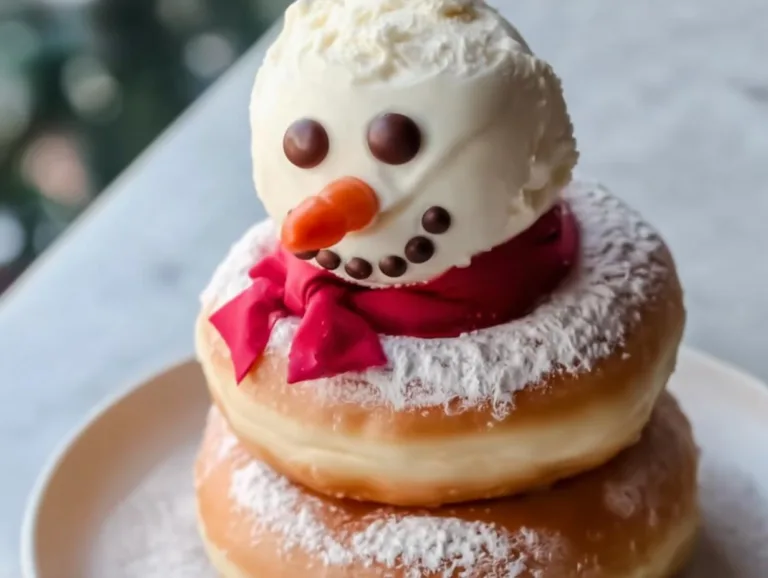
2 Magical Ways to Make a Donut Snowman They’ll Love
A fun and festive dessert featuring stacked donuts and ice cream to create an adorable snowman.
- Total Time: 40 minutes (includes freezing time)
- Yield: 1 snowman 1x
Ingredients
- 2 sugar-dusted round donuts (yeast donuts hold shape best)
- 1 scoop vanilla ice cream, pre-scooped and frozen
- 2 mini chocolate chips
- 1 mini orange jelly bean or candy-coated sunflower seed
- 1 red licorice string or thin strip of fruit leather
- 1 small dab of chocolate or chocolate frosting
- Powdered sugar (optional, for dusting)
- Toothpick or short skewer (optional, for stability)
Instructions
- PREPARE THE ICE CREAM: Scoop the vanilla ice cream into a firm, rounded ball. Place it on a parchment-lined tray and freeze for at least 30 minutes until solid enough to handle.
- STACK THE DONUTS: Arrange one donut on a serving plate, then gently place the second donut on top. Press slightly to keep them stable. Lightly dust the top donut with powdered sugar if desired.
- ADD THE ICE CREAM HEAD: Take the firm ice cream scoop from the freezer and place it carefully on top of the stacked donuts. Use a toothpick or skewer down the center for extra support if needed.
- DECORATE THE FACE: Press two mini chocolate chips into the ice cream for eyes. Add the jelly bean or seed for the nose. Use a toothpick dipped in melted chocolate or chocolate frosting to draw a smiling mouth.
- WRAP THE SCARF: Tie the licorice string or fruit leather around the base of the ice cream scoop. Allow the ends to fall naturally or curl slightly for a fun scarf effect.
- SERVE IMMEDIATELY: Present the snowman as soon as possible to prevent melting. If making several, assemble and decorate quickly just before serving.
Notes
- Use yeast donuts for better stability.
- Freeze the ice cream scoop beforehand to prevent melting.
- Assemble quickly before serving.
- Prep Time: 10 minutes
- Cook Time: 0 minutes
- Category: Dessert
- Method: No-cook
- Cuisine: American
- Diet: Vegetarian
Nutrition
- Serving Size: 1 snowman
- Calories: 350
- Sugar: 25g
- Sodium: 150mg
- Fat: 15g
- Saturated Fat: 7g
- Unsaturated Fat: 3g
- Trans Fat: 0g
- Carbohydrates: 45g
- Fiber: 1g
- Protein: 3g
- Cholesterol: 30mg
Tips for the Perfect Donut Snowman
After making dozens of these sweet little guys (some more successful than others!), I’ve picked up a few tricks to ensure your Donut Snowman turns out picture-perfect every time:
- Yeast donuts are your best friend – They hold their shape better than cake donuts when stacked. No lopsided snowmen here!
- Freeze that ice cream scoop solid – I let mine chill for a full hour if I have time. The firmer it is, the less likely you’ll end up with a snowman avalanche.
- Work fast but gentle – Have all your decorations ready before assembly. Cold hands help too – I sometimes run mine under cool water first.
- Powdered sugar magic – Dust it lightly right before serving for that fresh snowfall effect. Too early and it’ll absorb into the donut.
- Get creative with accessories – Mini pretzel sticks make great arms, and crushed peppermint adds festive flair as buttons!
Donut Snowman Variations
Oh, the fun you can have with these little guys! Once you’ve mastered the classic Donut Snowman, try these tasty twists:
- Chocolate lovers’ dream – Swap the sugar donuts for chocolate-glazed ones and use chocolate ice cream for the head. Mini M&Ms make perfect colorful buttons!
- Fruity frosty – Try strawberry ice cream with pink sprinkles for a “berry” cute snowman. Gummy bears become adorable ear muffs!
- Peppermint party – Crushed candy canes pressed into the ice cream create a minty fresh look – perfect for Christmas gatherings!
- Breakfast snowman – Use mini bagels instead of donuts and cream cheese “frosting” for a morning-friendly version.
The possibilities are endless – just follow your sweet tooth’s imagination!
Serving Suggestions for Your Donut Snowman
This adorable Donut Snowman absolutely shines when served with steaming mugs of hot cocoa—the cold ice cream and warm drink are a match made in winter heaven! For parties, arrange a whole “snowman family” on a platter with gingerbread cookies and peppermint sticks. Kids love pairing them with mini marshmallows for extra snowy fun!
Donut Snowman Storage & Reheating
Let’s be real—this sweet little guy is meant to be devoured fresh! Ice cream and donuts wait for no one, so assemble and serve your Donut Snowman immediately for maximum cuteness (and minimum meltiness).
Donut Snowman Nutritional Information
Here’s the scoop on your sweet snowman’s stats (based on average ingredients): about 350 calories per serving, with 25g sugar and 15g fat. Remember—nutrition varies by brands and substitutions, so consider this a friendly estimate!
Donut Snowman FAQs
Q1. Can I make a gluten-free Donut Snowman?
Absolutely! Just swap regular donuts for your favorite gluten-free version. The ice cream and decorations are naturally gluten-free (but always check labels if you’re sensitive). The assembly works exactly the same way—your snowman will be just as adorable!
Q2. How long will the Donut Snowman last before melting?
Honestly? Not long—that’s part of the fun! In a cool room, you’ve got about 5-10 minutes before Mr. Frosty starts slouching. If you’re serving at a party, assemble them in batches right before bringing them out. Pro tip: Keep extra ice cream scoops frozen on standby for quick refills!
Q3. What if I can’t find mini chocolate chips for the eyes?
Get creative! Sprinkles, small candy dots, or even bits of pretzel work great. Once, I used mini chocolate-covered sunflower seeds—they gave my snowman such a cute beady-eyed look! The key is tiny edible items that will stick to the ice cream.
Q4. Can I make these ahead of time?
You can prep components ahead—freeze the ice cream scoops overnight and have all decorations ready—but assemble last minute. Nobody wants a melted snowman at the party! If you must refrigerate, do it for 10 minutes max before serving.
Share Your Donut Snowman Creations
Oh my goodness, I can’t wait to see what you dream up! Snap a photo of your sweet snowman before it disappears—those little faces are just too precious not to share. Drop a comment below telling me how your family reacted (I still giggle remembering my niece’s gasp when she saw hers). Let’s spread the joy—one donut snowman at a time!
For More recipes, Follow me on Facebook!