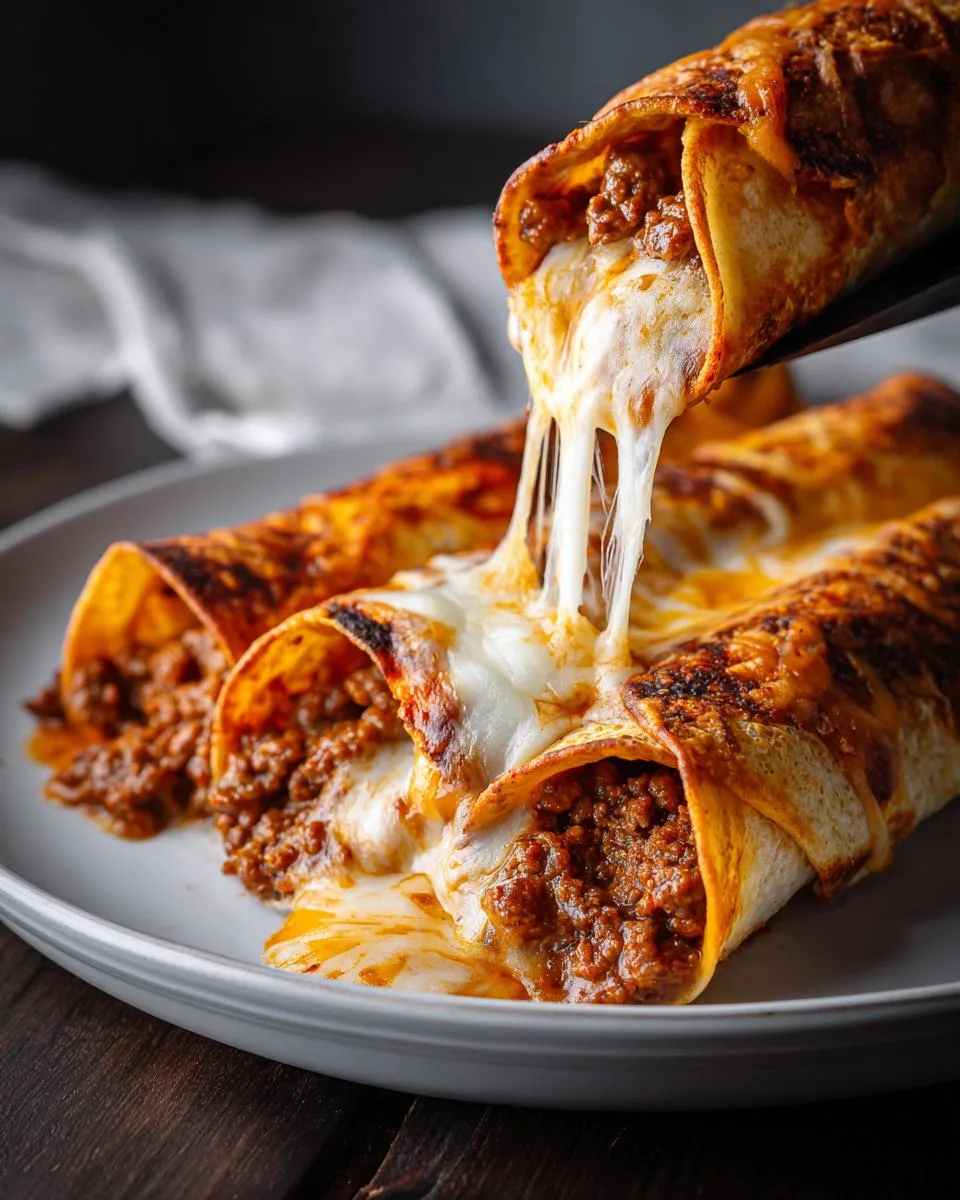
Oh my gosh, you guys – these Crispy Cheesy Beef Taquitos are my absolute weakness! As a chef who’s spent years perfecting quick, flavor-packed meals, I can tell you nothing beats that first crunchy bite revealing melty mozzarella and perfectly seasoned beef. They’re my go-to when friends pop over unexpectedly or when my nieces beg for “Auntie Martavia’s special rolls.” What makes them so dang good? Fresh tortillas crisped to golden perfection hugging that savory filling – simple ingredients transformed into pure magic. Trust me, once you try these, you’ll be hooked just like my regulars at Dishivia!
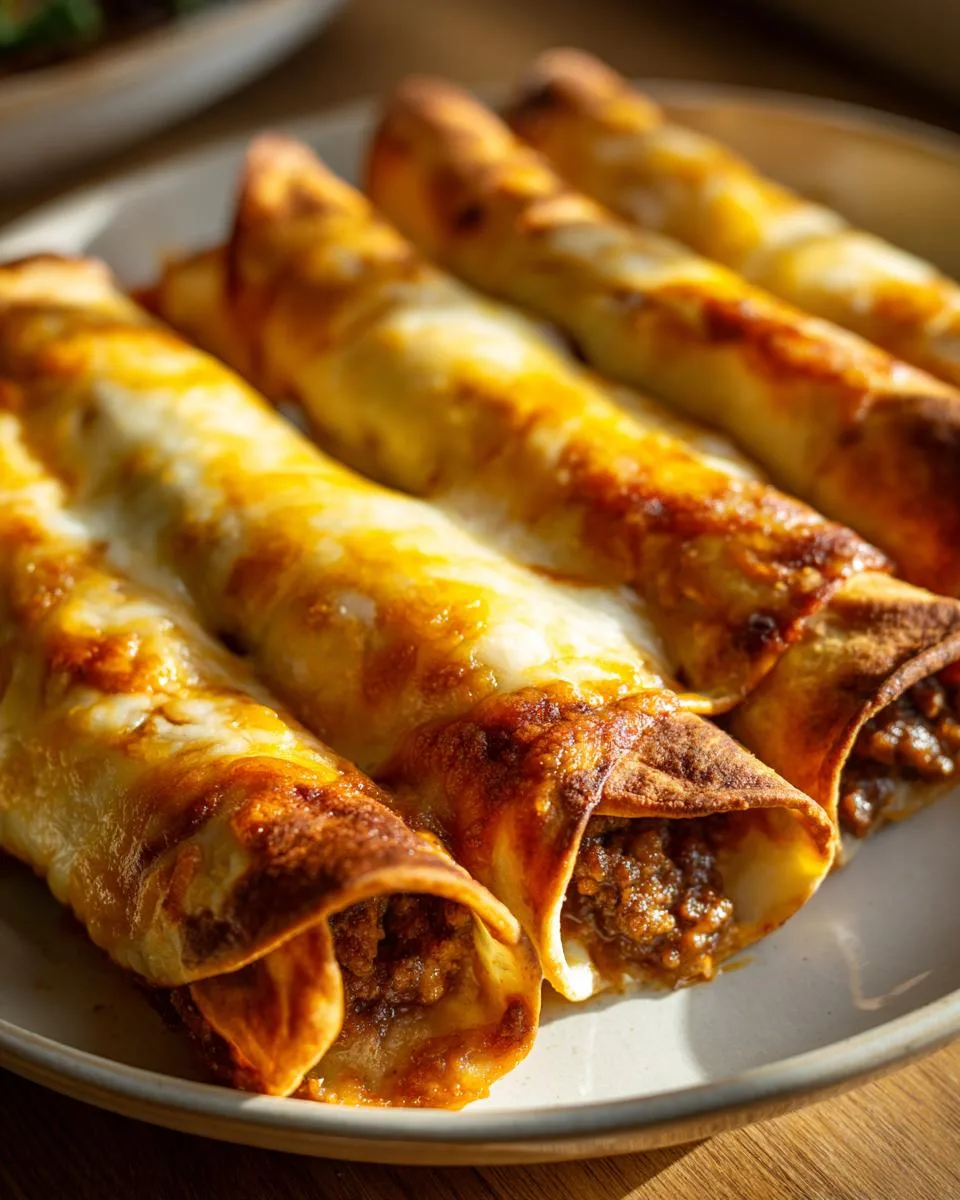
Table of Contents
Table of Contents
Why You’ll Love These Crispy Cheesy Beef Taquitos
Listen, I don’t blame you if you become obsessed—these taquitos check ALL the boxes:
- Crazy quick: Ready in under 35 minutes (even faster if you prep filling ahead!)
- Flavor bombs: That crispy shell gives way to melty cheese and beef spiked with smokey taco seasoning
- Meal or snack: Pack ‘em for lunch, serve as appetizers, or make ‘em dinner with a side salad
- Kid-approved: My pickiest niece devours three at a time—just call them “cheese rolls”
- Totally yours: Swap beef for chicken, add jalapeños, or try different cheeses—have fun with it!
Seriously, what’s not to love?
Ingredients for Crispy Cheesy Beef Taquitos
Okay, let’s talk about what makes these taquitos sing! Every ingredient plays a role – I’ve learned through trial and error (and happily eating my “mistakes”) exactly what works best. Here’s what you’ll need:

- 1 pound 90/10 ground beef – The leaner cut means less grease pooling in your taquitos
- 1/2 cup onions, finely chopped – I like yellow onions here for their mild sweetness when cooked
- 1 tablespoon oil, plus more for frying – Any neutral oil works, but I’m partial to avocado oil for its high smoke point
- 2 tablespoons taco seasoning – Use your favorite brand or my homemade blend (ask me for the recipe!)
- 2 tablespoons tomato paste – That concentrated umami magic that brings depth
- 1/4 cup water or beef broth – Only if your mixture looks dry – we want moist but not soggy filling
- Salt, to taste – Taste as you go! The taco seasoning already has some salt
- 3 to 4 cups mozzarella cheese, shredded – Yes, that’s not a typo – we go big on cheese!
- 14 taco-sized flour tortillas – Fresh ones roll SO much easier than stiff refrigerated ones
Pro tip: Having everything prepped and within arm’s reach makes assembly go smoother than my niece’s dance moves!
How to Make Crispy Cheesy Beef Taquitos
Alright, let’s get rolling—literally! These taquitos come together in three simple phases: cooking that amazing beef filling, assembling our cheesy bundles of joy, and frying them to golden perfection. I promise it’s easier than folding a fitted sheet (why are those things so impossible?). Here’s exactly how I do it every Tuesday when my crew demands “taquito night.”
Cooking the Beef Filling
First things first—let’s make that filling irresistible. Here’s my no-fail method:
- Heat 1 tablespoon oil in a large pan over medium heat. Toss in those chopped onions and let them soften for about 3 to 4 minutes—you want them translucent but not browned.
- Add the ground beef, breaking it up with your spoon like you’re playing the world’s tiniest game of Whack-a-Mole. Cook until no pink remains, about 6 to 8 minutes. Drain any excess grease if needed—we want flavor, not a swimming pool!
- Stir in the taco seasoning, tomato paste, and salt. Now’s when the magic happens—that rich, savory aroma will have everyone wandering into the kitchen. If the mixture looks too dry (it happens!), splash in 1/4 cup water or broth to bring it together.
- Remove from heat and let cool slightly—this stops the cheese from melting prematurely when we assemble. Patience, my friend!
Assembling and Frying the Taquitos
Here’s where the fun begins—and where my nieces beg to “help” (read: eat shredded cheese straight from the bag). Follow these steps for taquito perfection:
- Lay a tortilla flat and sprinkle 3-4 tablespoons of cheese down the center—don’t skimp! Then add 2 tablespoons of beef filling in a neat line on top of the cheese.
- Roll tightly like you’re wrapping the world’s tastiest cigar. Pro tip: If a tortilla cracks, microwave the stack for 10 seconds under a damp towel—heat makes them more flexible!
- Heat 1/2 cup oil in a skillet over medium heat—you’ll know it’s ready when a breadcrumb sizzles. Fry taquitos in batches of 3-4 (crowding leads to sad, soggy taquitos). Turn them with tongs until golden on all sides, about 1-2 minutes total.
- Drain on a wire rack—this keeps them crisp underneath instead of steaming on a plate. Resist eating immediately unless you enjoy molten cheese burns!
See? Easy peasy cheesy! Now let’s talk about keeping that perfect crispiness…
Print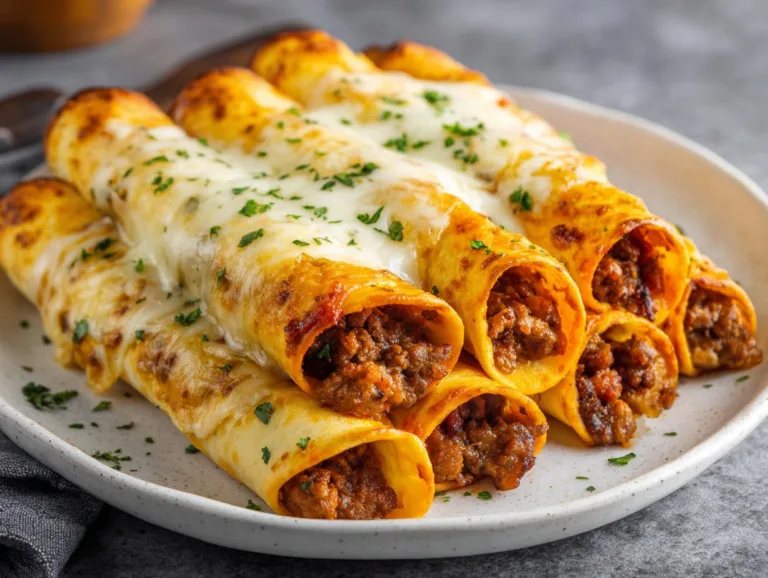
Crispy Cheesy Beef Taquitos: Irresistible Yummy Food
Crispy Cheesy Beef Taquitos are a delicious and easy-to-make snack or meal, featuring seasoned ground beef and melted mozzarella cheese wrapped in a crispy tortilla.
- Total Time: 35 minutes
- Yield: 14 taquitos 1x
Ingredients
- 1 pound 90/10 ground beef
- 1/2 cup onions, finely chopped
- 1 tablespoon oil, plus more for frying
- 2 tablespoons taco seasoning
- 2 tablespoons tomato paste
- 1/4 cup water or beef broth, as needed
- salt, to taste
- 3 to 4 cups mozzarella cheese, shredded
- 14 taco-sized flour tortillas
Instructions
- Heat oil in a large pan over medium heat. Add onions and cook until softened, about 3 to 4 minutes.
- Add ground beef to the pan, breaking it into smaller pieces with a spoon.
- Mix in taco seasoning, salt, tomato paste, and water or beef broth if the mixture is dry. Cook until beef is no longer pink, about 6 to 8 minutes.
- Remove beef mixture from heat and let it cool.
- Place a tortilla on a clean surface, add 3 to 4 tablespoons of cheese, then 2 tablespoons of beef filling. Roll tightly into a log.
- Repeat with remaining tortillas, beef, and cheese to make 14 taquitos.
- Heat 1/2 cup oil in a frying pan over medium heat. Fry taquitos in batches, turning until golden brown on all sides, about 1 to 2 minutes per batch.
- Transfer to a wire rack to drain excess oil. Serve hot and crispy.
Notes
- Use fresh tortillas for easier rolling.
- Adjust taco seasoning to your taste.
- Serve with sour cream, guacamole, or salsa for extra flavor.
- Prep Time: 15 minutes
- Cook Time: 20 minutes
- Category: Snack
- Method: Frying
- Cuisine: Mexican
- Diet: Low Lactose
Nutrition
- Serving Size: 2 taquitos
- Calories: 320
- Sugar: 2g
- Sodium: 480mg
- Fat: 18g
- Saturated Fat: 7g
- Unsaturated Fat: 8g
- Trans Fat: 0g
- Carbohydrates: 22g
- Fiber: 1g
- Protein: 18g
- Cholesterol: 50mg
Tips for Perfect Crispy Cheesy Beef Taquitos
Listen, I’ve made enough taquitos to know what separates the “good” from the “oh-my-word-I-need-this-every-day” ones. Here are my hard-won secrets:
Fresh tortillas make all the difference – Those stiff refrigerated ones? Forget ’em. Grab the softest flour tortillas from the bakery section—they roll like a dream without cracking. If yours feel stubborn, a quick 10-second microwave zap with a damp paper towel turns them into perfect pliable wrappers.
Drain smart – That wire rack isn’t just for show! Letting taquitos drain there instead of on paper towels keeps every inch crispy. My niece learned this the hard way when her “quick snack” turned into a soggy mess—now she waits patiently by the rack like it’s a cookie cooling station.
Temperature control is key – Too hot and they burn before the cheese melts; too low and they soak up oil like sponges. Test with one taquito first—aim for bubbles around the edges when you drop it in. If your first batch browns too fast, just lower the heat slightly and carry on.
Spice it your way – I like adding a pinch of smoked paprika to my taco seasoning for depth, but this is YOUR kitchen. Kids prefer milder? Use half seasoning. Want heat? Toss in some diced jalapeños with the onions. The beauty of these is how easily they adapt to your taste buds.
Freeze like a pro – These taquito treasures freeze beautifully before frying! Roll them up, place on a baking sheet to freeze solid, then transfer to bags. Fry straight from frozen—just add an extra minute to the cooking time. Future you will be SO grateful.
Serving Suggestions for Crispy Cheesy Beef Taquitos
Now for the best part—what to serve with these golden beauties! I’ve hosted enough taquito nights to know pairing them right turns snack time into a fiesta. Here’s how I make mine disappear faster than my teenage nephew can say “seconds”:
Dips that dazzle silly:
- Creamy avocado lime sauce – Blend 1 avocado with 1/4 cup sour cream, lime juice, and cilantro (my secret? A dash of garlic powder!)
- Smoky chipotle ranch – Mix ranch dressing with adobo sauce from canned chipotles to taste
- Restaurant-style salsa roja – The acidity cuts through richness perfectly
- Queso fundido – Because more cheese is always the right answer
Sidekicks that shine:
- Tangy cabbage slaw – Shredded purple cabbage with lime vinaigrette adds crunch
- Charred corn salad – Toss grilled corn with cotija and chili powder
- Cilantro-lime rice – Fluffy basmati with fresh herbs balances the crispy texture
- Black bean soup – For those “I want taquitos but also soup” days
Garnish game changers:
- Quick-pickled red onions – Soak thin slices in lime juice + salt for 10 minutes
- Crumbled queso fresco – Salty little clouds of deliciousness
- Fresh pico de gallo – Dice tomatoes, onions, and jalapeños small so they stick
- Lime wedges – That citrus squeeze at the end? *chef’s kiss*
Pro tip: Set up a “taquito bar” with all the fixings when hosting—watching friends customize their plates brings me so much joy! Just don’t blame me when they raid your fridge for leftovers!
Storing and Reheating Crispy Cheesy Beef Taquitos
Okay, let’s be real—these taquitos rarely last long enough to store at my house! But when they do (or when I deliberately make extra because adulting), here’s how I keep that perfect crispiness alive for round two:
Fridge Storage
If you’ve got leftovers (who are you and what magic is this?), let them cool completely before storing. I lay them in a single layer on a baking sheet lined with parchment—no stacking!—and cover loosely with foil. They’ll stay crispy like this for up to 3 days in the fridge. Trying to cram them into a container while still warm? That’s a one-way ticket to Soggy Town.
Freezer Magic
Here’s my favorite trick: freeze taquitos before frying! Roll them up, place on a parchment-lined tray until solid (about 1 hour), then transfer to freezer bags. They’ll keep for 2 months—fry straight from frozen, just add an extra minute to cooking time. Already fried taquitos freeze well too—layer between parchment in an airtight container for up to 1 month.
Reheating Like a Pro
The cardinal rule? No microwave! (Unless you enjoy chewy tortillas, bless your heart.) Here’s how to revive that perfect crunch:
- Oven method: Preheat to 375°F (190°C). Place taquitos on a wire rack over a baking sheet—this lets hot air circulate. Bake for 8-10 minutes until heated through and crispy.
- Air fryer magic: 350°F (175°C) for 4-5 minutes—shake halfway. Works beautifully for frozen ones too!
- Skillet refresh: A quick 1-minute fry in fresh oil brings back that just-made crispiness.
Pro tip: If reheating frozen fried taquitos, sprinkle a few drops of water on them before baking—the steam helps prevent drying out while still keeping them crispy. Learned that trick after my third “why is the cheese so dry?!” kitchen meltdown!
Crispy Cheesy Beef Taquitos Variations
Listen, rules were made to be broken—especially in the kitchen! While my classic beef-and-mozzarella combo is perfection, even I love switching things up sometimes. Here are my favorite ways to play with this recipe (because variety is the spice of life, right?):
Meat swaps that work magic:
- Shredded chicken – Use leftover rotisserie chicken or poached breasts mixed with the same seasonings
- Ground turkey – Leaner but still flavorful—just add an extra tablespoon of oil
- Pulled pork – Skip the taco seasoning and use your favorite BBQ rub instead
- Black beans – Mash them slightly for a vegetarian version that still packs protein
Cheese dreams come true:
- Pepper jack – For those who like a little kick with their crunch
- Queso quesadilla – Melts beautifully and has that authentic Mexican flair
- Cheddar + Monterey Jack blend – My nephew’s favorite—extra gooey!
- Cotija – Salty and crumbly for a different texture experience
Tortilla tricks:
- Corn tortillas – Authentic flavor, but double-wrap them to prevent cracking
- Spinach or tomato tortillas – Adds color and subtle flavor variations
- Mini tortillas – Perfect for bite-sized party appetizers
Pro tip: Once you’ve mastered the basic recipe, try mixing and matching—my current obsession is shredded chicken with pepper jack and a smear of cream cheese inside the tortilla before rolling. Don’t tell my niece though—she thinks the original is still the best!
Nutritional Information
Now, I’m no nutritionist (just a cheese-loving chef!), but I know folks like to have the facts. These numbers are estimates based on standard ingredients—your exact counts might vary depending on brands and how generous you are with that mozzarella (no judgment here!). Here’s the scoop per serving (that’s 2 taquitos, because who stops at one?):
- Calories: 320 – Consider it fuel for your next dance party!
- Total Fat: 18g – Comes with the crispy territory
- Saturated Fat: 7g – Blame the delicious cheese
- Protein: 18g – Beef and cheese teaming up
- Carbs: 22g – Mostly from those golden tortillas
- Fiber: 1g – Not a salad, folks!
- Sugar: 2g – Just a whisper from the tomato paste
- Sodium: 480mg – Ease up on salt if using seasoned taco mix
Remember, these are happy little estimates—your dips and sides will change things. I calculate based on 90/10 beef and standard flour tortillas, but hey, life’s too short to stress over every gram when there’s crispy, cheesy goodness waiting! You can find more of my favorite quick meals over at my recipes page.
FAQs About Crispy Cheesy Beef Taquitos
I’ve gotten SO many questions about these taquitos over the years—here are the ones that pop up most often in my kitchen and at Dishivia:
Q1. Can I bake these instead of frying?
Absolutely! For baked taquitos, brush them lightly with oil and bake at 425°F (220°C) for 15-18 minutes, flipping halfway. They won’t get quite as crispy as fried, but still delicious. Pro tip: Place them on a wire rack over the baking sheet for even browning!
Q2. How do I keep my tortillas from cracking when rolling?
Fresh, pliable tortillas are key—I microwave the stack for 10 seconds under a damp paper towel before rolling. If cracks still happen, just press gently to seal—the frying process will help “glue” them together. And remember: imperfect taquitos still taste amazing!
Q3. What’s the best way to reheat leftovers?
Skip the microwave unless you like soggy taquitos! Instead, pop them in a 375°F (190°C) oven for 8-10 minutes or air fry at 350°F (175°C) for 4-5 minutes. The oven method works best for larger batches, while the air fryer brings back that just-fried crispiness beautifully.
Q4. Can I make these ahead?
You bet—two great options: 1) Prep the filling up to 3 days ahead and assemble when ready to fry, or 2) Roll and freeze uncooked taquitos for up to 2 months (fry straight from frozen, adding 1 extra minute). Already fried taquitos freeze well too—just reheat as above.
Q5. What dipping sauces pair best?
Oh, let me count the ways! My top picks:
• Cool sour cream with lime zest
• Smoky chipotle mayo
• Fresh tomato salsa
• Guacamole with extra garlic
• Queso dip (because more cheese is always right)
For More recipes, Follow me on Facebook!