Oh my gosh, let me tell you about my absolute go-to lifesaver recipe – these insanely delicious chicken sliders with rotisserie chicken! I swear, nothing saves my bacon faster when unexpected guests show up or when I’m just too wiped out to cook from scratch. That golden-brown rotisserie chicken from the grocery store? Total game-changer. It’s already packed with flavor, and when you mix it with just a few pantry staples, you’ve got slider magic ready in under 30 minutes.

Table of Contents
Table of Contents
I first made these for my niece’s birthday party when I realized – oops! – I’d completely forgotten to prep enough food. Twenty minutes later, I was pulling two trays of these warm, cheesy sliders out of the oven to a crowd of very happy (and very hungry) teenagers. Now they’re my signature dish for game nights, potlucks, or those “I need something tasty NOW” moments. The best part? You probably have most of these ingredients in your kitchen right this second.
As someone who’s spent years figuring out how to make quick meals that don’t taste quick, I can promise you these sliders deliver big flavor with minimal effort. That rotisserie chicken does all the heavy lifting while the Hawaiian rolls (trust me, they’re worth it!) soak up all the deliciousness. Let me show you how easy this is…
Why You’ll Love These Chicken Sliders with Rotisserie Chicken
Listen, I don’t just make these sliders because they’re easy—I make them because they disappear faster than I can say “dinner’s ready!” Here’s why they’ve become my secret weapon:
Quick and Easy
From fridge to table in under 30 minutes—that’s my kind of cooking! The rotisserie chicken means zero cooking stress. Just shred, mix, assemble, and pop in the oven. Even my teenager can make these (though he never gets the butter-brushing technique quite right—more for me!).
Crowd-Pleasing Flavor
That golden rotisserie chicken paired with melty provolone? Magic. The Hawaiian rolls soak up all the savory goodness while staying soft inside with that perfect crispy top. Last Thanksgiving, my uncle ate six before I could stop him—true story.
Perfect for Any Occasion
Game day? Check. Last-minute potluck? Check. “Mom forgot to meal prep again” Wednesday night? Double check. These sliders work for everything—I’ve served them at baby showers, backyard BBQs, and even fancy-ish brunches (just add mimosas). They’re the culinary equivalent of that friend who fits in anywhere.
Ingredients for Chicken Sliders with Rotisserie Chicken
Okay friends, here’s everything you’ll need to make these addictive little sliders. I’m going to walk you through exactly what works best based on my many (many!) test batches. The key is using quality ingredients that do the work for you – that’s why rotisserie chicken is our MVP here!

The Chicken Filling
- 2 cups shredded rotisserie chicken – Not chopped, not diced – shredded! I use two forks to pull it apart into nice, juicy strands (white and dark meat mixed is perfect)
- 1/2 cup mayonnaise – Full-fat please! This binds everything together and adds that creamy richness
- 1 tablespoon Dijon mustard – My secret flavor booster – just enough tang without overpowering
- 1/2 teaspoon garlic powder + 1/2 teaspoon onion powder – The dynamic duo that makes everything taste better
- Salt and pepper to taste – I start with 1/4 teaspoon salt and 1/8 teaspoon pepper, then adjust
The Assembly
- 12 slider buns – Hawaiian rolls are my absolute favorite here – that touch of sweetness is everything
- 6 slices provolone or mozzarella cheese – Provolone melts like a dream, but mozz works great too (cut each slice in half to cover all 12 sliders)
- 2 tablespoons unsalted butter, melted – For that golden, crispy top
- 1 tablespoon finely chopped parsley – Fresh looks prettiest, but dried works in a pinch
- 1/2 teaspoon poppy seeds (optional) – Adds nice little crunch if you’ve got them
See? Nothing crazy or hard-to-find. Just simple ingredients that come together to make something way more than the sum of its parts. Now let’s get mixing!
How to Make Chicken Sliders with Rotisserie Chicken
Alright, let’s get cooking! I promise this is so simple even my cat could probably do it (if she had opposable thumbs). Follow these steps and you’ll have golden, cheesy sliders that’ll make everyone think you slaved for hours.

Prep the Chicken Mixture
First, preheat that oven to 350°F (175°C) – trust me, you don’t want to realize you forgot this step when your sliders are assembled and ready to go! While it’s heating, grab a big bowl and toss in your shredded chicken. Add the mayo, Dijon, garlic powder, onion powder, salt, and pepper. Now here’s my trick – mix it with your hands!
Sounds messy, but it’s the best way to make sure every strand of chicken gets coated evenly. The mixture should hold together when you press it – if it seems dry, add another tablespoon of mayo. Taste it – this is your chance to adjust the seasoning before baking!
Assemble the Sliders
Take your Hawaiian rolls (still connected if possible) and slice the whole pack horizontally – like you’re making one giant sandwich. Place the bottom halves in your greased baking dish. Now spread that chicken mixture evenly across all the rolls – I use a spoon first, then gently press with clean fingers to make sure it reaches the edges.
Next, layer your cheese slices (torn to fit if needed). Here’s where I sometimes get fancy – a sprinkle of smoked paprika or a few sliced green onions if I’m feeling extra. Then pop the top halves back on like little edible blankets.
Bake to Perfection
Mix your melted butter with parsley and poppy seeds (if using), then brush it generously over the tops – this is what gives that gorgeous golden color! Now, the foil trick: cover loosely with foil and bake for 10 minutes. This lets the cheese melt perfectly without over-browning the tops.
Remove the foil and bake another 5-7 minutes until they’re golden brown and smell irresistible. Watch closely those last few minutes – Hawaiian rolls brown fast! Let them cool just 2 minutes before separating (if you can wait that long).
Print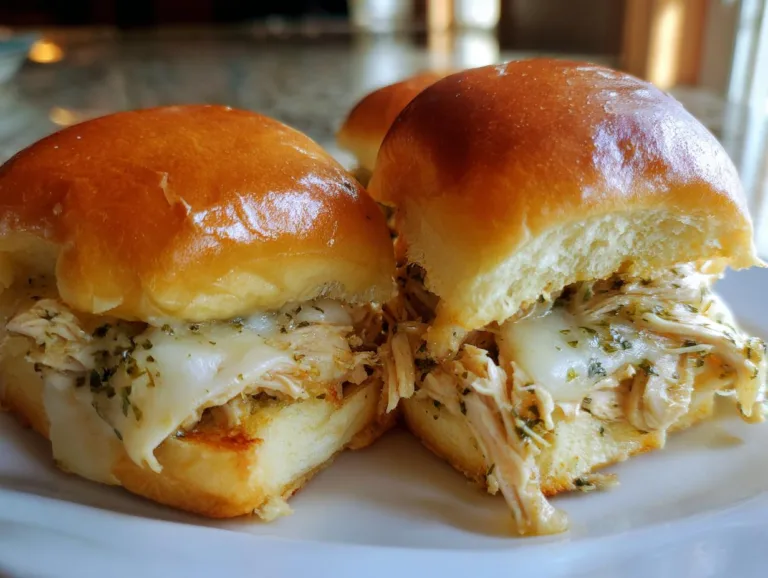
Chicken Sliders with Rotisserie Chicken – Heavenly Flavor!
Easy and delicious chicken sliders made with rotisserie chicken, perfect for quick meals or gatherings.
- Total Time: 27 minutes
- Yield: 12 sliders 1x
Ingredients
- 12 slider buns (Hawaiian rolls work best)
- 2 cups shredded rotisserie chicken
- 1/2 cup mayonnaise
- 1 tablespoon Dijon mustard
- 1/2 teaspoon garlic powder
- 1/2 teaspoon onion powder
- Salt and pepper to taste
- 6 slices provolone or mozzarella cheese
- 2 tablespoons unsalted butter, melted
- 1 tablespoon finely chopped parsley
- 1/2 teaspoon poppy seeds (optional)
Instructions
- Preheat oven to 350°F (175°C). Lightly grease or line a baking dish with parchment paper.
- Slice the slider buns horizontally to separate tops from bottoms. Place the bottom halves in the prepared baking dish.
- In a bowl, mix shredded rotisserie chicken with mayonnaise, Dijon mustard, garlic powder, onion powder, salt, and pepper.
- Spread the chicken mixture evenly over the bottom halves of the buns.
- Layer cheese slices over the chicken mixture.
- Place the top halves of the buns over the cheese to close the sliders.
- In a small bowl, mix melted butter with parsley and poppy seeds (if using). Brush the tops of the buns generously with the butter mixture.
- Cover the dish loosely with foil and bake for 10 minutes. Remove foil and bake for an additional 5–7 minutes, or until the tops are golden brown and cheese is melted.
- Serve warm and enjoy!
Notes
- Use Hawaiian rolls for a slightly sweet flavor.
- Adjust seasoning to taste.
- Add poppy seeds for extra crunch.
- Prep Time: 10 minutes
- Cook Time: 17 minutes
- Category: Appetizer
- Method: Baking
- Cuisine: American
- Diet: Low Lactose
Nutrition
- Serving Size: 1 slider
- Calories: 220
- Sugar: 3g
- Sodium: 380mg
- Fat: 12g
- Saturated Fat: 4g
- Unsaturated Fat: 6g
- Trans Fat: 0g
- Carbohydrates: 18g
- Fiber: 1g
- Protein: 10g
- Cholesterol: 30mg
Tips for the Best Chicken Sliders with Rotisserie Chicken
After making these sliders more times than I can count (seriously, my neighbors now expect them whenever they smell butter melting), I’ve picked up some foolproof tricks to make them absolutely perfect every time.

Bun Selection
Don’t even think about using regular dinner rolls – Hawaiian rolls are the secret weapon here! That hint of sweetness plays so nicely with the savory chicken. When shopping, look for the King’s Hawaiian brand – their texture holds up beautifully during baking without getting soggy. If you can’t find them, brioche buns make a decent backup, but they’ll never be quite as magical.
Cheese Melting
Here’s where I learned the hard way – not all cheeses melt equally! Provolone is my gold standard because it gets gloriously gooey without separating. Mozzarella works in a pinch, but it can get a bit rubbery if overbaked. Whatever you do, avoid pre-shredded cheese – those anti-caking agents prevent that smooth melt we’re after. And here’s my sneaky trick: tear the cheese slices rather than cutting them – the rough edges melt more evenly across the chicken.
One last pro tip – if your sliders seem to brown too fast, tent them with foil after the first 5 minutes of uncovered baking. This gives the cheese extra time to melt perfectly while preventing burnt tops. Happy baking!
Variations for Chicken Sliders with Rotisserie Chicken
Oh, the fun part! Once you’ve mastered the basic recipe (which, let’s be honest, is already perfection), try these easy twists to keep things exciting. I love playing with variations depending on who’s coming over or what ingredients I’ve got hanging around the fridge.
Spicy Twist
For my heat-loving friends, I’ll mix in a tablespoon of sriracha or chipotle hot sauce right into the chicken mixture. Sometimes I’ll layer thin jalapeño slices under the cheese – the heat mellows beautifully while baking. My brother begs for these with pepper jack cheese instead of provolone – talk about a flavor explosion!
Veggie Boost
When I want to feel slightly virtuous, I’ll toss baby spinach leaves over the chicken before adding cheese – they wilt perfectly in the oven. Avocado slices added after baking are another favorite (just don’t bake them – they’ll turn bitter). My vegetarian sister-in-law loves when I make a separate batch with roasted mushrooms instead of chicken – same delicious seasonings!
The beauty of these sliders? They’re like a blank canvas for your cravings. I’ve even done a buffalo version with blue cheese crumbles that disappeared in minutes. What will you try first?
Serving Suggestions
Oh, let me tell you how I love to serve these sliders – they’re like the social butterflies of the food world! A big tray of these golden beauties practically begs for fun sides. My go-to? A tangy homemade coleslaw that cuts through the richness perfectly.
Those little dill pickles spears? Absolute must – the crunch and acidity balance everything so well. For game days, I’ll throw some crispy potato wedges on the side, and for fancier gatherings, a simple arugula salad with lemon vinaigrette. Honestly though? They’re so good they don’t need sides – just napkins and happy eaters!
Storage and Reheating
Okay, let’s be real—leftovers rarely happen with these sliders in my house! But if you’re lucky enough to have some, here’s how to keep them tasting fresh: Store cooled sliders in an airtight container for up to 3 days. When reheating, skip the microwave (soggy buns = sad day).
Instead, pop them in a 350°F oven for 5-7 minutes to revive that crispy top. Pro tip: A quick brush of melted butter before reheating makes them taste just-baked. For longer storage, wrap individual sliders in foil and freeze for up to a month—perfect for emergency snack attacks!
Nutritional Information
Now, I know what you’re thinking – “But Martavia, how bad are these delicious little sliders for me?” Here’s the scoop: Each slider runs about 220 calories with 10g protein. But let’s be real – nutrition facts can change based on your exact ingredients (like if you go heavy on that cheese like I sometimes do!).
These numbers are estimates, so if you’re counting closely, adjust based on your brands and portions. Either way, life’s too short not to enjoy a warm, cheesy slider now and then!
Frequently Asked Questions
After making these sliders for every occasion under the sun, I’ve heard all the questions! Here are the answers to the ones I get asked most – straight from my kitchen to yours.
Can I use fresh chicken instead of rotisserie?
Absolutely! While rotisserie chicken is my lazy-day hero, you can totally use fresh. Just roast or poach 2 chicken breasts (season them well!), let them cool, then shred. But here’s my confession – I only do this when I’m feeling fancy. The rotisserie version saves at least 30 minutes and has that incredible pre-seasoned flavor we all love.
How do I prevent soggy buns?
Ah, the great slider dilemma! My two golden rules: 1) Don’t overdo the mayo in your chicken mixture – it should coat the chicken without being swimming in it. 2) That butter brushing isn’t just for looks – it creates a protective barrier that keeps bottoms crisp. Also, always bake uncovered those last few minutes – that final blast of heat works wonders!
Can I make these ahead?
You bet! Here’s my party-prep secret: Assemble the sliders completely (butter topping and all), cover tightly, and refrigerate up to 24 hours before baking. Just add 2-3 extra minutes to the baking time since they’ll be cold. The flavors actually get better as they sit! For longer storage, freeze before baking (up to 1 month), then bake straight from frozen, adding 10-12 minutes to the cook time.
Try this recipe and share your results below! Did you stick to the classic version or try one of my fun twists? I can’t wait to hear how yours turn out! You can also find more delicious recipes on our recipe page.
For More recipes, Follow me on Facebook!