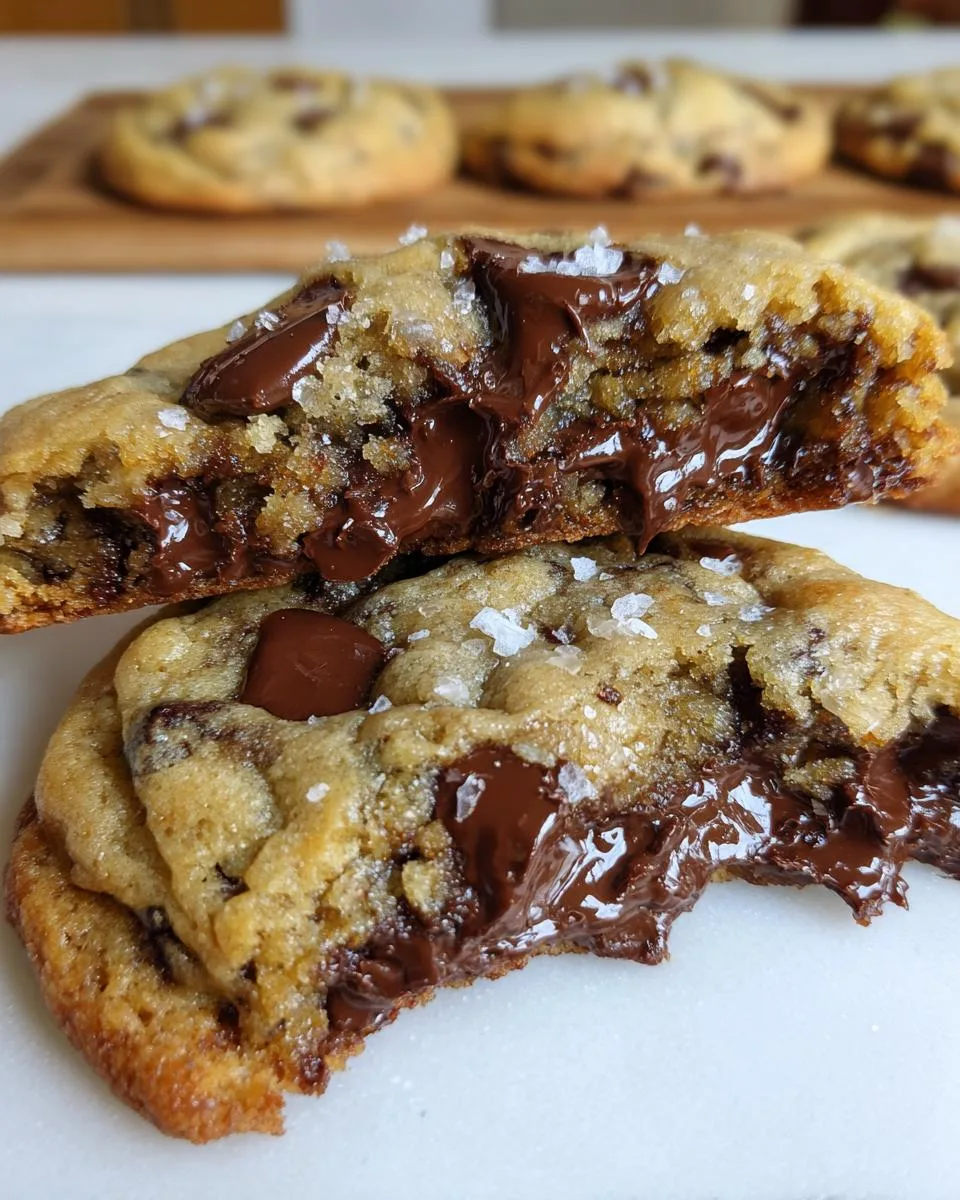
You know that moment when you bite into a bakery-style chocolate chip cookie – crisp edges giving way to a chewy center packed with melty chocolate chips? That’s exactly what I craved one rainy afternoon when my best friend and I decided to recreate our favorite coffee shop treat. After testing dozens of recipes (and eating way too many cookies!), we finally nailed it. These bakery-style chocolate chip cookies strike the perfect balance – golden and slightly crisp outside, soft and tender inside, with pools of chocolate in every bite. The secret? A mix of semisweet and dark chocolate chips, melted butter for richness, and just enough chilling time to develop incredible flavor.
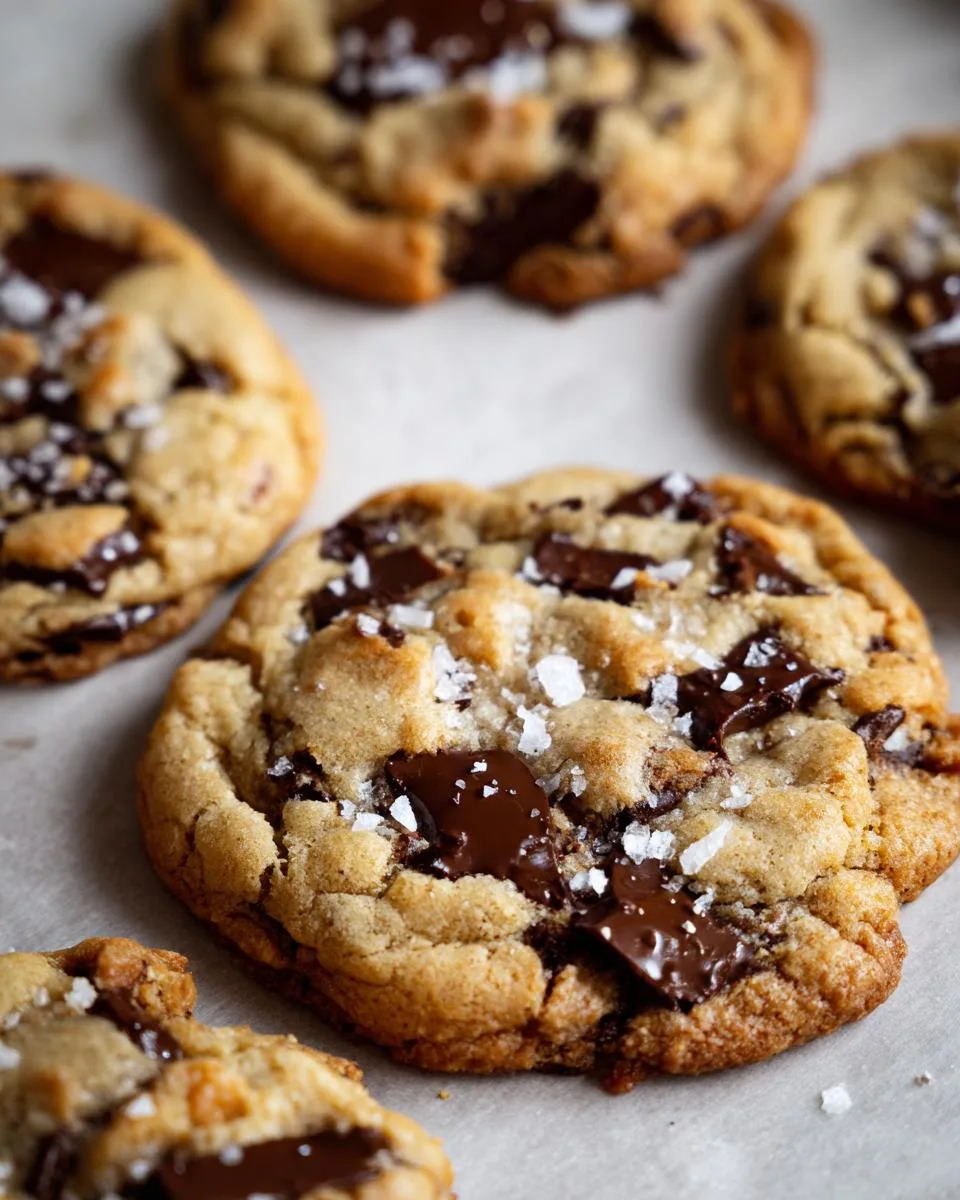
Table of Contents
Table of Contents
Why You’ll Love These Bakery Style Chocolate Chip Cookies
Trust me, these cookies will become your new go-to recipe for so many reasons:
- Easy-peasy – No fancy techniques, just simple mixing and chilling. Perfect for when that cookie craving hits hard!
- That dreamy texture – Crispy golden edges hugging a soft, buttery center with melty chocolate in every bite.
- Chocolate heaven – The mix of semisweet and dark chips gives that professional bakery flavor you can’t find in store-bought cookies.
- Always a hit – Whether it’s for bake sales, potlucks, or just because, these disappear faster than you can say “second batch!”
My neighbor’s kids literally come knocking when they smell these baking – that’s how good they are!
Ingredients for Bakery Style Chocolate Chip Cookies
Here’s everything you’ll need to make these dreamy cookies – and trust me, every ingredient plays a special role in creating that perfect bakery-style texture and flavor:
- 14 tablespoons unsalted butter – Melted and slightly cooled (about 200g or 1¾ sticks). The melted butter gives that perfect chew while keeping the edges crisp. Just make sure it’s not piping hot when you mix it in!
- 1 cup granulated sugar (200g) – For that classic sweetness and helps create those crisp edges we love.
- ½ cup packed light brown sugar (100g) – Really pack it in there! The molasses in brown sugar adds moisture and that deep caramel note.
- 2 large eggs – Straight from the fridge is fine, but let them sit out for 10 minutes if you remember. They bind everything together beautifully.
- 1 teaspoon vanilla extract – The good stuff, please! It makes all the difference in flavor.
- 2½ cups all-purpose flour (312g) – Spoon and level this – no scooping directly from the bag or your cookies will be dry.
- 1 teaspoon baking soda – Our leavening agent for just the right amount of lift.
- ½ teaspoon salt – I prefer fine sea salt, but table salt works too. This balances all the sweetness.
- 3 cups chocolate chips (about 18oz) – Here’s my secret: use a mix of semisweet (about 2 cups) and dark chocolate chips (1 cup) for bakery-quality depth. Guittard or Ghirardelli are my go-tos.
- Optional extras – Extra chips for pressing on top before baking, and flaky sea salt for that gourmet finishing touch!
Pro tip: Measure your flour right – too much makes dry cookies! I like to whisk mine first, then spoon it gently into my measuring cup and level it off with a knife. And don’t skip chilling the dough (more on that later) – it’s what gives these cookies their perfect texture.
Ingredient Substitutions
Baking is all about creativity, so don’t stress if you’re missing an ingredient! Here are my tried-and-true swaps that still deliver amazing bakery-style cookies – though I’ll be honest, nothing beats the original recipe:
- Butter – In a pinch, you can use salted butter (just reduce added salt by ¼ tsp). Margarine works too, but cookies may spread more and lack that rich flavor. For dairy-free, I’ve had luck with high-quality vegan butter sticks (Earth Balance is my go-to).
- Sugars – All granulated sugar? Use 1½ cups total – cookies will be crisper. All brown sugar? They’ll be chewier and darker. Coconut sugar works but expect a more caramel-like flavor. Just don’t use liquid sweeteners – the texture will be way off!
- Chocolate chips – No semisweet? All dark chocolate is heavenly. Milk chocolate makes sweeter cookies (reduce sugar by 2 tbsp if using). Chopped chocolate bars create gorgeous puddles – just aim for similar total weight (about 18oz). White chocolate chips? Sure, but add ½ tsp extra vanilla.
- Eggs – For one egg, mix 1 tbsp ground flaxseed + 3 tbsp water (let sit 5 mins). Cookies will be slightly denser but still delicious. Applesauce (¼ cup per egg) works too, but expect cake-like texture.
- Flour – Need gluten-free? Use a 1:1 GF blend (Bob’s Red Mill works great). Whole wheat flour can replace up to half the all-purpose – cookies will be heartier with a nutty flavor.
Fair warning – every substitution changes the texture and flavor a bit. My neighbor once used coconut oil instead of butter (she was out!) and while the cookies tasted good, they spread like crazy and had a distinct coconut flavor. Not bad – just different! The beauty of baking is making it your own.
Equipment You’ll Need
Don’t worry – you probably already have everything required for these bakery-style chocolate chip cookies! Here’s what I grab:
- Mixing bowls – One large for wet ingredients, medium for dry
- Baking sheets – Standard half-sheet pans work perfectly
- Parchment paper – Lifesaver for easy cleanup and preventing sticking
- Measuring cups & spoons – Accuracy matters with baking!
- Rubber spatula – For folding in all those chocolate chips
- Cookie scoop (optional) – Creates uniform cookies, but a spoon works too
That’s it! No fancy gadgets needed – just good old-fashioned baking tools.
How to Make Bakery Style Chocolate Chip Cookies
Alright, let’s dive into the magic of creating these perfect bakery-style cookies! I’ll walk you through each step with all my favorite tips – the same ones I use when baking these for my cookie-obsessed friends.
Mixing the Dough
First things first – whisk together your dry ingredients: flour, baking soda, and salt in a medium bowl. Set this aside while you work on the good stuff – the wet ingredients! In a large bowl, beat together the melted (but slightly cooled) butter with both sugars until smooth and creamy. Don’t rush this step – about 1 minute of mixing makes all the difference in texture.
Now add eggs one at a time, mixing well after each. I like to crack them into a small bowl first – just in case of shell bits. Stir in the vanilla – that heavenly scent means we’re getting close! Gradually add the dry ingredients to the wet mixture, mixing just until combined. Overmixing leads to tough cookies, and nobody wants that.
Here comes the best part – fold in those glorious chocolate chips! I reserve about ½ cup to press on top later. The dough will be thick and oh-so tempting to eat raw (I won’t judge). Now, cover the bowl and chill for at least 1 hour – this is non-negotiable for that perfect bakery-style texture. Overnight is even better if you can wait!
Baking the Cookies
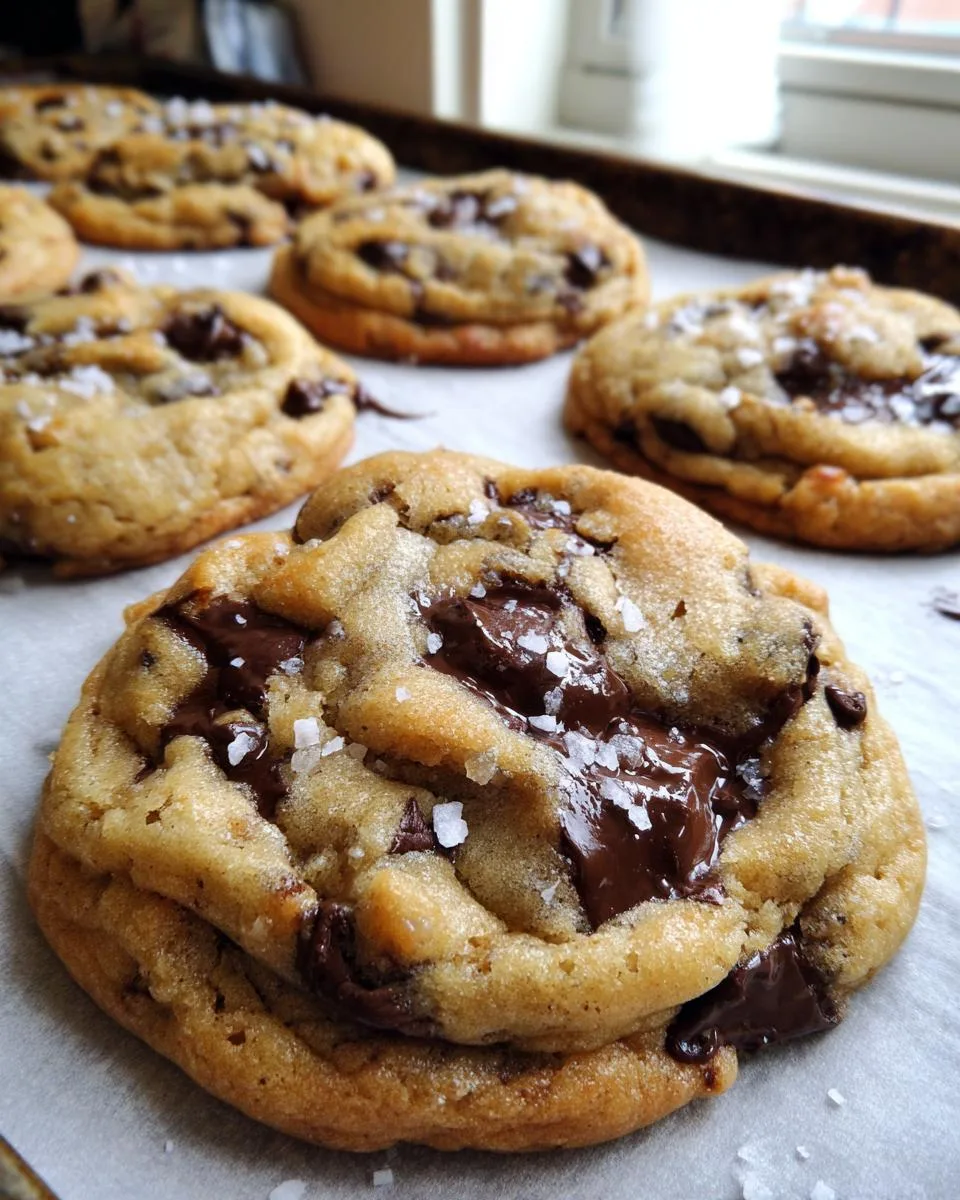
When you’re ready to bake, preheat your oven to 375°F (190°C) and line baking sheets with parchment paper. Here’s my pro tip: scoop the dough into balls slightly taller than they are wide – about 3 tablespoons each. This helps create that perfect thick-and-chewy bakery shape. Space them about 2 inches apart – they’ll spread just enough.
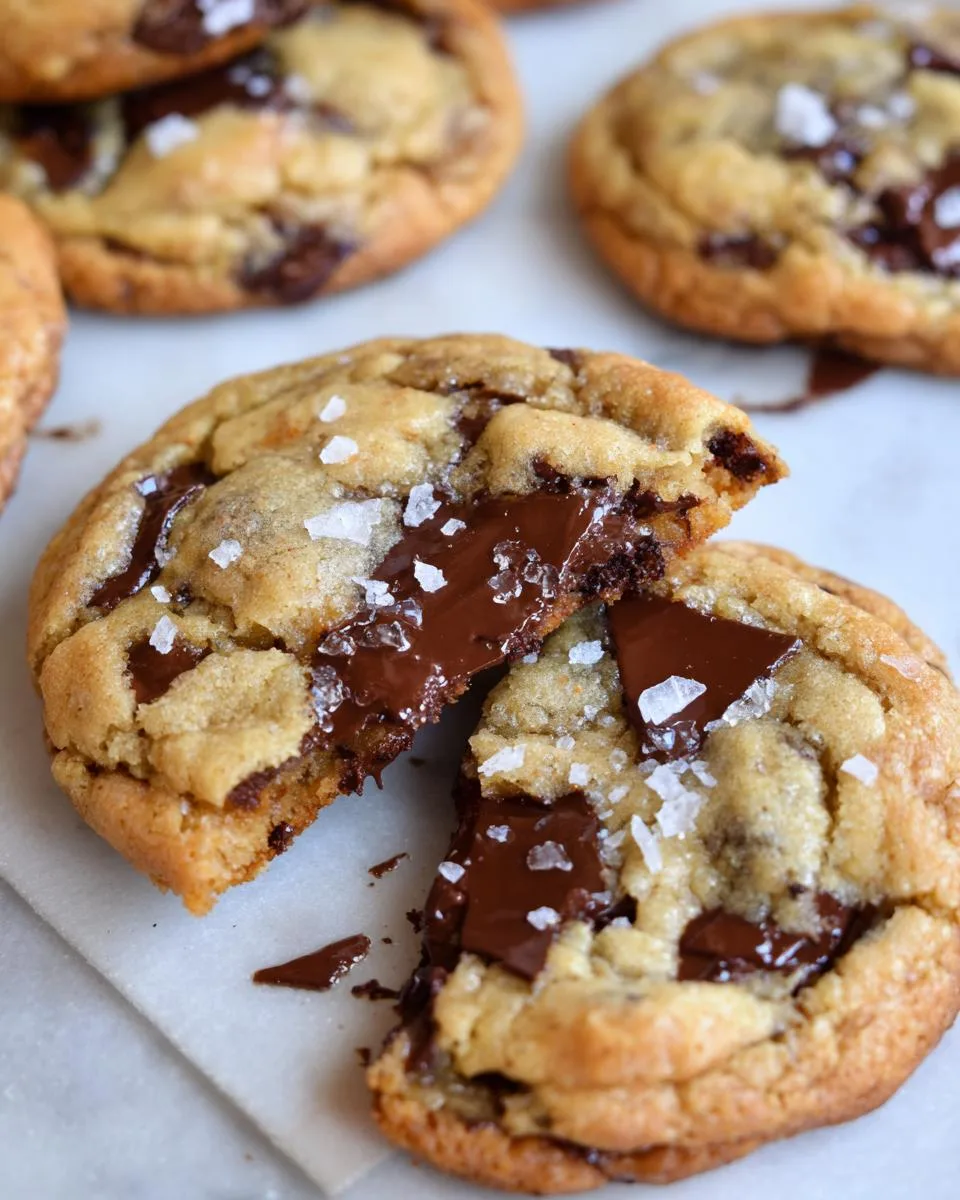
Now press those reserved chocolate chips on top – this gives that gorgeous bakery look with melty pools of chocolate. Bake for 10-13 minutes until the edges are golden but centers still look soft. They’ll seem underdone, but trust me – this is the secret to soft centers! Every oven is different, so check at 10 minutes.
Cooling and Serving
Here’s where patience comes in – let the cookies cool on the baking sheet for 5-10 minutes. This allows them to set properly (and gives you time to sneak a warm bite). Then transfer to a wire rack to cool completely – if you can resist eating them all immediately!
For that final bakery touch, sprinkle with flaky sea salt while still slightly warm. The salty-sweet combo is absolutely divine. Serve with cold milk for the ultimate experience. And yes, the cookie dough balls freeze beautifully for instant cookie cravings – just add 1-2 minutes to the bake time straight from frozen!
Print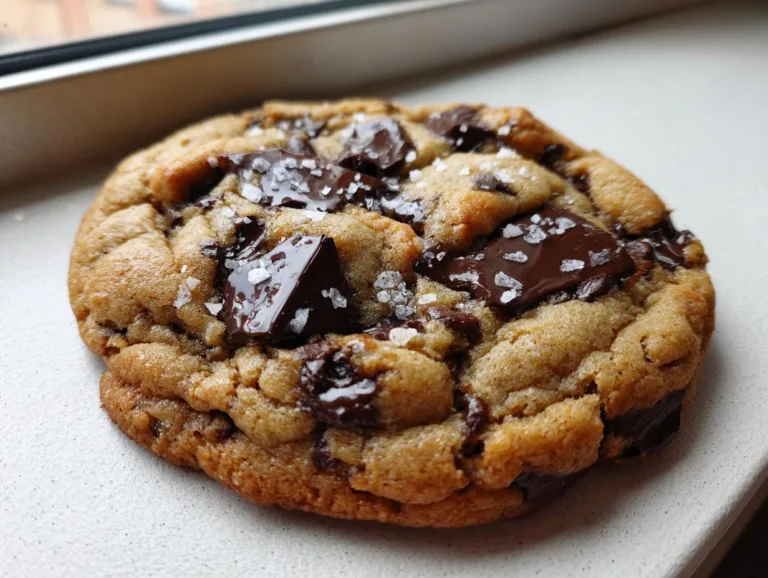
Top 16 Tips for Best Bakery Style Chocolate Chip Cookies
Bakery-style chocolate chip cookies with a perfect balance of chewiness and crisp edges, loaded with chocolate chips.
- Total Time: 1 hour 28 minutes (including chilling)
- Yield: 24 cookies 1x
Ingredients
- 2 large eggs
- 2½ cups all-purpose flour
- 1 teaspoon baking soda
- ½ teaspoon salt or sea salt
- 1 cup granulated sugar
- ½ cup packed light brown sugar
- 1 teaspoon vanilla extract
- 3 cups chocolate chips (mix of semisweet and dark)
- 14 tablespoons unsalted butter, melted and slightly cooled
- Optional: Extra chocolate chips and flaky sea salt for topping
Instructions
- Mix flour, baking soda, and salt in a bowl. Set aside.
- Beat melted butter, granulated sugar, and brown sugar until smooth. Add eggs one at a time, then stir in vanilla.
- Gradually add dry ingredients to wet mixture. Fold in chocolate chips, reserving some for topping.
- Chill dough for at least 1 hour or overnight.
- Preheat oven to 375°F (190°C). Line baking sheets with parchment paper.
- Scoop dough into balls, slightly taller than wide. Press extra chocolate chips on top.
- Bake for 10–13 minutes until edges are golden and centers are soft.
- Cool on baking sheet for 5–10 minutes, then transfer to a wire rack. Sprinkle with flaky sea salt if desired.
Notes
- Chilling the dough prevents spreading and enhances flavor.
- Underbaking slightly ensures soft centers.
- Use a mix of semisweet and dark chocolate for a bakery-style taste.
- Prep Time: 15 minutes
- Cook Time: 13 minutes
- Category: Dessert
- Method: Baking
- Cuisine: American
- Diet: Vegetarian
Nutrition
- Serving Size: 1 cookie
- Calories: 220
- Sugar: 18g
- Sodium: 120mg
- Fat: 11g
- Saturated Fat: 7g
- Unsaturated Fat: 3g
- Trans Fat: 0g
- Carbohydrates: 28g
- Fiber: 1g
- Protein: 3g
- Cholesterol: 35mg
Tips for Perfect Bakery Style Chocolate Chip Cookies
After burning through more batches than I’d care to admit, here are my hard-earned secrets for cookie perfection every time:
- Chill that dough! At least 1 hour – overnight is golden. Cold dough = thick, chewy cookies that don’t spread into pancakes.
- Underbake on purpose – Pull them out when centers look slightly underdone. They’ll firm up perfectly as they cool.
- Quality chocolate matters – Splurge on good chips (I love Ghirardelli 60% cacao) – they melt into those gorgeous pools.
- Weigh your flour – Too much makes hockey pucks. 312g is the sweet spot.
- Shape matters – Roll dough balls taller than wide for that bakery-style thick-and-chewy texture.
Bonus: If dough seems sticky after chilling, just wet your hands slightly when shaping – works like a charm!
Storage and Reheating
These bakery-style chocolate chip cookies stay incredibly fresh when stored right – if they last that long in your house! Here’s how to keep them tasting like they just came out of the oven:
Room temperature storage: Let cookies cool completely, then tuck them into an airtight container with a slice of bread. The bread works magic – it keeps the cookies soft by absorbing excess moisture! They’ll stay perfect for 3-5 days this way (just swap the bread daily if it gets hard).
Freezing baked cookies: Layer cooled cookies between parchment paper in a freezer bag or container. They’ll keep for up to 3 months! When the craving hits, just grab what you need – no thawing required. Pop them in a 300°F oven for 5 minutes, and they’ll taste freshly baked.
Freezing the dough: My secret weapon! Portion the dough balls onto a baking sheet, freeze until solid (about 2 hours), then transfer to a freezer bag. Bake straight from frozen – just add 1-2 minutes to the bake time. Perfect for when unexpected guests arrive or when you need just one… okay, maybe three cookies.
Reviving day-old cookies: If your cookies lose their magic after a couple days (though mine never last that long!), place one on a microwave-safe plate with a damp paper towel. Heat for 5-8 seconds – just enough to make the chocolate melty again without turning them rubbery. Pure bliss!
Bakery Style Chocolate Chip Cookies FAQ
After years of baking these cookies (and answering my friends’ frantic texts!), here are the questions I get asked most often – with all my best troubleshooting tips baked right in:
Can I skip chilling the dough?
Oh honey, I wish! That chill time is what gives bakery-style cookies their perfect texture. Cold dough bakes up thicker and chewier instead of spreading into sad, flat disks. If you’re really in a pinch, 30 minutes in the freezer helps, but 1 hour minimum in the fridge makes all the difference. Pro tip: I always make extra dough balls to freeze – future me is so grateful when cookie cravings strike!
Why did my cookies spread too much?
We’ve all been there! The usual suspects: butter too warm (should be just melted, not hot), dough not chilled enough, or your baking soda might be old (check the expiration date!). Also, watch your oven temp – if it runs cool, the dough melts before setting. Next time, try chilling the shaped dough balls for 15 minutes before baking – works like a charm!
Can I use all dark chocolate chips?
Absolutely! I actually do this sometimes when I’m feeling fancy. The cookies will have a deeper, richer chocolate flavor – perfect for dark chocolate lovers. Just keep an eye on baking time since dark chocolate burns more easily. And if you go this route, you might want to sprinkle a tiny bit more sea salt on top to balance the bitterness.
How do I get those pretty chocolate pools on top?
Here’s my little trick: reserve about ½ cup of chocolate chips when mixing the dough. After scooping the balls, press 3-4 extra chips right onto the tops before baking. As they melt, they create those gorgeous, Instagram-worthy chocolate puddles. Bonus points if you use a mix of chopped chocolate and chips – the irregular pieces make even more beautiful pools!
Can I halve/double this recipe?
Of course! The recipe scales beautifully. For half batches, just use 1 egg + 1 yolk instead of trying to split an egg. Doubling? Make sure your mixing bowl is big enough – this dough gets hefty! One note: baking times might need slight adjustment when changing batch sizes, so keep an eye on your first tray.
Nutritional Information
Now, I’m no nutritionist (just a cookie enthusiast!), but I know some folks like to keep track of these things. Here’s the scoop – these bakery-style chocolate chip cookies are definitely an indulgence, packed with all the good stuff like real butter and quality chocolate. The nutritional values are estimates and vary based on ingredients/brands used, especially when it comes to different chocolate chip varieties.
Each generously-sized cookie contains a balance of carbohydrates, fats, and a bit of protein – perfect for that afternoon pick-me-up or post-dinner treat. The brown sugar adds a touch of molasses nutrients, and if you use dark chocolate chips, you’re getting some antioxidants too! But let’s be real – we’re not eating these for their health benefits. They’re about pure, unapologetic joy.
Remember, baking is about celebration, not calculation. Enjoy every melty, chocolatey bite guilt-free – life’s too short to skip the good cookies!
For More recipes, Follow me on Facebook!