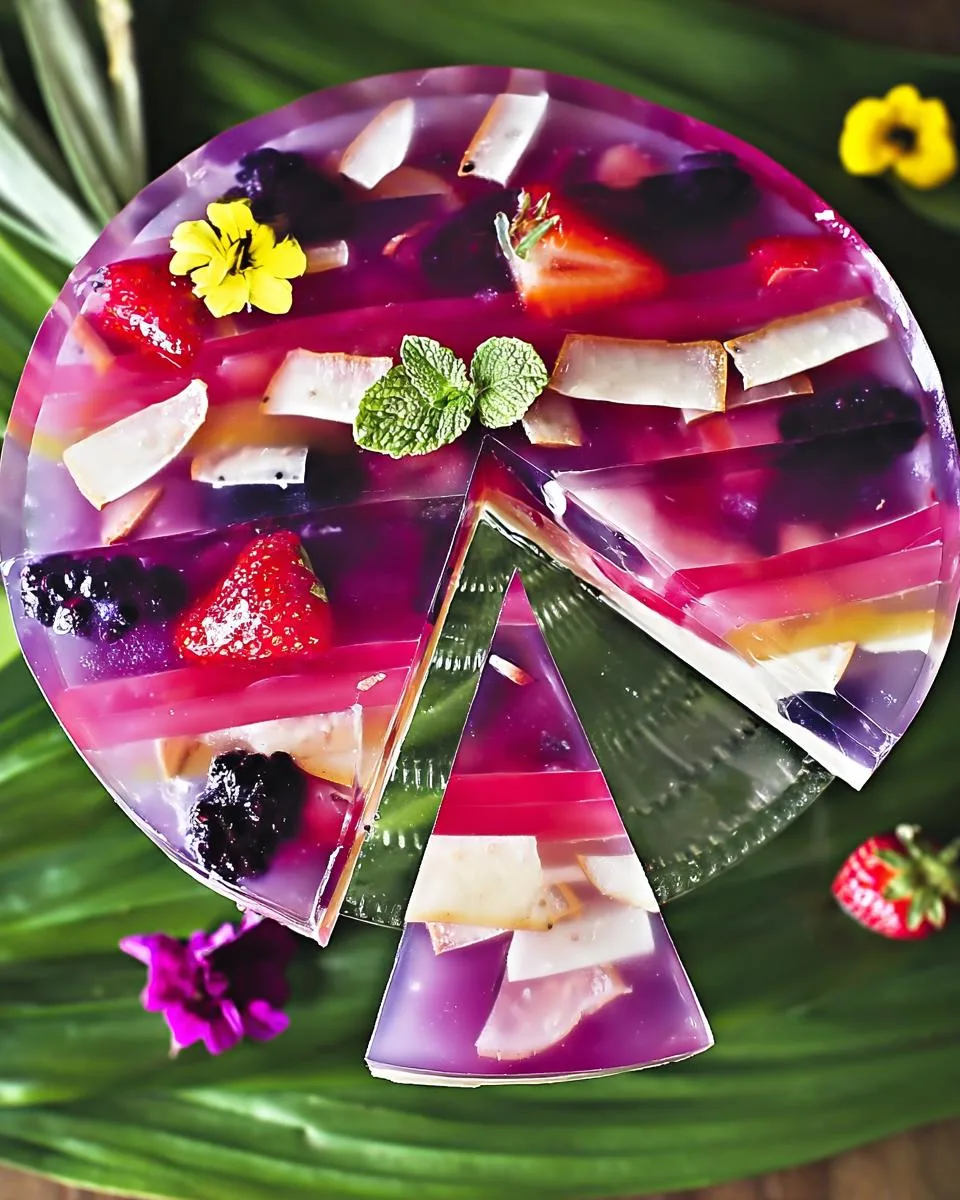
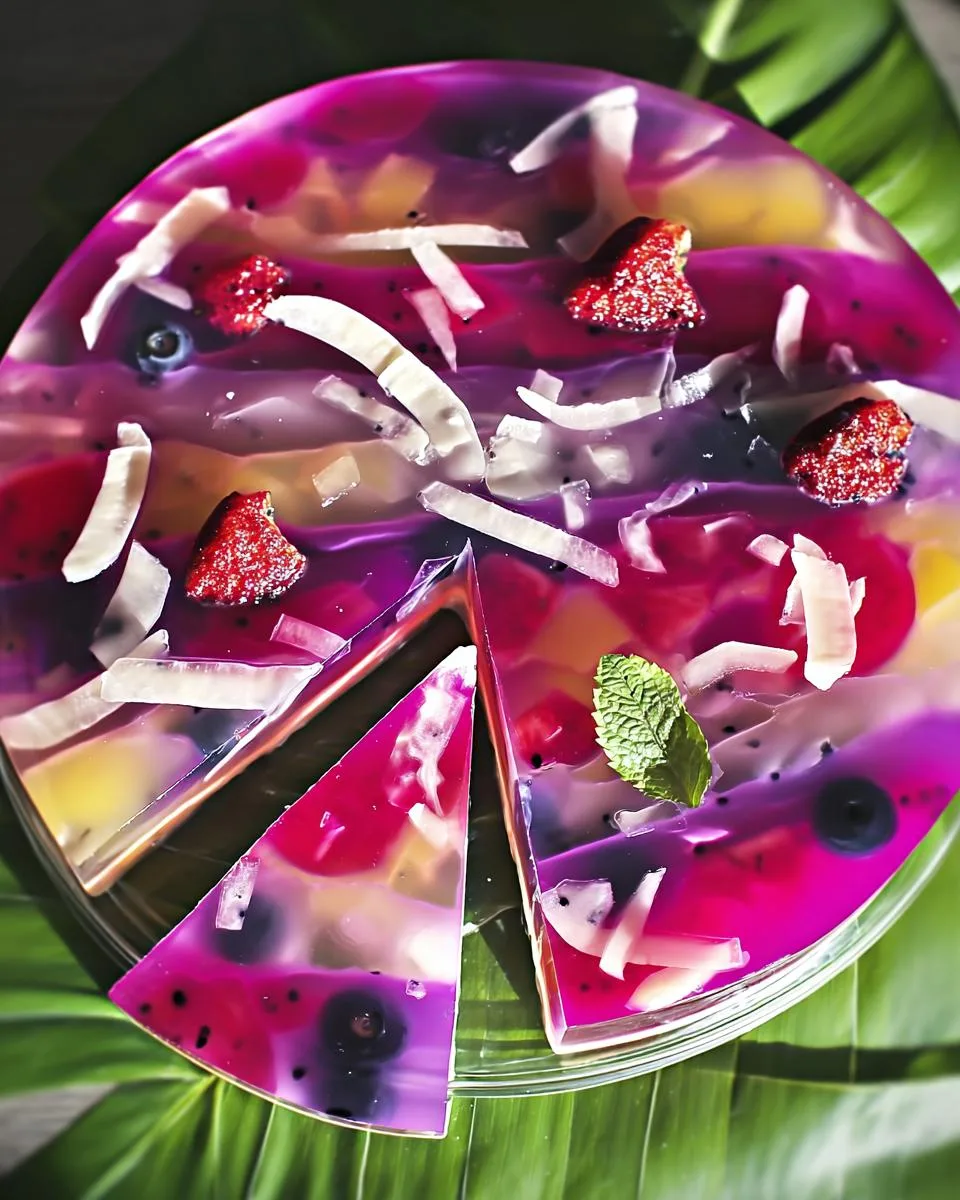
Oh my gosh, you guys—these Agar Agar Fruit Jelly Gems are my absolute obsession right now! Picture this: a creamy coconut base, a vibrant dragon fruit middle layer that looks like tiny sunsets, and a clear, jewel-like top that shimmers when the light hits it just right. The best part? They’re ridiculously easy to make with agar agar powder—no gelatin needed—and you can totally play with flavors. I love whipping these up for summer picnics or as a light, guilt-free dessert after dinner. Trust me, one bite of these wiggly, refreshing gems, and you’ll be hooked!
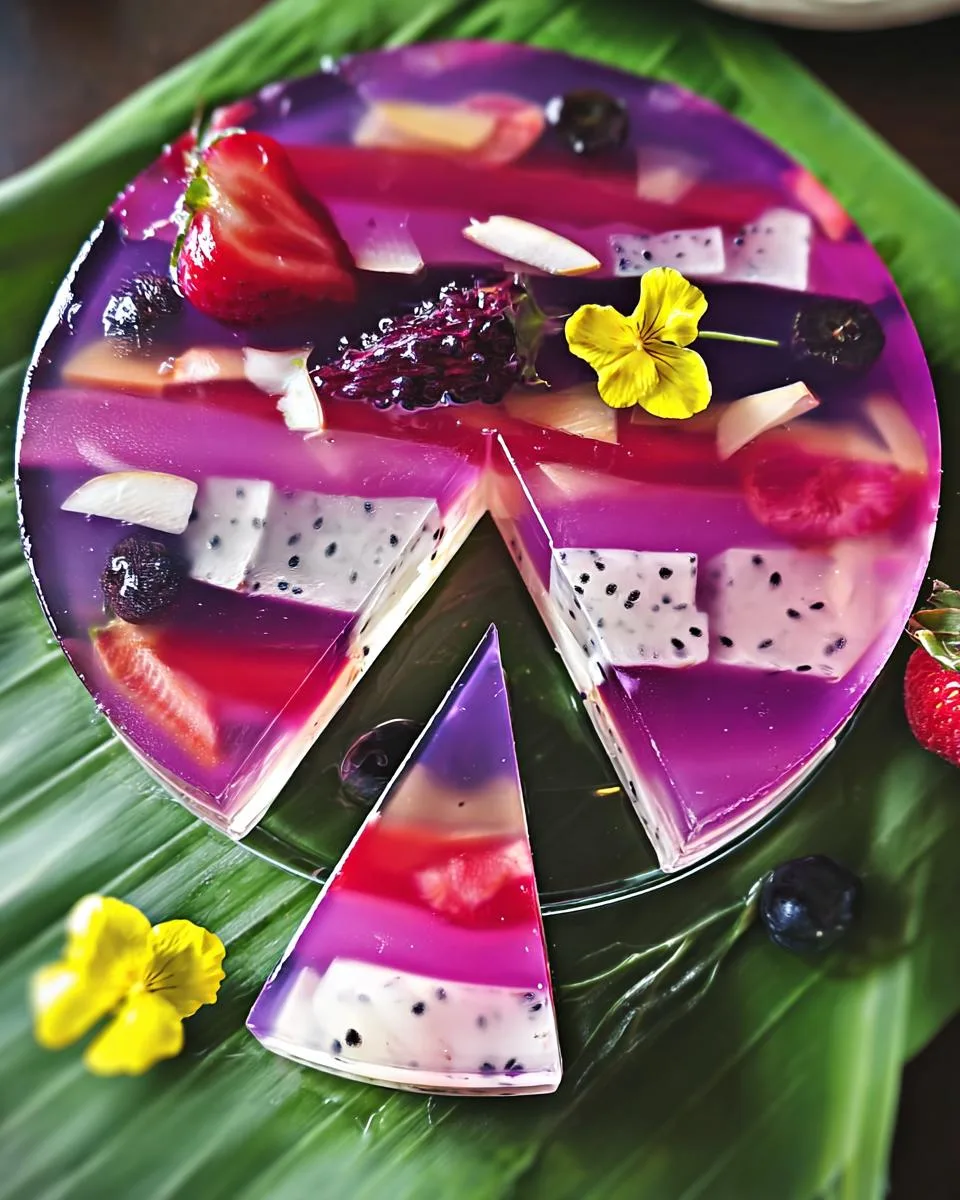
Table of Contents
Table of Contents
Ingredients for Agar Agar Fruit Jelly Gems
Okay, let’s gather our goodies! I swear by having everything measured and prepped before we start—it makes the whole process so much smoother. Pro tip: set up three little ingredient stations by layer so you don’t accidentally grab the wrong sugar amount mid-recipe (been there, done that!). Here’s exactly what you’ll need:
For the Coconut Base Layer
- 1 can (13.5 oz) coconut milk – full fat for that dreamy creaminess
- 1 tablespoon agar agar powder (use 1.5 tbsp if you like a firmer bite)
- ½ cup water – to bloom the agar agar
- ¼ cup sugar – I use organic cane sugar
- ½ teaspoon salt – just a pinch to balance the sweetness
For the Dragon Fruit Middle Layer
- 1 large dragon fruit (~1 lb) – peeled (trust me, remove that spiky skin!)
- 1.5 cups water – for blending into the purée
- ½ cup water – for the agar agar mixture
- 1 tablespoon agar agar powder (again, 1.5 tbsp for extra firmness)
- ⅓ cup sugar – adjust up if your dragon fruit is tart
For the Clear Top Layer
- 1.5 cups liquid – get creative! My faves are:
- Coconut water (so refreshing)
- Rose water (so fancy)
- Hibiscus tea (gorgeous pink hue)
- ½ cup water – for the agar agar mixture
- 1 tablespoon agar agar powder
- ⅓ cup sugar
Quick note about that dragon fruit purée—just blend the peeled fruit with the 1.5 cups water until silky smooth. No need to strain unless you spot black seeds bugging you (I kinda like the texture they add!). Now let’s make some magic happen!
How to Make Agar Agar Fruit Jelly Gems
Alright, let’s dive into the fun part—creating those gorgeous layers! I’ll walk you through each step like we’re cooking together in my kitchen. The key here is patience between layers (I know, I know—it’s hard to wait when something smells this good!). But trust me, letting each layer set slightly before adding the next is what gives you those picture-perfect, distinct stripes of yumminess.
Step 1: Prepare the Coconut Base Layer
First things first—let’s bloom that agar agar! In a small saucepan, whisk together the ½ cup water and agar agar powder. Let it sit for about 5 minutes—you’ll see it start to swell up and look kinda like wet sand. This step is crucial for getting that perfect jelly texture later.
Now, add your coconut milk, sugar, and that pinch of salt. Turn the heat to medium and—here’s my big warning—stir constantly! Coconut milk can scorch if you’re not careful, and nobody wants burnt-tasting jelly gems. You’re looking for tiny bubbles around the edges—just a gentle boil—and keep stirring until the agar agar completely dissolves. This usually takes 3-5 minutes. Test it by rubbing a bit between your fingers—no gritty bits means you’re golden!
Pour this creamy goodness into your molds (I use silicone ones for easy popping out later) or a glass dish if you’re going for squares. Let it sit at room temp for about 10 minutes—you want it slightly set but still warm when you add the next layer. If it cools too much, the layers won’t stick together properly!
Step 2: Create the Dragon Fruit Middle Layer
While your coconut layer is doing its thing, let’s make that showstopping pink layer! Blend your peeled dragon fruit with 1.5 cups water until smooth—it should look like a tropical smoothie. If you’re a texture person like me, leave the seeds in; if you want it super smooth, strain it through a fine mesh sieve.
Now, same drill as before: whisk together ½ cup water and agar agar powder in a clean saucepan, let it bloom for 5 minutes, then add your dragon fruit purée and sugar. Medium heat again, stirring constantly until it comes to that same gentle boil and the agar agar dissolves completely. The color will intensify as it heats—so pretty!
Here’s the tricky part: pouring without disturbing your coconut base. I use the back of a spoon to break the fall—just hold it close to the surface and let the mixture flow over it gently. Think of it like pouring beer to avoid too much foam! Let this layer set for another 10 minutes—it should be firm enough that your finger leaves just a slight indent when touched.
Step 3: Finish with the Clear Top Layer
Final stretch! Choose your liquid for this layer—I’m partial to rose water for that floral touch, but coconut water keeps it tropical. Same process: bloom 1 tbsp agar agar in ½ cup water, then add your chosen liquid and sugar. Heat until dissolved—you’ll know it’s ready when the mixture looks perfectly clear with no cloudiness.
Now the most delicate pour of all—you’ve worked hard for those clean layers! I tilt my mold slightly and pour down the side, or use that spoon trick again. The liquid should spread evenly without mixing with the pink layer beneath. Pop it in the fridge uncovered for at least 2 hours—I usually wait 4 for perfect firmness.
Pro tip: If you see any bubbles on top, gently poke them with a toothpick right after pouring. And don’t cover until fully set or you’ll get condensation ruining that glossy finish!
Print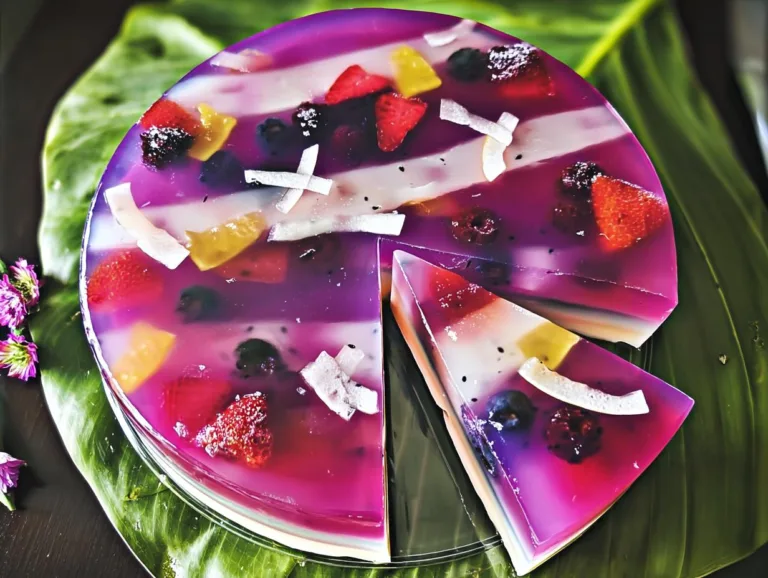
3-Ingredient Agar Agar Fruit Jelly Gems Recipe Magic
Agar Agar Fruit Jelly Gems are a delightful, multi-layered treat with a coconut base, dragon fruit middle layer, and clear top layer. Perfect for a refreshing dessert or snack.
- Total Time: 35 minutes (plus cooling time)
- Yield: 6–8 servings 1x
Ingredients
- 1 can (13.5 oz) coconut milk
- 1 tablespoon agar agar powder (for a softer set; use up to 1.5 tbsp for a firmer texture)
- ½ cup water (to dissolve agar agar powder)
- ¼ cup sugar
- ½ teaspoon salt
- 1.5 cups dragon fruit purée (blend about 1 large dragon fruit, ~1 lb with skin, peeled before use, with 1.5 cups water until smooth)
- ½ cup water (to dissolve agar agar powder)
- 1 tablespoon agar agar powder (for a softer set; use up to 1.5 tbsp for a firmer texture)
- ⅓ cup sugar (adjust to taste depending on fruit’s tartness)
- 1.5 cups liquid of choice (water, coconut water, rose, jasmine, hibiscus, or orange blossom water)
- ½ cup water (to dissolve agar agar powder)
- 1 tablespoon agar agar powder (for a softer set; use up to 1.5 tbsp for a firmer texture)
- ⅓ cup sugar
Instructions
- Make the Coconut Base: In a saucepan, whisk together ½ cup water and agar agar powder. Let sit for 5 minutes to bloom. Add coconut milk, sugar, and salt. Bring to a gentle boil over medium heat, stirring constantly until the agar agar fully dissolves (about 3–5 minutes). Pour the mixture into a mold or dish as the first layer. Let it cool slightly while you prepare the next layer — it will start to set quickly.
- Make the Dragon Fruit Layer: Blend dragon fruit with 1.5 cups water until smooth (should equal about 1.5 cups purée). In a saucepan, whisk together ½ cup water and agar agar powder. Let sit for 5 minutes to bloom. Add the purée and sugar. Bring to a gentle boil, stirring until the agar agar completely dissolves. Gently pour over the coconut layer. Use the back of a spoon to soften the fall so it doesn’t break the layer underneath. Let cool until just set.
- Make the Clear Top Layer: In a saucepan, whisk together ½ cup water and agar agar powder. Let sit for 5 minutes to bloom. Add 1.5 cups of your chosen liquid (coconut water, rose water, jasmine tea, hibiscus, or orange blossom water) and sugar. Bring to a gentle boil, stirring until the agar agar fully dissolves. Pour gently over the fruit layer. Allow to cool to room temperature, then refrigerate until fully set.
Notes
- Adjust sugar to taste based on the tartness of the fruit.
- For a firmer texture, use up to 1.5 tbsp agar agar powder per layer.
- Cool each layer slightly before adding the next to prevent breaking.
- Prep Time: 20 minutes
- Cook Time: 15 minutes
- Category: Dessert
- Method: Boiling, Layering
- Cuisine: Asian Fusion
- Diet: Vegetarian
Nutrition
- Serving Size: 1 piece
- Calories: 120
- Sugar: 15g
- Sodium: 100mg
- Fat: 5g
- Saturated Fat: 4g
- Unsaturated Fat: 1g
- Trans Fat: 0g
- Carbohydrates: 20g
- Fiber: 2g
- Protein: 1g
- Cholesterol: 0mg
Pro Tips for Perfect Agar Agar Fruit Jelly Gems
After making countless batches (and yes, some hilarious failures!), I’ve learned these game-changing tricks that’ll take your jelly gems from good to “can I have the recipe?” amazing:
1. Taste as You Go with Tart Fruits
That dragon fruit can vary wildly in sweetness! Before adding sugar to your mixture, dip a spoon in and taste. If it makes your lips pucker, add an extra tablespoon of sugar—but do it while the mixture is warm so it dissolves completely. I learned this the hard way after serving some face-twisting gems at a baby shower!
2. The Finger Test for Agar Agar
Don’t trust the timer—trust your fingers! After blooming the agar agar, rub a bit between your fingers. If you feel any gritty bits, keep stirring over heat until it’s completely smooth. One under-dissolved speck can make your whole layer grainy. I usually sing “Happy Birthday” twice while stirring—that’s about the right timing!
3. Chill Your Molds for Faster Setting
Here’s my secret for impatient cooks (like me!): Pop your empty molds in the freezer for 10 minutes before pouring. The cold surface helps each layer set in half the time. Just don’t leave them too long or your first layer might get condensation—30 seconds on the counter fixes that.
4. The Spoon Tilt for Pristine Layers
Want those Instagram-perfect layers? Pour each new layer over the back of a spoon tilted at 45 degrees. This disperses the liquid gently so it doesn’t plunge through and mix with the layer below. It’s like making a layered cocktail—slow and steady wins the race!
5. Room Temp is Your Friend
Resist the fridge for the first hour! Letting the gems set at room temp prevents sudden temperature changes that can cause cracking. I leave mine on the counter until the top layer loses its shine (about 60 minutes), then transfer to the fridge uncovered. This also prevents those dreaded “sweaty” droplets on your beautiful finish!
Variations for Agar Agar Fruit Jelly Gems
Oh honey, the fun part about these gems is how easily you can mix and match flavors! I love experimenting—here are my favorite twists that always impress:
Fruit Swaps That’ll Make You Swoon
Ran out of dragon fruit? No sweat! Try these vibrant alternatives:
- Mango purée – Adds a tropical sunset vibe (use 1 cup purée + ½ cup water)
- Blended raspberries – Strain seeds if you want that jewel-clear look
- Passionfruit pulp – Tart perfection with edible crunchy seeds (my husband’s fave!)
Next-Level Liquid Choices
The clear top layer is your canvas—get creative with these liquids:
- Hibiscus tea – Steep 2 bags in hot water for that ruby red glow
- Jasmine green tea – Fragrant and delicate (cool completely first!)
- Lemonade – Add zest for extra zing in summer months
Vegan-Friendly Twists
Want to keep it plant-based? Easy peasy:
- Swap honey for agave in the fruit layer (use ¼ cup)
- Try almond milk instead of coconut for a nuttier base
- Use beet juice for natural pink color if avoiding dragon fruit
Pro tip: When trying new combos, make mini test batches in ice cube trays first—I call them my “flavor lab experiments!” The best mistakes still taste delicious.
Serving and Storing Agar Agar Fruit Jelly Gems
Alright, let’s talk about the best part—showing off these beauties! The secret to serving agar agar jelly gems is all about temperature. I always pull mine from the fridge about 10 minutes before serving—just long enough to take the chill off but keep that perfect wobbly texture. They should jiggle like a happy little dance when you nudge the plate!
Presentation Perfection
I love serving these on a platter with fresh fruit around the edges—think sliced kiwi, berries, or even edible flowers for extra fancy points. The contrast between the creamy coconut layer and tart fruits is *chef’s kiss*. For parties, I cut them into tiny cubes and skewer them with toothpicks—instant finger food that disappears fast!
The Great Unmolding Trick
Struggling to get them out clean? Here’s my foolproof method: dip the mold briefly in warm water (just 3 seconds!), then flip onto a damp plate. If they resist, run a thin silicone spatula around the edges first. And if all else fails—hey, rustic-looking gems taste just as good!
Storage Smarts
These keep beautifully in the fridge for up to 5 days—just cover loosely with plastic wrap once fully set. Pro tip: place a paper towel underneath to absorb any condensation. And whatever you do, don’t freeze them—agar agar gets weirdly crumbly when frozen (learned that one the hard way during a heat wave!).
One last thing—these are absolutely meant to be eaten cold. If they warm up too much, they’ll lose that delightful bounce. So no reheating, no microwave, just pure chilled perfection straight from the fridge. Trust me, on a hot day, there’s nothing more refreshing than biting into one of these jewel-toned treats!
Nutritional Information
Okay, let’s talk numbers—but keep in mind these are estimates since fruit sweetness and coconut milk brands can vary. What I love about these jelly gems is how they satisfy my sweet tooth without the guilt! Here’s the scoop per serving (about one decent-sized gem):
- Calories: Around 120 – perfect little pick-me-up
- Sugar: 15g (mostly from the natural fruit and a bit of added sweetness)
- Fat: 5g – thank you, creamy coconut milk!
- Protein: Just 1g – but hey, it’s dessert!
- Fiber: 2g from all that good fruit
The best part? These gems are 100% vegetarian (no gelatin here!) and can easily be made vegan if you swap the sugar for coconut sugar or maple syrup. They’re naturally gluten-free too—my cousin with celiac disease goes crazy for them!
Pro tip: If you’re watching sugar intake, try reducing the added sugar by half and letting the natural fruit sweetness shine through. I’ve done this with super ripe mangoes and barely missed the extra sugar!
Remember—these values can change based on your exact ingredients. My nutritionist friend always says “The best dessert is one you enjoy mindfully,” and these little gems definitely fit the bill!
Frequently Asked Questions
I get so many questions about these wiggly little wonders—let me answer the ones that pop up most often in my kitchen and inbox!
Can I use agar agar flakes instead of powder?
Absolutely! But here’s the conversion magic: use 3x the amount (so 3 tbsp flakes = 1 tbsp powder). The flakes take longer to dissolve—I usually let them bloom for 10 minutes and stir like crazy while heating. Pro tip: strain the mixture through a fine mesh sieve after boiling to catch any stubborn bits!
How long do these jelly gems last in the fridge?
They keep beautifully for 4-5 days if stored properly! Just make sure they’re covered loosely with plastic wrap (tight wrapping makes them sweat). The coconut layer might start separating after day 3—still safe to eat, just not as pretty. If you see any mold (ew!), toss them immediately.
Why did my layers mix together?
Oh honey, we’ve all been there! Two likely culprits: 1) Your bottom layer wasn’t set enough before adding the next (wait until it’s slightly firm to the touch), or 2) You poured too aggressively. Try my spoon trick—pour slowly over the back of a spoon held close to the surface. And don’t jiggle the mold while setting!
Can I make these without sugar?
You bet! Swap in monk fruit sweetener or erythritol 1:1, or use ripe bananas blended into the fruit layer for natural sweetness. Just know that sugar helps the texture—super low-sugar versions might be slightly less firm. I’ve had success with 2 tbsp maple syrup per layer too!
What’s the difference between agar agar and gelatin?
Great question! While both create jiggly desserts, agar agar comes from seaweed (perfect for vegetarians!) and sets firmer at room temp. Gelatin needs refrigeration and gives that melt-in-your-mouth feel. Agar agar also withstands heat better—these gems won’t melt on your picnic blanket like gelatin would!
Got more questions? Slide into my DMs @Dishivia—I love troubleshooting kitchen adventures with fellow food lovers!
Final Thoughts
Alright, my fellow jelly enthusiasts—it’s time to grab those molds and get creating! I promise once you taste that first spoonful of homemade Agar Agar Fruit Jelly Gems, you’ll never look at store-bought jelly the same way again. There’s something magical about watching those colorful layers come together, isn’t there?
Remember—don’t stress if your first batch isn’t picture-perfect. My very first attempt looked more like abstract art than elegant gems, but wow did they still disappear fast! The beauty of this recipe is how forgiving it is. Too firm? Add a touch more liquid next time. Layers blended? Just call it “marbled style” and serve it with pride.
I’d love to see your creations—tag me @Dishivia so I can cheer you on! And hey, if you come up with an amazing new flavor combo (peach lavender, anyone?), you better believe I’ll be trying it myself. Happy jiggling, friends—may your layers be vibrant and your agar agar always dissolve perfectly!
For More recipes, Follow me on Facebook!