Oh my gosh, you have to try these witch finger cookies – they’re the highlight of my Halloween baking every year! I’ll never forget the first time I made them for my niece’s spooky party. Those little fingers peeking out from the treat table had kids squealing with delight (and maybe just a tiny bit of nervous laughter).

Table of Contents
Table of Contents
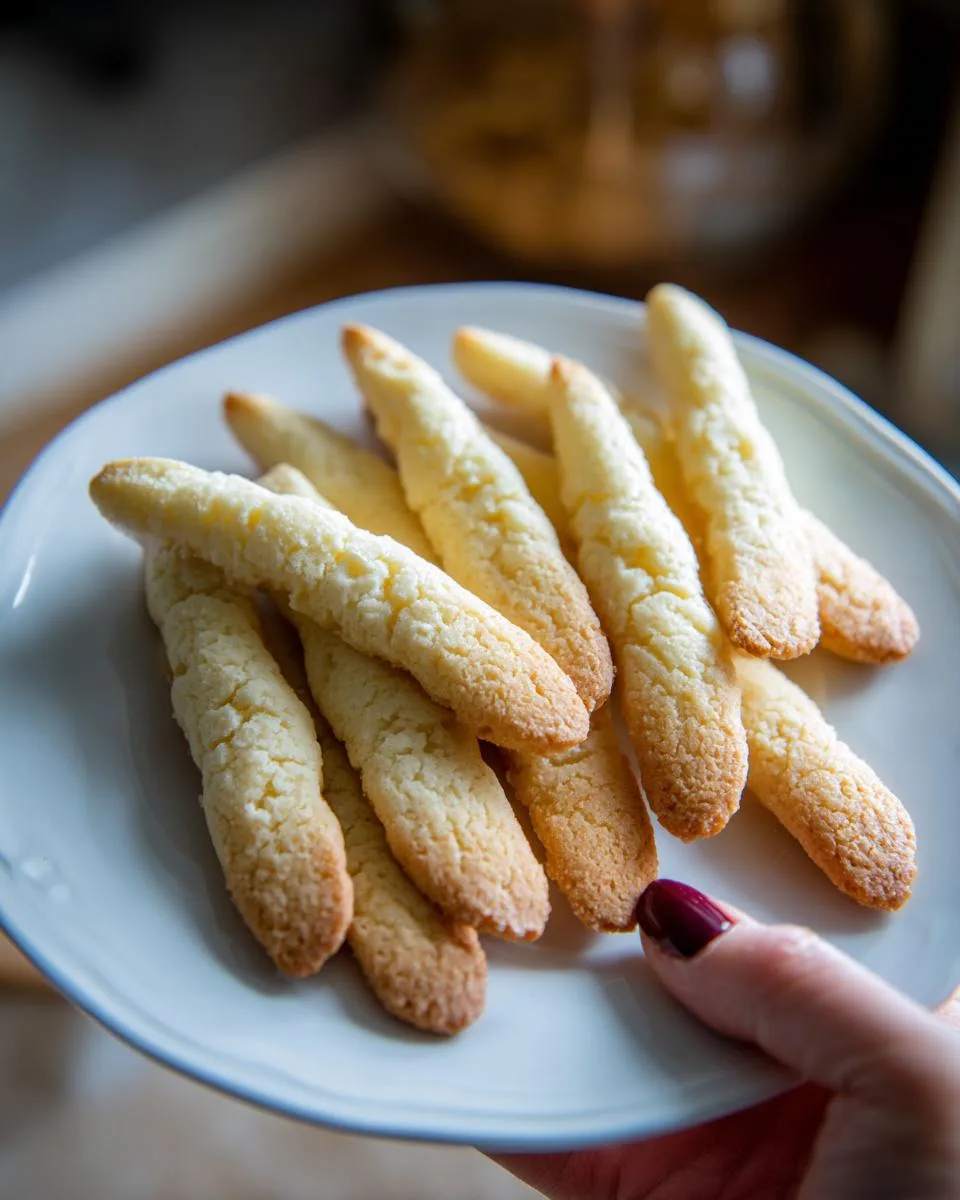
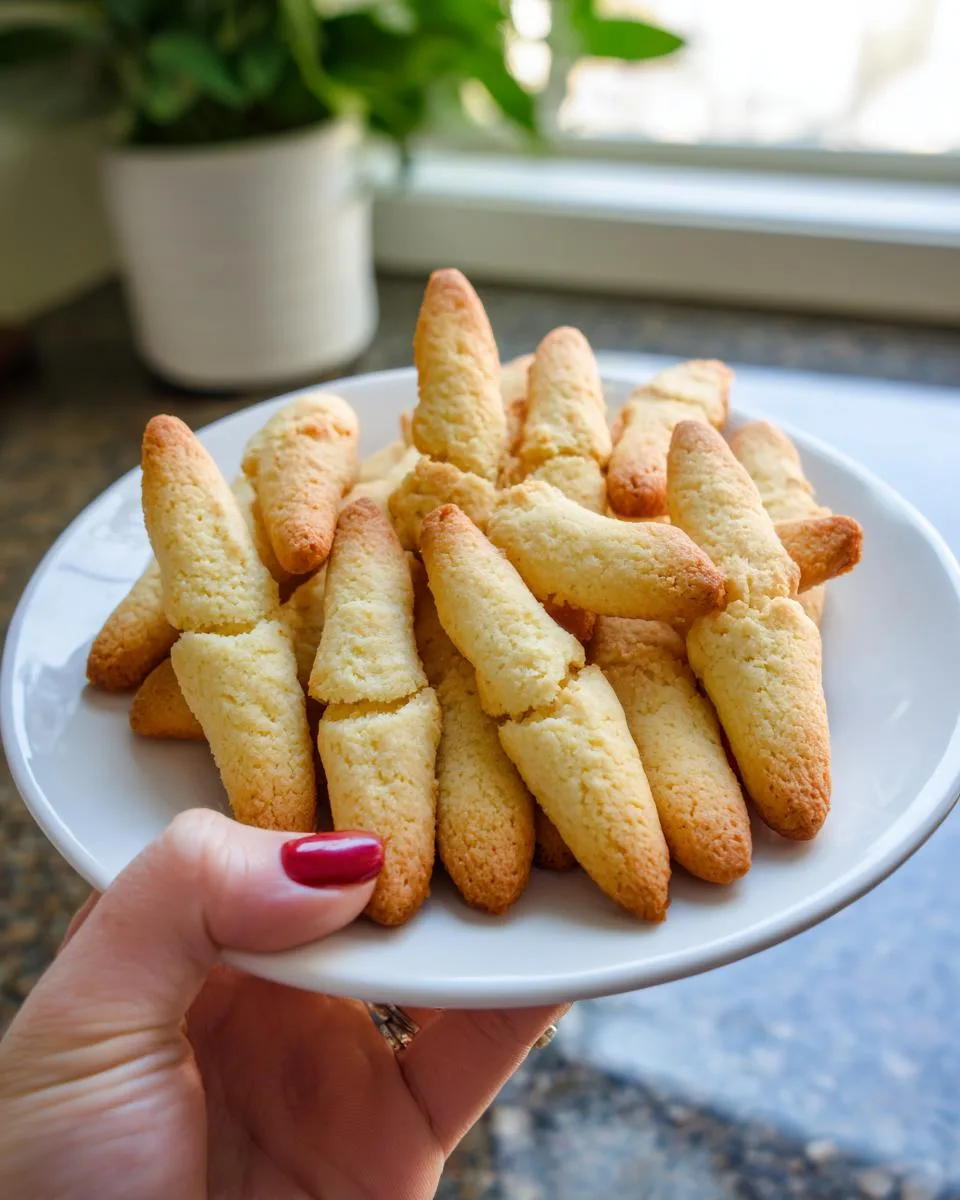
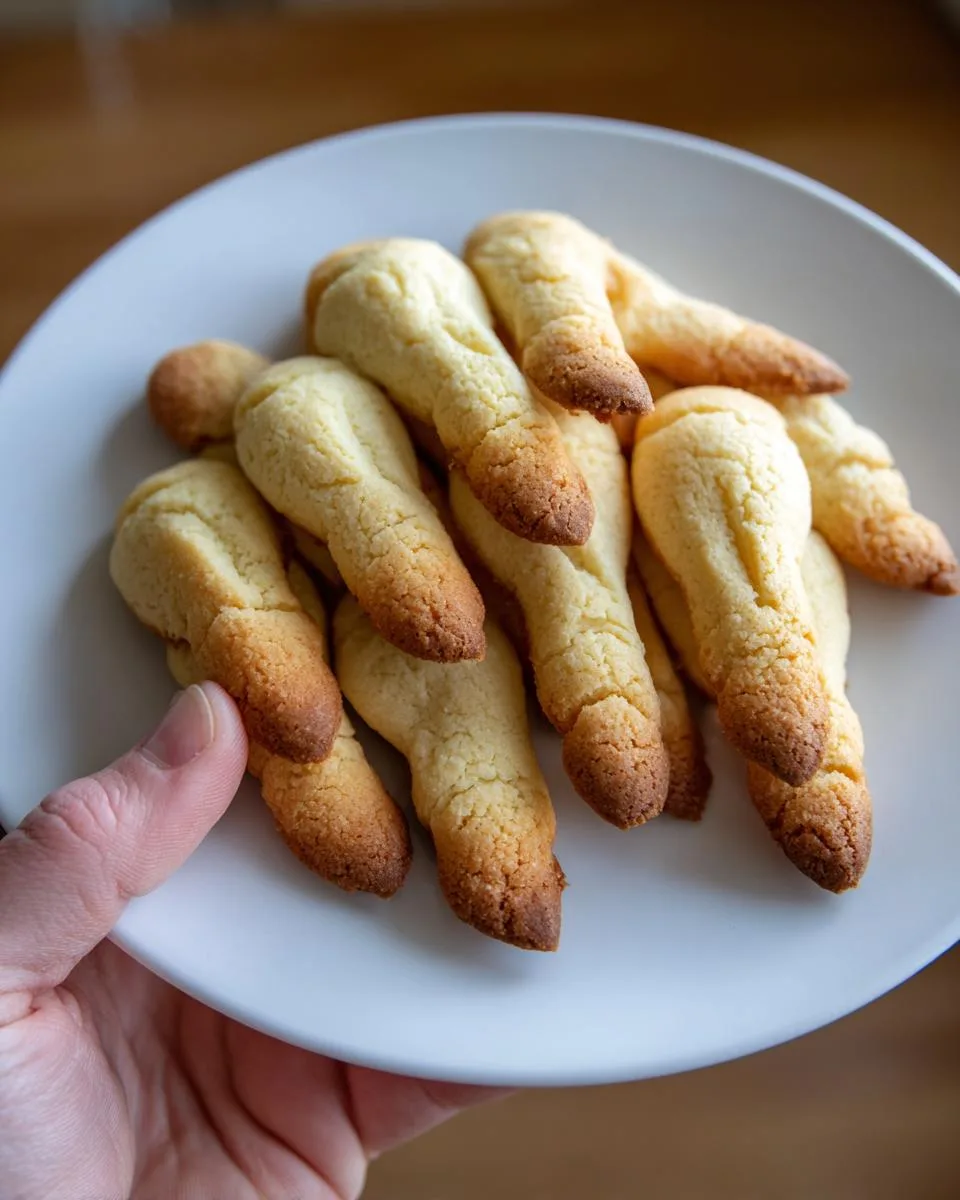
There’s something so wonderfully creepy about these buttery shortbread cookies. The way the almond “nails” catch the light, the knuckle marks that look just real enough to give you pause – it’s all about that perfect balance between delicious and delightfully disturbing. I’ve had grown adults do a double-take before realizing they’re cookies!
What I love most is how simple they are to make. No fancy piping skills needed – just roll, shape, and press. The dough comes together in minutes, and shaping the fingers is oddly satisfying. Pro tip: The more “imperfect” they look, the better! A few crooked fingers and jagged nails just add to the spooky charm.
Every Halloween, my kitchen turns into a witch’s workshop, and these cookies are always the star. They disappear faster than you can say “double double toil and trouble!”
Why You’ll Love These Witch Finger Cookies
Trust me, once you make these spooky treats, they’ll become your Halloween staple. Here’s why everyone goes crazy for them:
- So easy even a zombie could do it – No fancy skills needed, just roll, shape, and press. The dough is forgiving, and “messy” fingers look even creepier!
- Kids absolutely lose their minds – Watching their faces when they see these cookies is half the fun. Bonus: They love helping press in the almond nails.
- That perfect shortbread texture – Crisp edges with a melt-in-your-mouth center that makes you want to eat just one more… finger.
- Halloween showstoppers – These steal the spotlight on any dessert table. Pro tip: Arrange them crawling out of a “dirt” bowl of crushed Oreos!
Seriously, the only scary thing about these cookies is how fast they disappear once you put them out!
Ingredients for Witch Finger Cookies
Gather these simple ingredients – you probably have most in your pantry already! The magic is in how ordinary items transform into something wonderfully creepy:
- 3 cups (375g) all-purpose flour – The backbone of our shortbread. Spoon and level it – don’t scoop!
- 1 cup (110g) powdered sugar – Gives that melt-in-your-mouth texture regular sugar can’t.
- 1 cup (2 sticks/240g) unsalted butter, softened – Must be softened to room temp – cold butter won’t cream properly.
- ½ teaspoon salt – Just enough to balance the sweetness.
- 20 blanched almonds – You’ll halve these for the “nails.” Buy extra – some always crack weird!
See? Nothing fancy! The real witchcraft happens when these humble ingredients come together. Just wait till you smell that buttery dough – it’s heavenly, even if the final product looks… well, finger-licking good in a very different way!
How to Make Witch Finger Cookies
Okay, let’s get our hands dirty (figuratively, of course – we want clean cookie fingers!). This is where the magic happens – turning simple dough into gloriously creepy witch fingers. Follow these steps, and you’ll have everyone wondering if you’ve got a real witch helping in your kitchen!
Step 1: Prepare the Dough
First, grab your food processor – this makes everything so easy! Dump in the flour, powdered sugar, butter, and salt. Pulse until it looks like coarse crumbs, then keep going until it suddenly clumps together in one big mass. That’s your cue it’s ready!
Now, here’s my favorite part – turn it out onto your counter and gently knead it just until smooth. Don’t overwork it! Flatten into a disk, wrap in plastic, and refrigerate for at least an hour. This chilling time is crucial – it makes the dough easier to shape and gives our fingers that perfect snap when baked.
Step 2: Shape the Fingers
While the dough chills, prep your almonds – carefully split them lengthwise with a small knife. Some will break, that’s okay! The wonky ones make the creepiest nails anyway.
When ready, take out the dough and let it soften slightly. Pinch off walnut-sized pieces and roll into finger-length logs. Make one end slightly rounded for the fingertip – imperfections make them look more realistic! Press an almond half into each tip for the nail, then use the back of a knife to make three shallow lines across the “knuckles.”
Step 3: Bake and Cool
Preheat your oven to 320°F (160°C) – low and slow keeps them from browning too much. Arrange your creepy fingers on parchment-lined baking sheets, leaving space between them. Bake for 12-15 minutes until just lightly golden – we want pale, ghostly fingers!
Let them cool on the sheet for 5 minutes (they’re fragile when hot!), then transfer to a rack. The hardest part? Waiting until they’re completely cool before devouring them – but trust me, it’s worth it for that perfect shortbread texture!
Print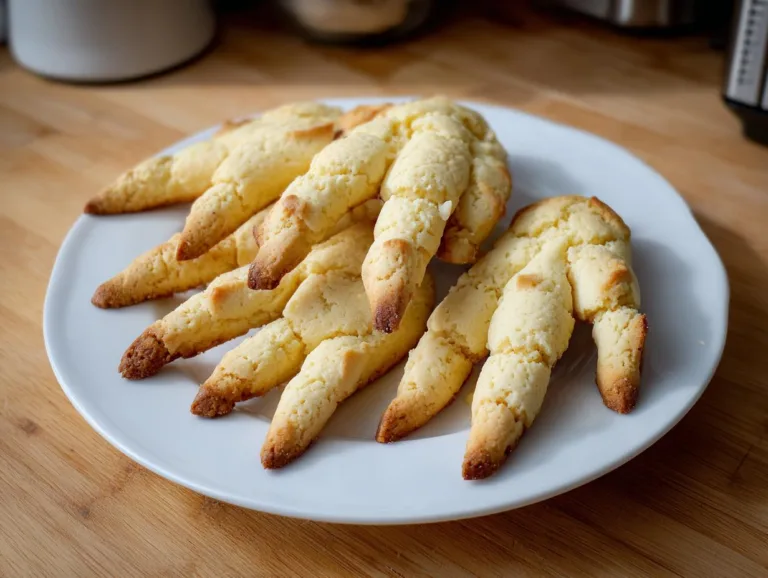
Spooky Witch Finger Cookies Kids Can’t Resist!
Spooky and fun witch finger cookies that are perfect for Halloween. These buttery shortbread cookies shaped like fingers with almond nails will delight kids and adults alike.
- Total Time: 1 hour 30 minutes
- Yield: 20 cookies 1x
Ingredients
- 3 cups (375 grams) all purpose flour
- 1 cup (110 grams) powdered sugar
- 1 cup (2 sticks/240 grams) unsalted butter (softened)
- ½ teaspoons salt
- 20 blanched almonds for decorating
Instructions
- In a food processor, put the all purpose flour, powdered sugar, unsalted butter and salt. Process until it all comes together.
- Scrape the dough out onto a work surface. Gently press and knead the crumbly mixture to form a smooth dough.
- Flattened the dough into a disk. Wrap in plastic and refrigerate for 1 hour.
- While the dough is chilling, use a small pointed knife to halves the almonds.
- Preheat oven 320ºF/160º and line two large baking sheets with non-stick parchment paper.
- Let the dough soften a bit before forming shapes.
- Cut off a small portion of dough and rolling a log the size of your finger. Cut into finger lengths.
- Shape the end of each finger so that it is a little rounded. Press a split almond on the end to represent finger nails.
- Use a knife to press three lines to mark the knuckles.
- Place witches fingers onto prepared cookie sheet and bake for 12-15 minutes or until lightly colored.
- Cool for 5 minutes on the cookie sheet then transfer to a wire rack to cool completely.
Notes
- Have extra almonds on standby in case some don’t split properly
- Dough may need to soften slightly after refrigeration for easier shaping
- These cookies can be stored in an airtight container for up to 1 week
- Prep Time: 1 hour 15 minutes
- Cook Time: 15 minutes
- Category: Dessert
- Method: Baking
- Cuisine: American
- Diet: Vegetarian
Nutrition
- Serving Size: 1 cookie
- Calories: 150
- Sugar: 6g
- Sodium: 60mg
- Fat: 8g
- Saturated Fat: 5g
- Unsaturated Fat: 2g
- Trans Fat: 0g
- Carbohydrates: 18g
- Fiber: 1g
- Protein: 2g
- Cholesterol: 20mg
Tips for Perfect Witch Finger Cookies
After years of making these spooky treats, I’ve picked up some tricks (no treats!) to make sure your witch fingers turn out perfectly creepy every time:
- Buy extra almonds! About a third always split funny – just toss those aside for snacking and use the prettier halves.
- Let chilled dough soften slightly – Too cold and it cracks; too warm and fingers lose shape. Aim for Play-Doh consistency.
- Make knuckle marks before baking – Use a butter knife’s dull edge and press firmly enough to leave an impression.
- Go for variety – Make some fingers crooked, some stubby, some long and bony – real witches don’t have perfect manicures!
Remember – the “flaws” are what make these cookies so wonderfully eerie. Happy haunting… I mean, baking!
Variations for Witch Finger Cookies
Want to put your own spooky spin on these? Try swapping blanched almonds for sliced almonds painted red with food coloring for “bloody” nails – so creepy! Or knead in a few drops of green food coloring to the dough for truly witchy fingers. I’ve even seen folks use pistachios for a moldy zombie look!
Storing and Serving Witch Finger Cookies
These creepy cookies stay fresh in an airtight container for up to a week – if they last that long! I like layering them between parchment paper so the almond nails don’t snap off. For extra spooky presentation, try:
- Poking them through a bowl of crushed Oreo “dirt”
- Arranging them crawling out of a mini cauldron
- Drizzling with red icing “blood” right before serving
Pro tip: Store extra dough in the freezer – just thaw, shape, and bake whenever the Halloween mood strikes!
Witch Finger Cookies Nutritional Information
Now, let’s talk witch finger cookie nutrition – because even creepy treats deserve some nutritional transparency! Keep in mind these are estimates (your exact amounts may vary based on ingredient brands):
- Per cookie: About 150 calories
- Fat: 8g (5g saturated)
- Carbs: 18g
- Sugar: 6g
Fair warning – these numbers might vanish as quickly as the cookies themselves when Halloween hunger strikes!
FAQs About Witch Finger Cookies
I get asked about these spooky treats all the time – here are the witch finger cookie questions that pop up most often:
Can I freeze witch finger cookies?
Absolutely! These freeze like a dream. Place cooled cookies in single layers between parchment in an airtight container – they’ll keep for up to 3 months. Thaw at room temperature when the craving (or Halloween party) hits.
Help! My almond nails keep falling off!
Try this trick – lightly moisten the dough where you’ll place the almond before pressing it in. The tiny bit of moisture helps it stick better during baking. And if some still pop off? Just “reattach” with a dab of melted white chocolate – it dries clear!
How do I make them extra creepy?
For truly terrifying fingers, brush the tips with red food coloring mixed with a drop of water before baking. The “blood” bakes into eerie streaks that’ll have your guests doing double-takes!
Can kids help make these?
Oh my gosh, yes! Rolling the dough into finger shapes is perfect for little hands. Just handle the almond pressing yourself – those knife-sharp edges can be tricky. Pro tip: Let kids name each finger for extra giggles!
Share Your Creepy Creations!
I live for seeing your witch finger cookie masterpieces! Snap a photo of your spookiest creations and tag me @Dishivia – nothing makes me happier than seeing those creepy fingers popping up in kitchens everywhere. Bonus points for the most creative presentation (bloody handprints in the cookie crumbs, anyone?). Let’s make this Halloween the most deliciously terrifying one yet!
For More recipes, Follow me on Facebook!