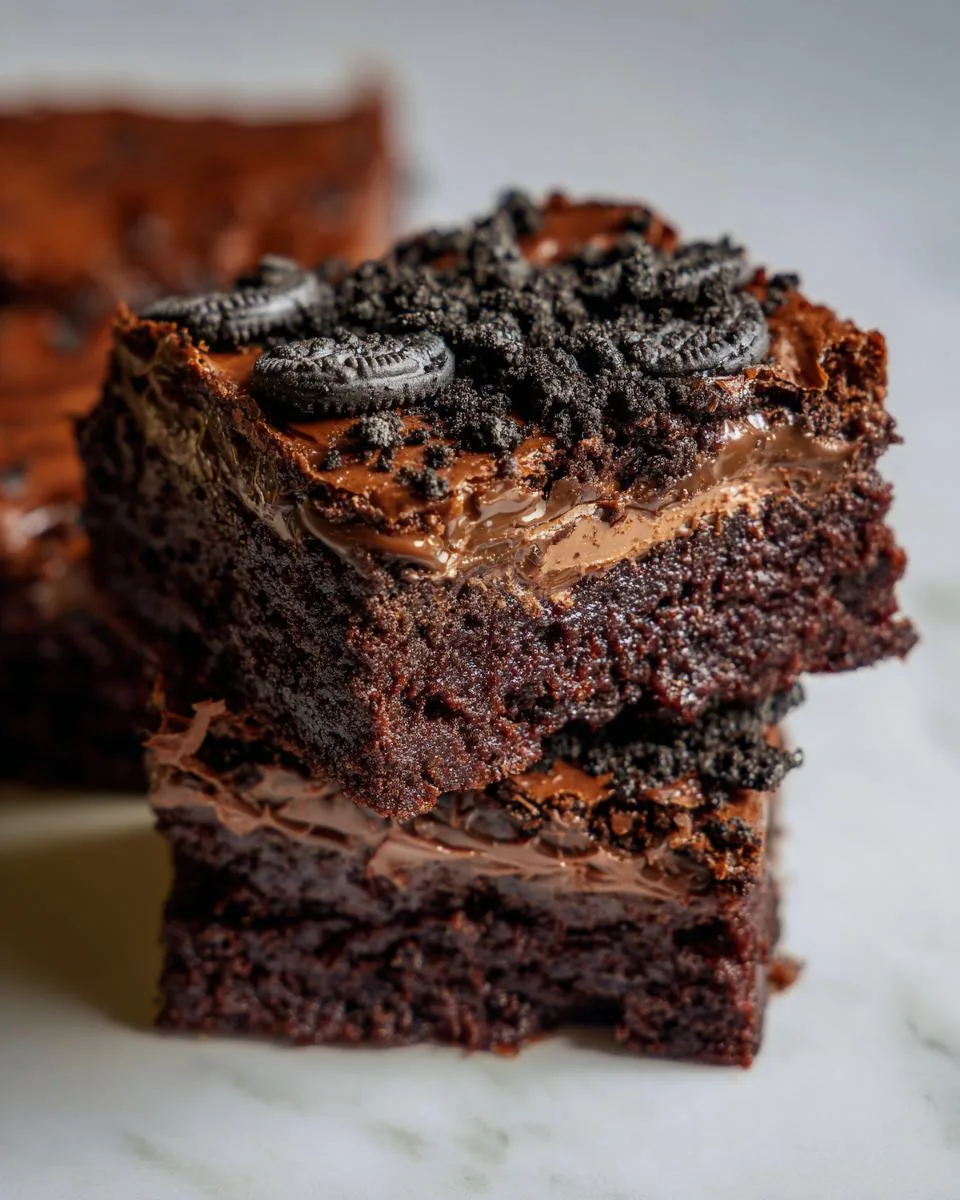
There’s something magical about Halloween treats—especially when they’re as fun to make as they are to eat! My Halloween dirt brownies are a hit every year, and I swear, the kids (and adults!) go wild for them. Picture this: rich, fudgy brownies topped with a silky chocolate fudge layer, crushed Oreos that look like “dirt,” and creepy-crawly gummy worms peeking out. I first made these for a spooky movie night, and now they’re a must-have at every Halloween party I throw. Trust me, once you try them, you’ll be digging into these brownies like there’s no tomorrow—worms and all!
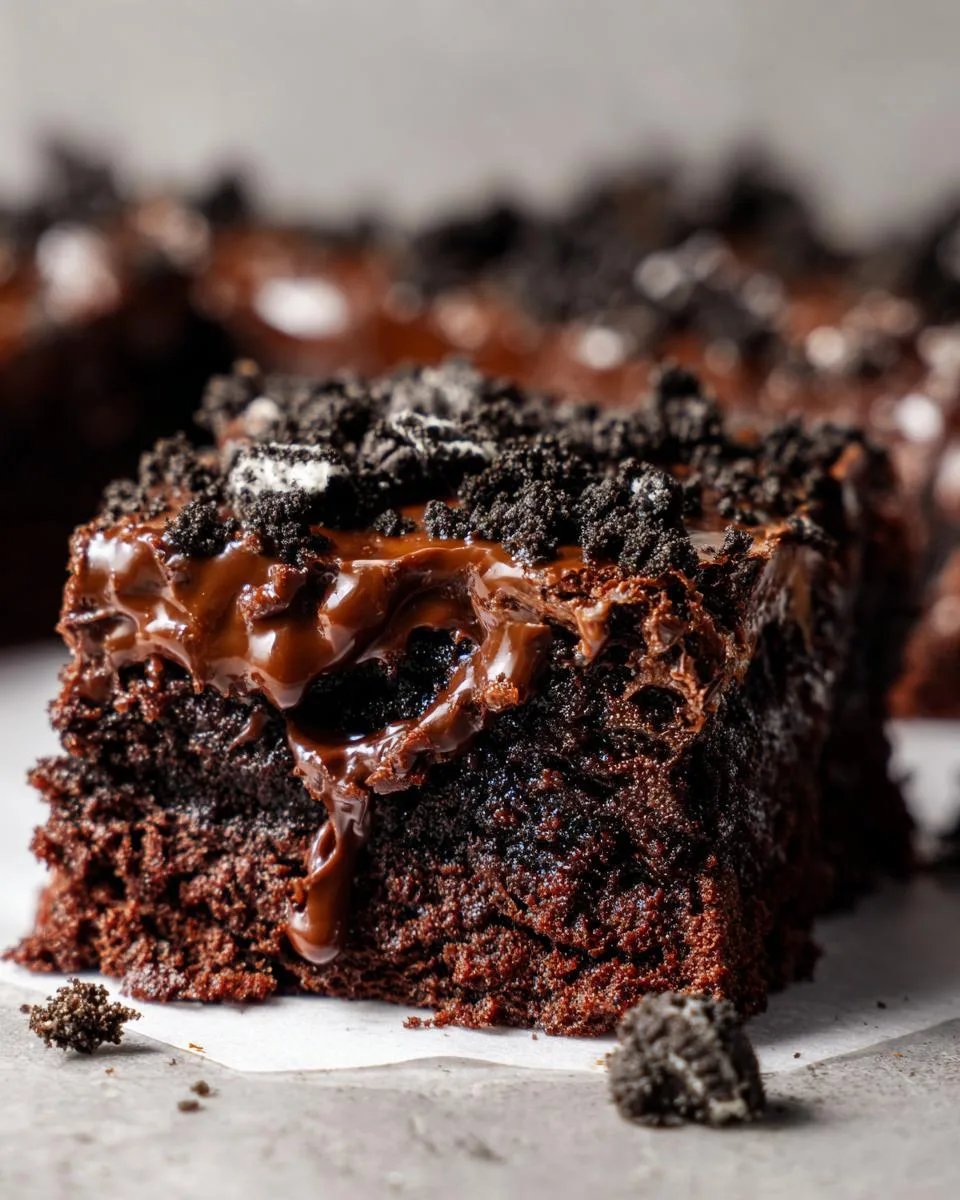
Table of Contents
Table of Contents
Ingredients for Halloween Dirt Brownies
Okay, let’s gather our spooky supplies! These Halloween dirt brownies come together with simple ingredients you probably already have—plus a few fun extras to make them scream “party.” I like to group everything into three parts: the brownie base, the fudge topping, and the decorations. Trust me, seeing it all laid out makes baking way less intimidating.
For the Brownie Base
- 1 cup unsalted butter, melted – The key to that rich, fudgy texture. No shortcuts here!
- 2 tablespoons canola oil – Keeps them extra moist, even after baking.
- 2 ¼ cups sugar – Sweetens the deal without overpowering the chocolate.
- 3 large eggs – Room temperature works best for even mixing.
- 1 tablespoon pure vanilla extract – A splash of warmth that ties everything together.
- ¼ cup milk – Just a bit to loosen the batter.
- ½ teaspoon cinnamon – My secret weapon for a hint of cozy spice.
- 1 cup all-purpose flour – Spoon and level it—don’t pack it down!
- 1 cup unsweetened cocoa powder – The darker, the better for that deep chocolate flavor.
- ½ teaspoon salt – Balances the sweetness perfectly.
- ¾ cup chocolate chips – Because more chocolate is always the answer.
For the Fudge Topping
- 1 cup condensed milk – Sweet, sticky, and oh-so-luxurious.
- 1 ½ cups dark chocolate chips – Melts into the creamiest topping.
- 2 tablespoons brewed espresso coffee – Just a touch to deepen the chocolate flavor (skip if you’re caffeine-shy).
For the Decorations
- 20 Oreos, crushed – Pulse them in a food processor or smash them in a bag—your call!
- 9 gummy worms – The star of the show. Go for extra creepy colors if you’re feeling fancy.
See? Nothing too wild, but when they come together, magic happens. Now, let’s bake!
Ingredient Substitutions
No worries if you’re missing something—these Halloween dirt brownies are super forgiving! Here’s how to tweak them without losing that spooky charm:
Gluten-free? Swap the all-purpose flour for a 1:1 gluten-free blend. The texture might be slightly denser, but still delicious. Dairy-free? Use vegan butter and dairy-free chocolate chips—the fudge topping works with coconut condensed milk too! Skip the espresso if caffeine isn’t your thing, or try a dash of vanilla instead. Just avoid reducing the sugar—it’s key for that fudgy bite. Happy swapping!
How to Make Halloween Dirt Brownies
Alright, let’s get our hands dirty—literally! These Halloween dirt brownies are easier than they look, but I’ll walk you through every step so they turn out perfectly fudgy, creepy, and delicious. Just follow along, and soon you’ll have a batch of spooky treats that’ll steal the show at any party.
Preparing the Brownie Batter
First things first—preheat that oven to 350°F (175°C) and line an 8-inch square pan with parchment paper. Trust me, you’ll thank me later when these beauties slide right out!
Now, grab a big bowl and whisk together the melted butter, oil, and sugar until it’s glossy and smooth—about a minute. Add the eggs, milk, and vanilla, and beat until the mix turns lighter in color. This is where the magic starts! Sift in the flour, cocoa powder, cinnamon, and salt, then gently fold everything together. Don’t overmix—just until no dry spots remain. Toss in the chocolate chips for extra gooeyness, then pour the batter into the pan and smooth the top. Easy, right?
Baking and Cooling
Pop the pan into the oven and bake for 45–50 minutes. You’ll know they’re done when the edges pull away slightly and a toothpick in the center comes out with a few moist crumbs (not wet batter). Resist the urge to dig in right away—let them cool completely on a rack. I know, it’s torture, but hot brownies + fudge topping = a melty mess. Patience pays off!
Adding the Fudge and Decorations
Time for the fun part! While the brownies cool, make the fudge topping: Melt the dark chocolate chips and condensed milk together over low heat, stirring constantly. Add the espresso for a deep, rich flavor—just a hint, but it makes all the difference. Let it cool slightly so it’s thick but still pourable.
Cut the cooled brownies into 9 squares, then pipe or spoon the fudge over each one. Immediately sprinkle crushed Oreos on top—they’ll stick to the fudge like, well, dirt! Finish with a gummy worm (or two) per brownie, pressing them halfway in so they look like they’re crawling out. Voilà—spooky, delicious, and downright irresistible!
Print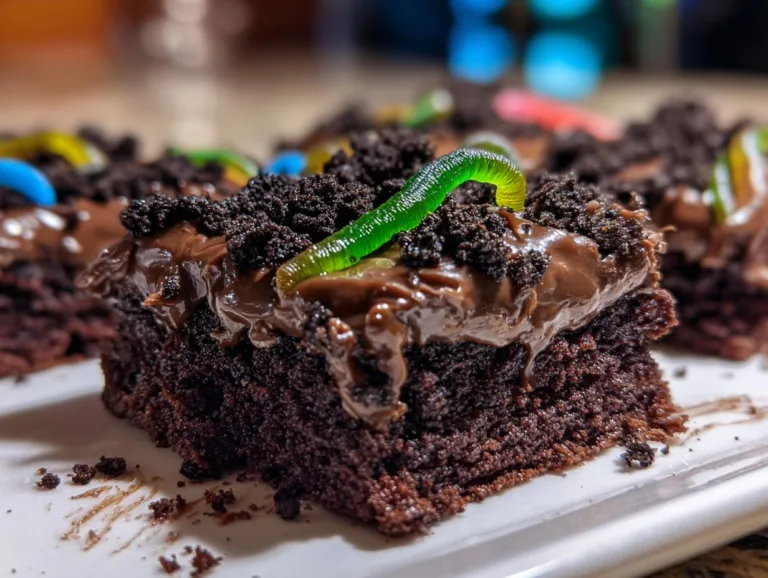
Spooky 9-Layer Halloween Dirt Brownies Kids Adore
Delicious and spooky Halloween dirt brownies with a fudge topping, crushed Oreos, and gummy worms.
- Total Time: 1 hour 5 minutes
- Yield: 9 brownies 1x
Ingredients
- 1 cup unsalted butter, melted
- 2 tablespoons canola oil
- 2 ¼ cups sugar
- 3 large eggs
- 1 tablespoon pure vanilla extract
- ¼ cup milk
- ½ teaspoon cinnamon
- 1 cup all-purpose flour
- 1 cup unsweetened cocoa powder
- ½ teaspoon salt
- ¾ cup chocolate chips
- 20 Oreos
- 9 gummy worms
- 1 cup condensed milk (for fudge topping)
- 1 ½ cups dark chocolate chips (for fudge topping)
- 2 tablespoons brewed espresso coffee (for fudge topping)
Instructions
- Preheat oven to 350°F (175°C).
- Line an 8-inch square baking pan with parchment paper.
- Combine melted butter, oil, and sugar in a large mixing bowl. Whisk for 1 minute.
- Add eggs, milk, and vanilla. Beat until lighter in color.
- Sift in flour, cocoa powder, cinnamon, chocolate chips, and salt. Fold gently until combined.
- Pour batter into the pan and smooth the top.
- Bake for 45–50 minutes or until the center is set.
- Let cool to room temperature.
- For the fudge topping, melt chocolate and condensed milk over low heat. Stir in espresso.
- Cut cooled brownies into 9 squares.
- Pipe fudge topping over brownies.
- Crush Oreos and sprinkle over the fudge.
- Place one gummy worm on each brownie.
Notes
- Store brownies in an airtight container for up to 3 days.
- For a nut-free version, omit the chocolate chips or use allergy-friendly alternatives.
- Adjust espresso amount for desired coffee flavor strength.
- Prep Time: 15 minutes
- Cook Time: 50 minutes
- Category: Dessert
- Method: Baking
- Cuisine: American
- Diet: Vegetarian
Nutrition
- Serving Size: 1 brownie
- Calories: 480
- Sugar: 42g
- Sodium: 180mg
- Fat: 24g
- Saturated Fat: 14g
- Unsaturated Fat: 8g
- Trans Fat: 0g
- Carbohydrates: 62g
- Fiber: 3g
- Protein: 6g
- Cholesterol: 70mg
Tips for Perfect Halloween Dirt Brownies
Want your Halloween dirt brownies to be the talk of the party? Here are my tried-and-true tricks to make them foolproof—and extra fun!
Parchment paper is your best friend. Line that pan with it, letting the edges hang over. When the brownies cool, you can lift them out in one glorious slab—no sticking, no crumbling, just perfect squares every time.
Play with the espresso. Not a coffee fan? Skip it! Love that mocha kick? Add an extra teaspoon. The fudge topping is your canvas—make it yours.
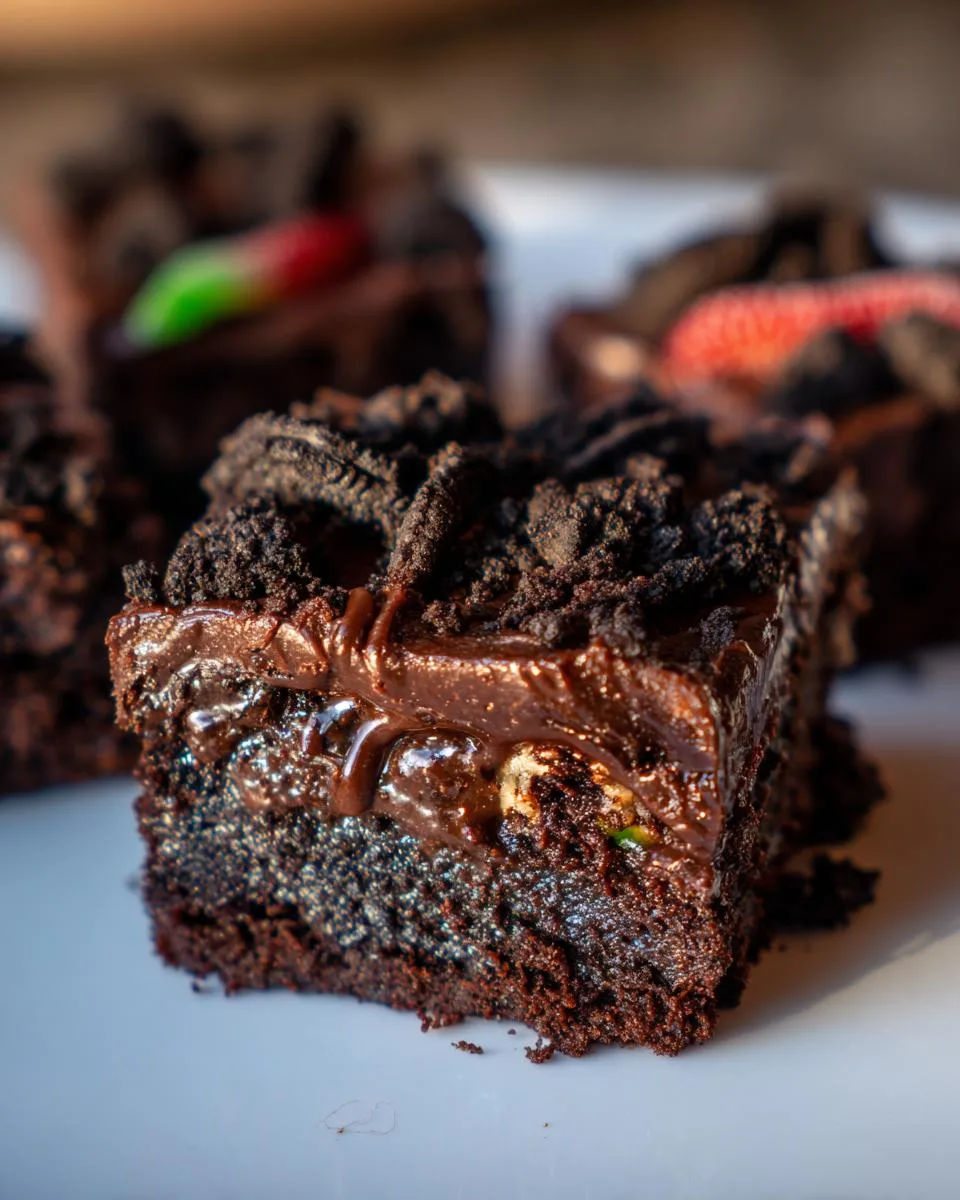
Get creative with decorations. Swap gummy worms for candy eyeballs, crushed graham crackers for “sand,” or even mini tombstones made from white chocolate. Halloween is all about imagination!
Crush Oreos last-minute. They stay crispier that way, giving your “dirt” that fresh-dug texture. And hey—if a few extra crumbs “accidentally” land in your mouth? I won’t tell.
Remember: baking should be fun, especially when it’s this deliciously spooky!
Storing Halloween Dirt Brownies
These brownies disappear fast at my house, but if you somehow have leftovers, here’s the trick: pop them into an airtight container at room temperature. They’ll stay fresh for up to 3 days—just know those gummy worms might get a little stiff (still tasty though!). Avoid the fridge—it dries them out. Pro tip: hide them behind the veggies if you want any chance at seconds!
Nutritional Information
Each Halloween dirt brownie packs about 480 calories with that irresistible fudgy-chocolate goodness. Note: Nutritional values are estimates and vary based on ingredients used—because every baker’s spoonful is a little different!
FAQs About Halloween Dirt Brownies
Got questions? I’ve got answers! After years of making these spooky treats, here’s what people ask me most:
Can I use boxed brownie mix instead?
Sure! Skip the batter steps and bake a 9×9 pan of your favorite mix. But trust me—homemade batter makes them extra fudgy and rich. If you’re short on time though, no shame in the boxed game!
How do I make these nut-free?
Easy-peasy. Just leave out the chocolate chips or swap them for allergy-friendly ones. All other ingredients are naturally nut-free—so dig in safely!
Can I make these ahead of time?
Absolutely! Bake the brownies 1-2 days early, but wait to add the fudge and decorations until the day of serving. The Oreos stay crunchier, and the gummy worms won’t turn into rubber.
Help! My fudge topping is too thick.
No panic—just stir in a teaspoon of warm milk at a time until it’s pipeable. Too thin? Add more chocolate chips and melt again. You’ve got this!
What other candies can I use?
Get creative! Candy eyeballs, sour gummy bats, or even crushed peppermint for a “graveyard” vibe. Halloween is your playground—make it fun!
Share Your Spooky Creations!
I love seeing your Halloween dirt brownies come to life—literally! Snap a photo of your creepy-crawly creations and tag me on social media or leave a comment below. Did you switch up the toppings? Accidentally eat three before the party? (No judgment!) Can’t wait to hear how they turned out. Happy baking, ghouls!
For More recipes, Follow me on Facebook!