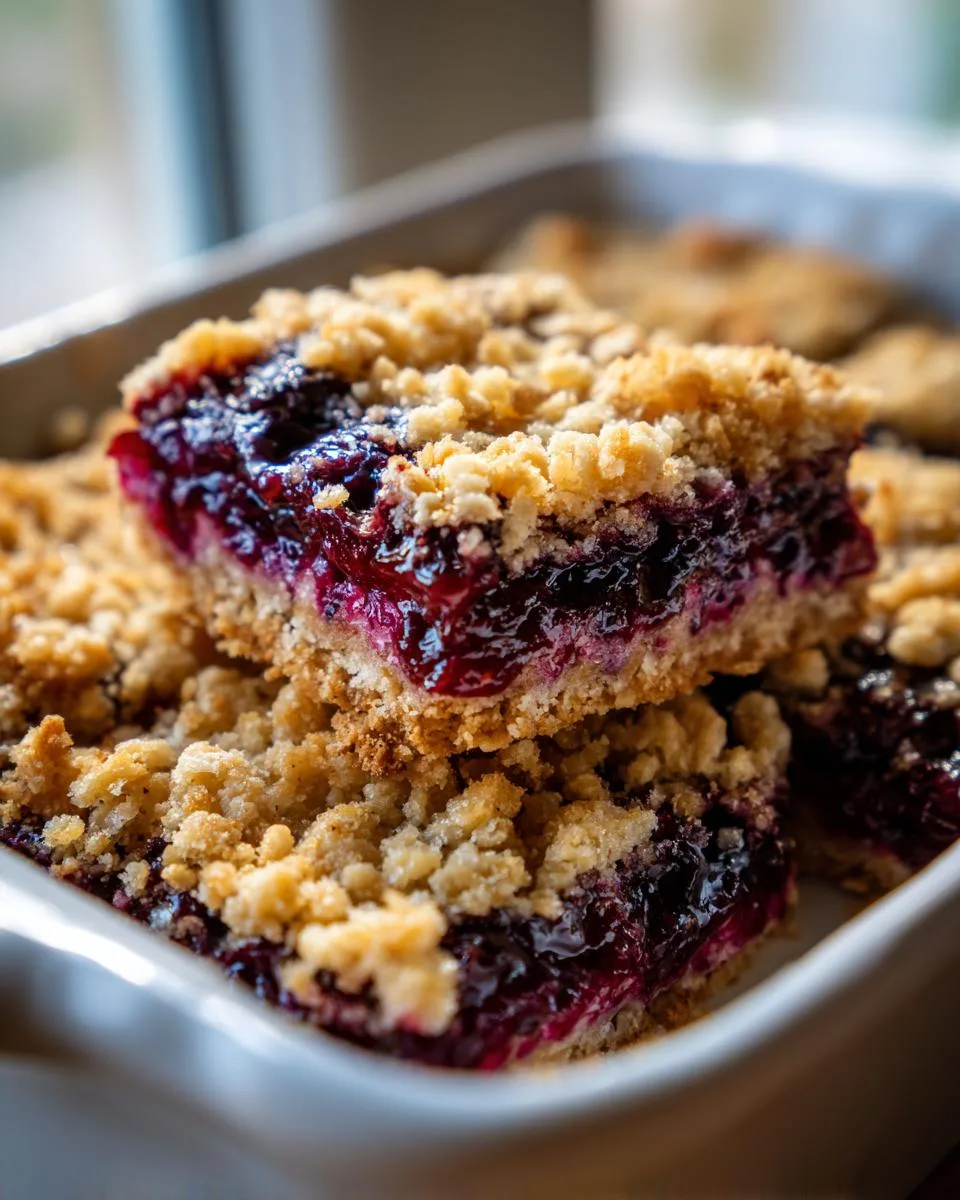
Oh my goodness, let me tell you about these Black Raspberry Oat Bars – they’re my go-to when I need a little taste of nostalgia in a hurry! As a chef who’s baked thousands of treats over the years, I can confidently say these simple bars capture that perfect balance of crumbly oats and sweet jam that reminds me of my grandma’s kitchen.
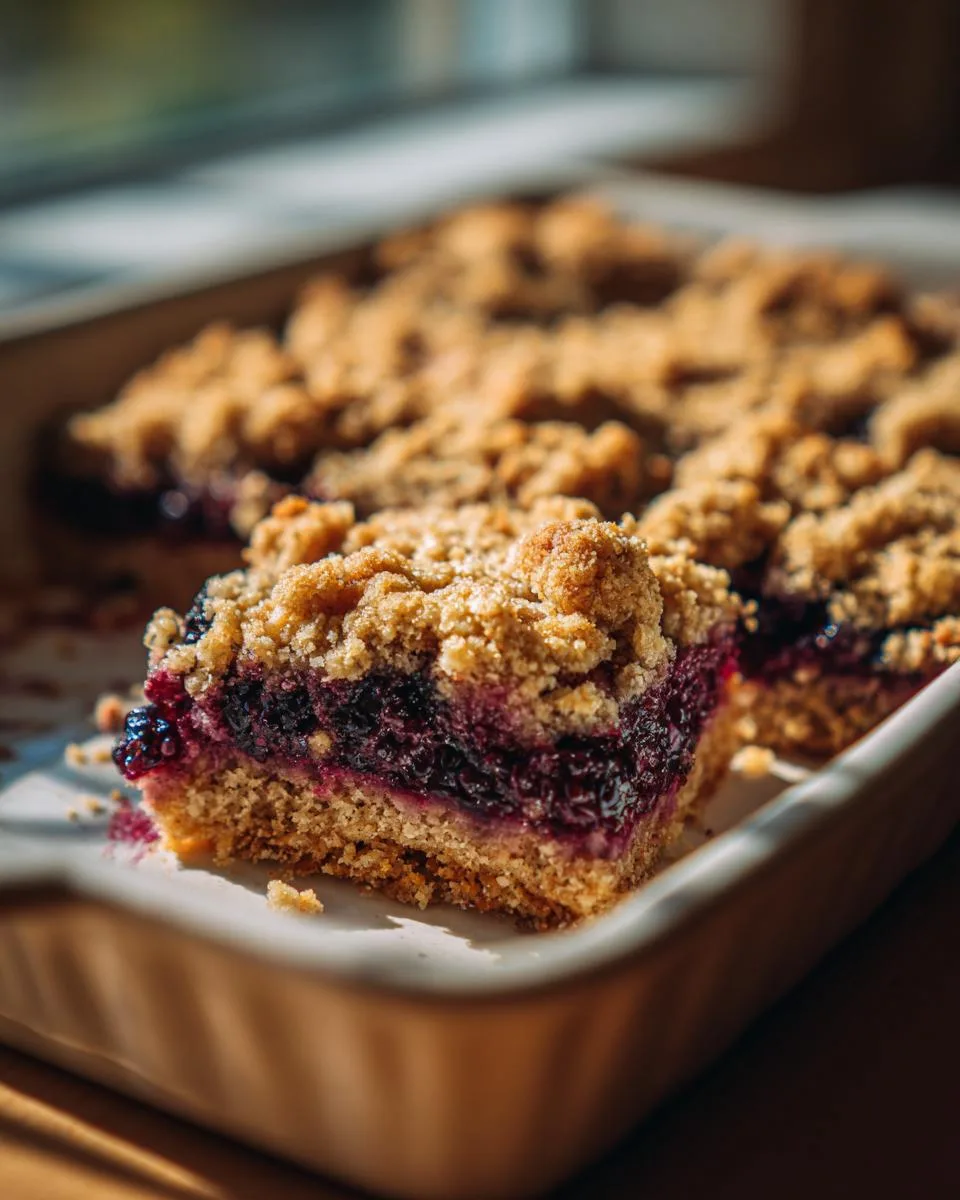
Table of Contents
Table of Contents
What I love most is how the buttery oat crust sandwiches that bright raspberry filling – it’s like sunshine in every bite! Trust me, once you try this foolproof recipe, you’ll understand why I keep coming back to it year after year. The best part? They come together with just a few pantry staples and about as much effort as stirring your morning coffee.
Why You’ll Love These Black Raspberry Oat Bars
Listen, I know you’re busy—we all are—but these bars? They’re the kind of magic that makes life sweeter without any fuss. Here’s why they’ve earned a permanent spot in my recipe rotation:
- Effortless elegance: They look like you spent hours, but that crumbly oat topping hides the truth—just mix, layer, and bake!
- Pantry superhero: Flour, oats, butter, jam… bet you’ve got everything right now. No fancy ingredients required.
- Versatile charm: Perfect with morning coffee, packed in lunchboxes, or dressed up with vanilla ice cream for dessert.
- Nostalgia in every bite: That jammy center? It’ll transport you straight to childhood summers.
Seriously, one batch and you’ll be hooked—just like I was when I first pulled these golden beauties out of the oven.
Ingredients for Black Raspberry Oat Bars
Gather these simple ingredients – I bet you already have most in your pantry! The magic happens when ordinary staples transform into something extraordinary. Here’s what you’ll need:
- 1 cup all-purpose flour – spooned and leveled, not packed
- 1 cup old-fashioned rolled oats – not instant (we want that lovely texture!)
- ½ cup packed light brown sugar – press it firmly into your measuring cup
- ¼ teaspoon baking soda – just a pinch to lift the crust
- ⅛ teaspoon salt – balances the sweetness perfectly
- ½ cup (1 stick) unsalted butter, softened – leave it out for 30 minutes first
- ¾ cup seedless raspberry jam – my secret? Black raspberry jam if you can find it!
See? Nothing fancy – just honest ingredients that create magic together. Now let me share a little chef’s tip: measure your flour correctly by fluffing it first, then spooning it into your measuring cup. Too much flour makes dry bars, and we want these babies tender-crisp!
How to Make Black Raspberry Oat Bars
Alright, let’s get baking! These bars come together so easily—just follow these simple steps, and you’ll have a tray of golden, jammy goodness in no time. I’ve made this recipe more times than I can count, and these are the little tricks I’ve learned along the way.
Preparing the Crust
First things first—preheat that oven to 350°F (175°C). While it’s warming up, grab your 8×8-inch pan and line it with foil, leaving some overhang on the sides. Trust me, this makes cleanup a breeze and helps lift the bars out later. Give the foil a quick spritz with cooking spray too—we don’t want any sticking!
Now, the fun part: in a big bowl, mix together your flour, oats, brown sugar, baking soda, and salt. Then comes the butter—use your fingers to work it in until the mixture looks like coarse crumbs. Don’t be shy here! You want to really rub the butter into the dry ingredients until no dry spots remain. The warmth from your hands helps create the perfect crumbly texture.
Here’s my favorite trick: reserve about 1 cup of this mixture for the topping, then press the rest firmly into your prepared pan. I mean really press it—use the bottom of a measuring cup to compact it evenly. This creates that sturdy base that’ll hold all that glorious jam.
Adding the Jam Layer
Now for the star of the show—that luscious raspberry jam! If your jam’s been in the fridge, microwave it for about 10 seconds to make it spreadable (but not hot). Pour it over the crust and use the back of a spoon to spread it evenly, leaving about a ¼-inch border around the edges. This prevents the jam from bubbling over and sticking to the pan.
Pro tip: if you’re using a particularly thick jam, you can thin it with a teaspoon of warm water first. Just stir gently—we want it pourable but not runny. Then sprinkle your reserved crumb mixture evenly over the top, and give it a gentle press with your palms to help it adhere to the jam layer.
Baking and Cooling
Pop your pan into the preheated oven and bake for 35-40 minutes. You’ll know they’re done when the edges are golden brown and the jam is bubbling slightly around the edges. Your kitchen will smell absolutely heavenly!
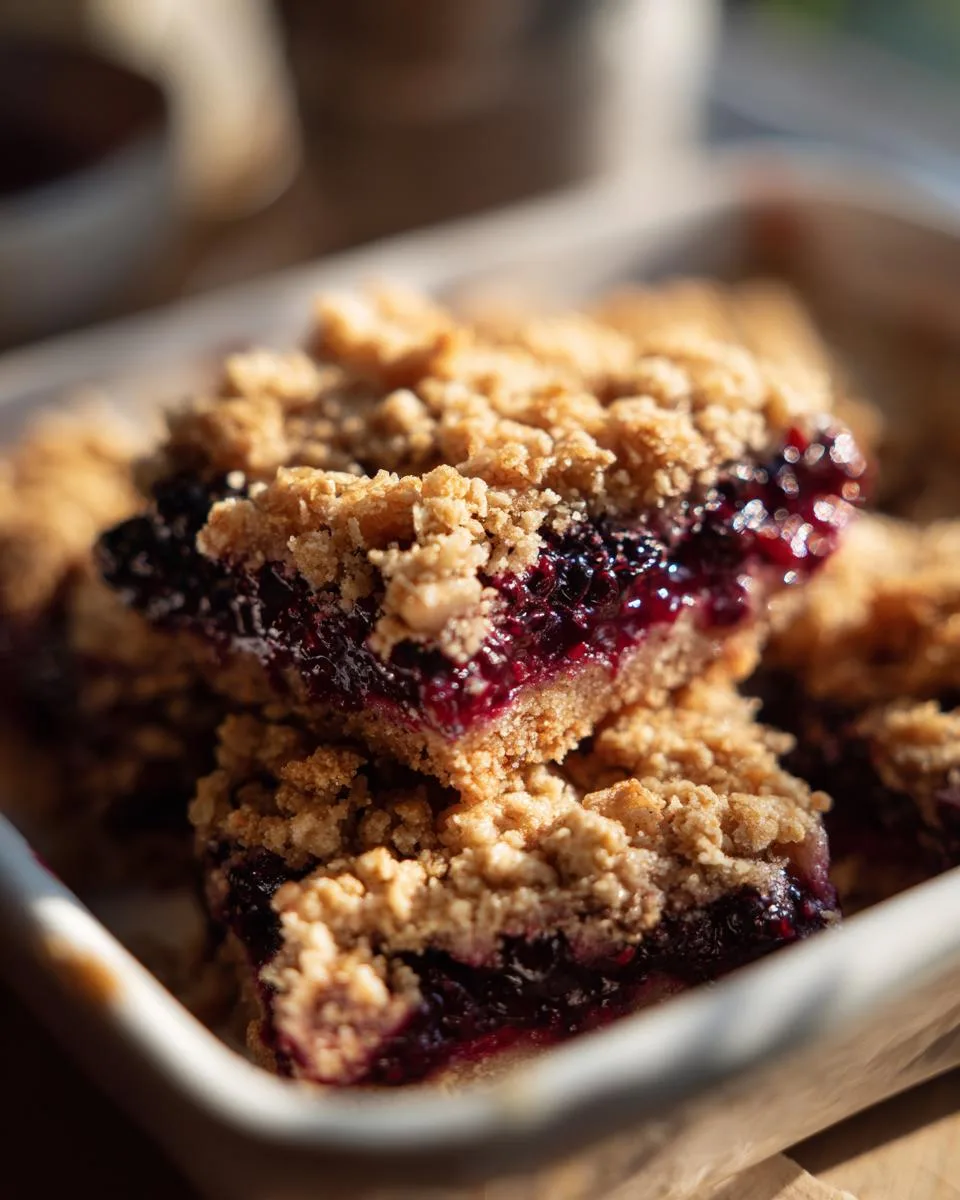
Now comes the hardest part—waiting. Let the bars cool completely in the pan on a wire rack, about 2 hours. I know it’s tempting to cut into them right away, but patience pays off here. Cooling allows the jam to set, so you’ll get clean slices instead of a gooey mess. When you’re ready, use the foil overhang to lift the whole slab out, then cut into 9 perfect squares with a sharp knife.
There you have it—black raspberry oat bars that are crisp on top, tender in the middle, and bursting with fruity goodness in every bite. Just try not to eat them all in one sitting (though I won’t judge if you do)!
Print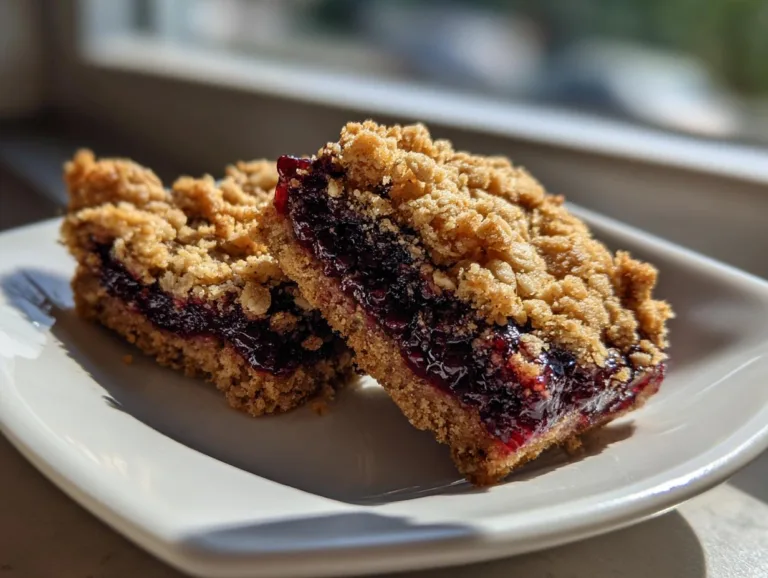
Irresistible Black Raspberry Oat Bars Recipe
Black Raspberry Oat Bars are a simple and delicious treat. They combine a crumbly oat base with sweet raspberry jam for a perfect balance of texture and flavor.
- Total Time: 55 mins
- Yield: 9 bars 1x
Ingredients
- 1 cup all-purpose flour
- 1 cup rolled oats
- ½ cup packed light brown sugar
- ¼ teaspoon baking soda
- ⅛ teaspoon salt
- ½ cup butter, softened
- ¾ cup seedless raspberry jam
Instructions
- Preheat the oven to 350 degrees F (175 degrees C). Grease an 8×8-inch square pan and line with greased foil.
- Combine flour, oats, brown sugar, baking soda, and salt in a large bowl. Rub in butter using your hands or a pastry blender to form a crumbly mixture.
- Press 2 cups of the oat mixture into the bottom of the prepared pan.
- Spread jam to within 1/4 inch of the edge.
- Sprinkle the remaining crumb mixture on top and press down lightly into the jam.
- Bake for 35 to 40 minutes or until lightly browned.
- Allow to cool before cutting into bars.
Notes
- Use room-temperature butter for easier mixing.
- Let the bars cool completely before cutting for clean slices.
- Store in an airtight container for up to 3 days.
- Prep Time: 15 mins
- Cook Time: 40 mins
- Category: Dessert
- Method: Baking
- Cuisine: American
- Diet: Vegetarian
Nutrition
- Serving Size: 1 bar
- Calories: 220 kcal
- Sugar: 15g
- Sodium: 80mg
- Fat: 8g
- Saturated Fat: 5g
- Unsaturated Fat: 2g
- Trans Fat: 0g
- Carbohydrates: 35g
- Fiber: 2g
- Protein: 3g
- Cholesterol: 20mg
Tips for Perfect Black Raspberry Oat Bars
After making these bars more times than I can count, I’ve picked up some game-changing tricks that’ll take yours from good to oh-my-goodness amazing. Listen up—these little nuggets of wisdom will save you so much trouble!
Butter Matters More Than You Think
That stick of butter needs to be properly softened—not melted, not cold, but just right. Leave it on the counter for 30 minutes until it gives slightly when pressed. Too soft? Your crust will spread. Too firm? You’ll have dry crumbs instead of that perfect sandy texture.
The Cooling Game-Changer
I know the aroma is intoxicating, but walk away after baking! Letting the pan cool completely (I mean completely) on a wire rack makes all the difference. Those beautiful clean slices you see in photos? That happens after a 2-hour rest—the jam needs time to set up properly.
Cutting Like a Pro
Use a sharp chef’s knife dipped in hot water and wiped dry between cuts. The warmth helps glide through the sticky jam layer without dragging the crumb topping. Bonus tip: wipe the knife clean after each cut for picture-perfect edges every time.
Storage Smarts
These keep beautifully in an airtight container at room temperature for 3 days—if they last that long! For longer storage, freeze them in a single layer (once fully cooled) between sheets of parchment paper. They’ll keep for up to 2 months—just thaw at room temperature when the craving hits.
There you have it—my tried-and-true secrets for black raspberry oat bars that’ll have everyone begging for the recipe. Now go bake up some magic!
Variations for Black Raspberry Oat Bars
Oh, the possibilities! While I adore the classic raspberry version, half the fun is playing with different flavors. Here are some of my favorite twists—each one tested in my kitchen and given the stamp of approval by my very picky taste-testers (aka my kids).
Jam Swaps That Work Wonders
That jar of strawberry jam staring at you from the fridge? Go for it! Any berry jam shines here. Blackberry gives a deeper, wine-like flavor, while apricot adds sunny sweetness. My neighbor swears by blueberry-lavender jam—just use 2 teaspoons dried lavender buds stirred into ¾ cup jam.
Crunchy Add-Ins for Texture Lovers
Fold ½ cup chopped pecans or walnuts into the oat mixture before pressing into the pan. The toasty nuts add such a lovely crunch! For a nut-free option, try toasted coconut flakes—they pair beautifully with raspberry.
Chocolate Dreams
Because everything’s better with chocolate, right? Sprinkle ¼ cup mini chocolate chips over the jam layer before adding the crumb topping. The chips melt into gooey pockets of joy. For grown-up vibes, use dark chocolate chunks and a pinch of espresso powder in the crust.
The beauty of this recipe? It’s like a blank canvas waiting for your personal touch. Once you master the basic formula, you’ll start seeing jam bar potential everywhere—I once made an incredible version with leftover cranberry sauce after Thanksgiving! Whatever variation you try, just remember the golden rule: keep the jam layer around ¾ cup for perfect balance.
Serving and Storing Black Raspberry Oat Bars
Here’s the beautiful thing about these bars—they’re just as good fresh from the pan as they are days later (if they last that long!). After years of making them for everything from bake sales to bridal showers, I’ve nailed down the best ways to serve and keep them tasting amazing.
The Perfect Serving Temperature
Room temperature is where these bars truly shine. The chilled jam loses some of its vibrant flavor, while warm bars can be too soft to hold their shape. About an hour out of the fridge gives you that ideal combo of crisp topping and luscious, slightly soft filling.
Want to make them extra special? Warm individual slices for 8-10 seconds in the microwave and serve with vanilla ice cream melting over the top. The contrast between hot jam and cold cream is absolutely heavenly!
Keeping Them Fresh
Store your cooled bars in an airtight container—I like layering them with parchment paper between stacks to prevent sticking. At room temperature, they’ll stay fresh for 3 days, though the texture gets softer each day.
For longer storage, freeze them! Arrange cooled bars in a single layer on a baking sheet to freeze solid first (about 2 hours), then transfer to freezer bags with parchment dividers. They’ll keep for 2 months this way—just thaw at room temperature when you’re ready to enjoy again.
Pro tip: If your kitchen runs warm, pop the container in the fridge to prevent the jam layer from getting too soft. Just remember to take them out about an hour before serving!
Nutritional Information
Now, I’m no nutritionist, but since we all like to know what we’re eating, here’s the scoop on these black raspberry oat bars. Keep in mind these numbers are estimates—your actual counts might vary depending on your exact ingredients and brands. But hey, at least we can feel slightly virtuous about that wholesome oat goodness!
- Serving Size: 1 bar (about 1/9 of the recipe)
- Calories: 220 kcal
- Sugar: 15g (mostly from the jam and brown sugar)
- Sodium: 80mg
- Fat: 8g (5g saturated from that lovely butter)
- Carbohydrates: 35g
- Fiber: 2g (thanks to those hearty oats!)
- Protein: 3g
Remember—these values change if you swap ingredients. Using coconut oil instead of butter? Different jam brand? Your numbers will adjust accordingly. I always say enjoy treats like these in moderation, savoring every delicious bite!
Frequently Asked Questions
Over the years, I’ve gotten so many great questions about these black raspberry oat bars—here are the most common ones with my tried-and-true answers!
Can I Use Frozen Raspberries Instead of Jam?
Absolutely! Just thaw 1 1/2 cups frozen raspberries first—drain them really well in a fine mesh strainer to remove excess liquid. Mash them lightly with 2 tablespoons sugar and 1 teaspoon cornstarch (this helps thicken the filling). Spread this mixture instead of jam, and bake as usual. You’ll get fabulous fresh berry flavor with little ruby-red fruit pockets!
How Long Do These Bars Actually Last?
At room temperature in an airtight container, they’re delicious for 3 days—after that the topping starts softening. But here’s my secret: they freeze like a dream! Layer cooled bars between parchment paper in freezer bags for up to 2 months. Thaw at room temperature whenever you need a sweet fix—they’ll taste just-baked.
Can I Make These Gluten-Free?
You bet! Swap the all-purpose flour with your favorite gluten-free blend (I like ones with xanthan gum already added). Just be sure to use certified gluten-free oats too—regular oats are often cross-contaminated. The texture comes out slightly more crumbly but still utterly delicious.
Why Did My Jam Bubble Over?
Ah, the great jam overflow—been there! Two tricks prevent this: leave that 1/4-inch border around the edges when spreading, and make sure your oven rack is in the center position. Too high and the top browns before the jam sets. Pro tip: placing a baking sheet on the rack below catches any drips just in case!
Can I Double This Recipe?
Please do—I always wish I’d made more! Use a 9×13-inch pan and double all ingredients exactly. Baking time increases to about 45-50 minutes—watch for that golden edge color. These are perfect for potlucks, and trust me, they disappear fast!
Share Your Black Raspberry Oat Bars
Nothing makes me happier than seeing your beautiful creations! Did you stick with classic raspberry or try a wild variation? Maybe you added chocolate chips or swapped in grandma’s homemade peach jam? I want to hear all about it! Snap a photo of your jammy masterpieces and tag me @Dishivia—I’ll feature my favorites in my stories!
And if you run into any baking questions, just drop them in the comments below. I read every single one (usually while nibbling on a freshly baked bar myself).
This recipe has brought so much joy to my kitchen over the years, and I’d love to hear how it turns out in yours. Happy baking, friends—may your oat bars be crumbly, your jam be sweet, and your kitchen smell like heaven!
For More recipes, Follow me on Facebook!