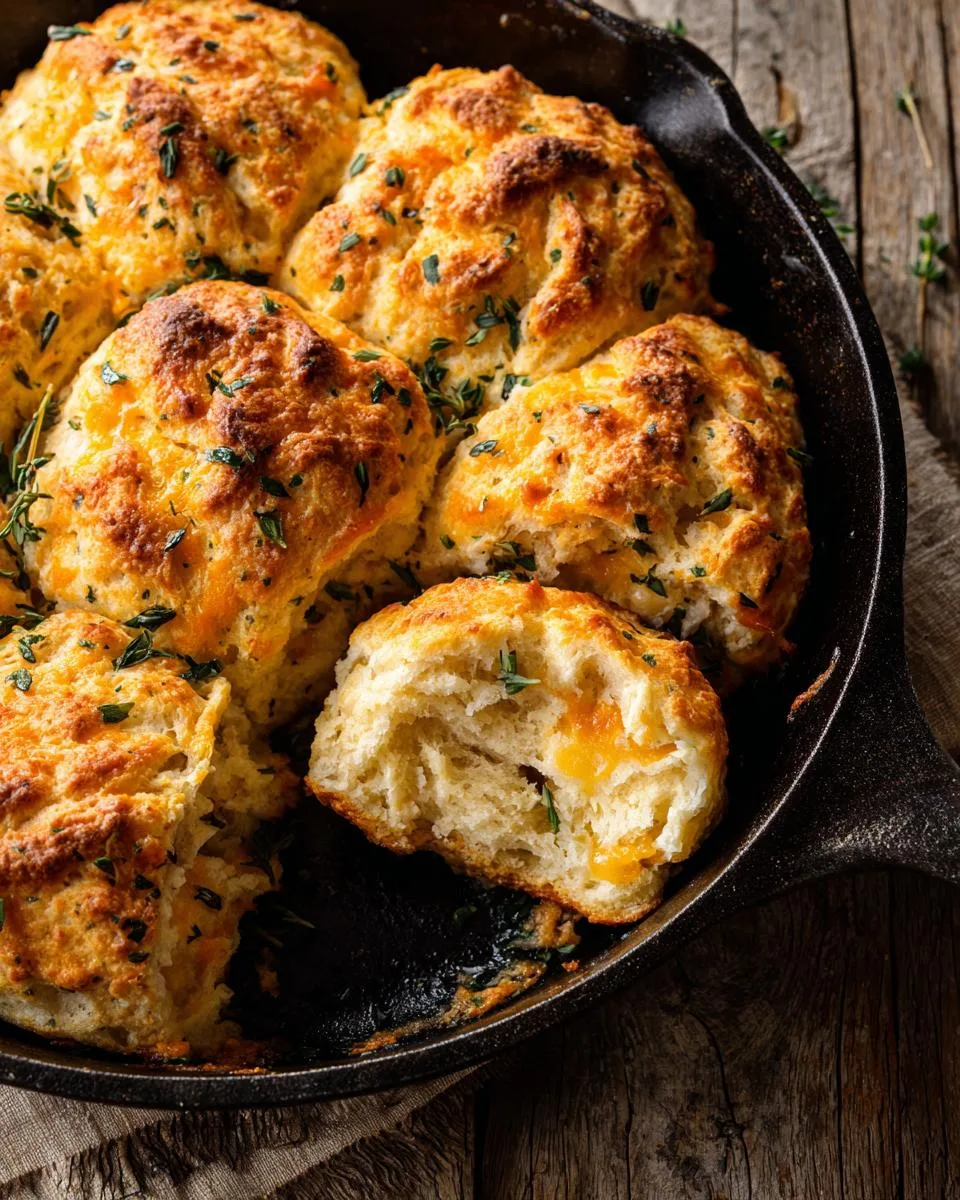
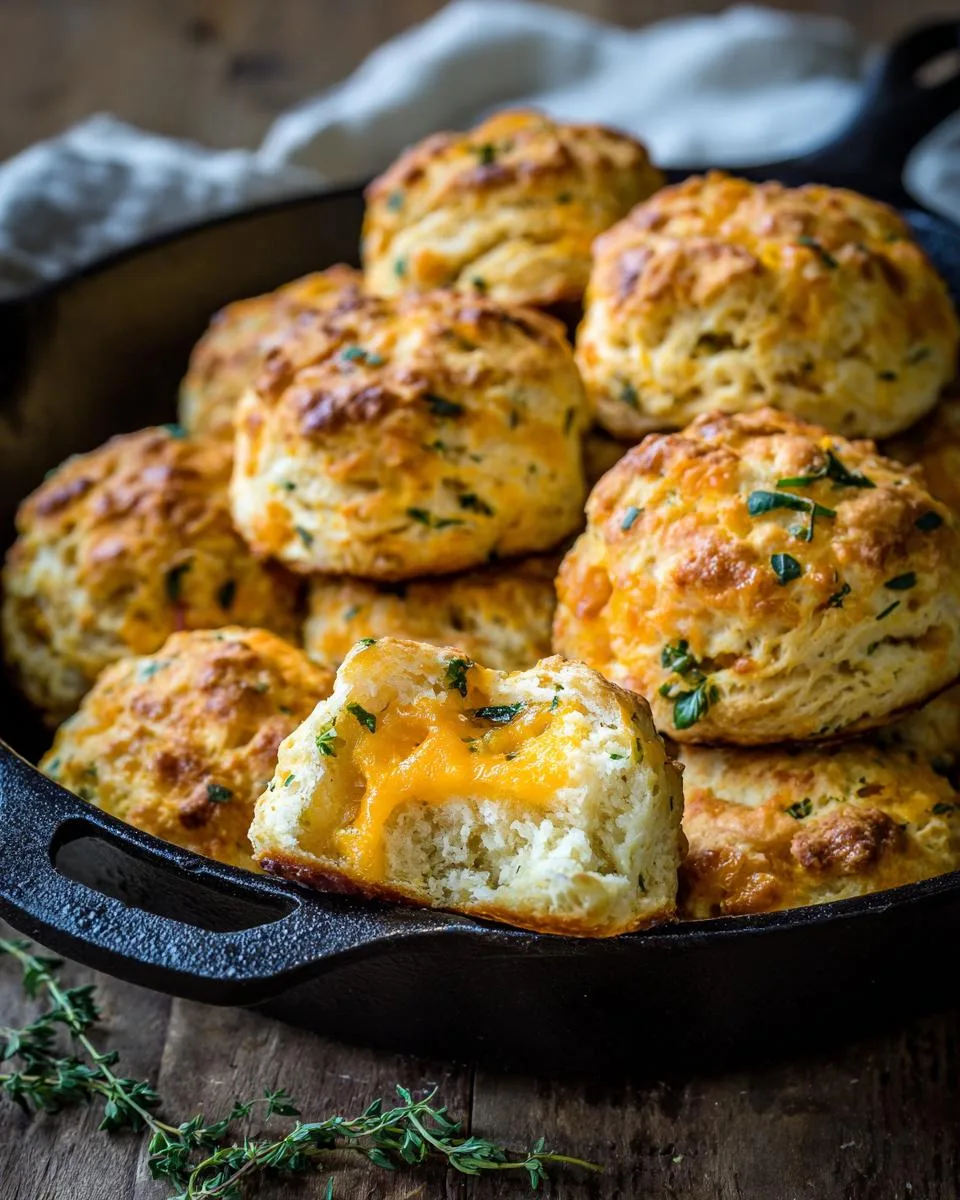
You know those mornings when you wake up craving something warm, buttery, and just a little bit fancy? That’s exactly why I created these Cheddar Herb Breakfast Biscuits—they’re like a cozy hug in edible form. As a chef who’s spent years perfecting comfort food, I can tell you there’s nothing quite like pulling a tray of golden-brown biscuits fresh from the oven. The way the sharp cheddar melts into pockets of gooey goodness while the fresh herbs add that perfect savory note? Pure breakfast magic.

Table of Contents
Table of Contents
What I love most about this recipe (besides how ridiculously good they smell while baking) is how simple they come together. With just a few basic ingredients and about 20 minutes of hands-on time, you’ve got fluffy, flaky biscuits that’ll make any morning feel special. Trust me, once you try them, you’ll understand why these became my family’s most-requested weekend treat!
Why You’ll Love These Cheddar Herb Breakfast Biscuits
Listen, I know you’ve probably had your fair share of biscuits, but these? These are something special. Let me tell you why:
- Fluffy cloud texture: That perfect combo of flaky layers and tender crumb that practically melts in your mouth
- Savory flavor bomb: Sharp cheddar mingles with fresh herbs in every bite—no boring biscuits here!
- Morning lifesaver: From bowl to table in under 40 minutes (yes, even on sleepy mornings)
- Endless possibilities: Serve them plain, sandwich them with eggs, or dunk them in gravy—they’re the breakfast MVP
Seriously, one bite and you’ll be hooked. My husband still jokes that I should open a biscuit shop after he tried his first one! If you’re looking for more great morning ideas, check out my collection of breakfast recipes.
Ingredients for Cheddar Herb Breakfast Biscuits
Now let’s talk ingredients – and I’m not messing around here! These biscuits come together with simple pantry staples, but how you prep them makes all the difference. Here’s what you’ll need:
- 2 and 1/2 cups (313g) all-purpose flour – spooned & leveled (this matters – don’t scoop straight from the bag!)
- 1 Tablespoon baking powder – make sure it’s fresh for max rise
- 1/2 teaspoon baking soda – our secret weapon for tenderness
- 1 teaspoon salt – I use fine sea salt for even distribution
- 1/2 cup (8 Tbsp; 113g) unsalted butter – cubed and VERY cold (I pop mine in the freezer for 10 minutes)
- 1 cup + 2 Tablespoons (270ml/g) cold buttermilk – divided (the acidity works magic)
- 2 teaspoons (14g) honey – just enough to balance the savory
Pro tip: Measure everything before starting – when working with cold ingredients, speed is your friend!
Ingredient Substitutions & Variations
Life happens, and sometimes you need to improvise – here are my tried-and-true swaps that still deliver amazing biscuits:
- No buttermilk? Make your own by mixing 1 cup milk with 1 Tbsp lemon juice or vinegar (let sit 5 minutes). Plain Greek yogurt thinned with milk works too!
- Different cheeses: Try sharp white cheddar, pepper jack for spice, or even crumbled feta for tang
- Fresh herbs running low? Use 1/3 the amount of dried herbs (I love rosemary-thyme combos)
- Butter alternatives: In a pinch, frozen grated butter works (just keep it icy cold)
My personal favorite variation? Adding crispy bacon bits and chives – absolute game changer for Sunday brunches! If you enjoy savory baked goods, you might also like my recipe for seeded sourdough discard crackers.
How to Make Cheddar Herb Breakfast Biscuits
Alright, let’s get our hands floury! The process for these biscuits is simple, but there are a few key steps that make all the difference between good and absolutely-can’t-stop-eating-them amazing. I’ll walk you through each step just like I do when teaching my cooking classes.
Preparing the Dough
First things first – preheat that oven to 425°F (218°C). Biscuits love a hot oven, and this gives it time to get perfectly heated while we work.
Now, grab your largest bowl (or food processor if you’re using one) and whisk together the flour, baking powder, baking soda, and salt. This is where I usually take a deep breath – that floury smell gets me every time!
Here comes the fun part: cutting in the butter. Drop in those icy-cold butter cubes and start working them into the flour mixture with a pastry cutter or two knives. You want pea-sized crumbs – some bigger flakes are actually good here! If you’re using a food processor, just pulse a few times until it looks like coarse meal. The cold butter is what gives us those beautiful flaky layers later.
Make a well in the center of your flour-butter mixture (if transferring from processor, do this now). Pour in most of the buttermilk (save 2 Tbsp for brushing later) and drizzle the honey over top. Now comes the gentle part – use a spoon or spatula to fold everything together until it just starts coming together. Don’t overmix! It’ll look shaggy with some dry spots, and that’s exactly what we want.
Shaping and Baking the Biscuits
Dump your dough onto a well-floured surface (I flour my hands too – this stuff’s sticky!). Gently pat and press it into a rough rectangle about 3/4-inch thick. Here’s where the magic happens: fold one side to the center, then the other side over top like you’re folding a letter. Turn the dough 90 degrees and repeat this fold-flatten-turn process two more times. This creates all those glorious flaky layers!
For the final shape, pat it out to 3/4-inch thickness again. Now grab your biscuit cutter (or a glass if you don’t have one) and press straight down without twisting – twisting seals the edges and prevents proper rising. Cut as many biscuits as you can, then gather scraps and pat out again to cut more. You should get 8-11 biscuits total.
Arrange them close together in your skillet or on a baking sheet – they’ll help each other rise tall and proud! Brush the tops with that reserved buttermilk for extra golden goodness. Into the oven they go for 18-20 minutes until puffed and gloriously golden brown.
Optional Honey Butter Topping
While the biscuits bake, melt a couple tablespoons of butter and whisk in a teaspoon of honey (or more to taste). As soon as those beauties come out of the oven, brush this mixture over the tops – it adds the most delicious sweet-savory glaze that makes everyone go “mmmm” on first bite. But honestly? They’re incredible plain too – seasonal fruit jam or crispy bacon also make fabulous partners!
Print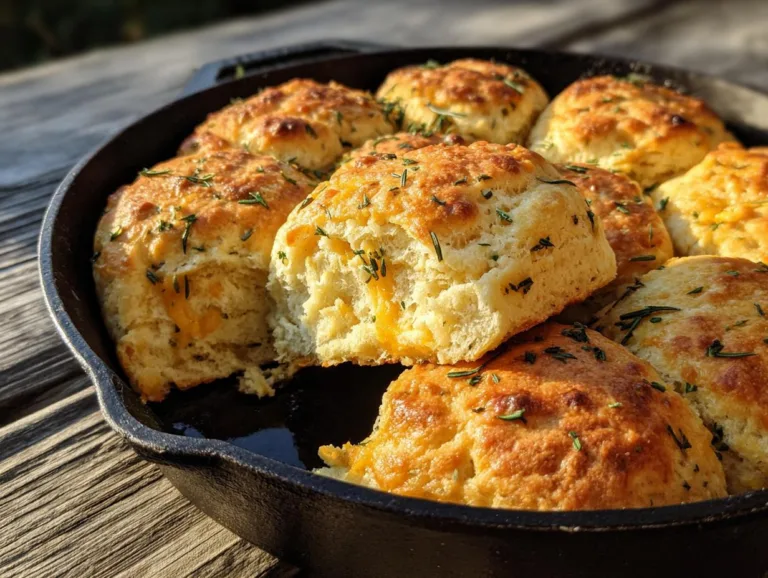
Irresistible Cheddar Herb Breakfast Biscuits in 40 Minutes
Fluffy and savory Cheddar Herb Breakfast Biscuits, perfect for a hearty morning meal.
- Total Time: 40 minutes
- Yield: 8–11 biscuits 1x
Ingredients
- 2 and 1/2 cups (313g) all-purpose flour (spooned & leveled), plus more as needed for hands and work surface
- 1 Tablespoon baking powder
- 1/2 teaspoon baking soda
- 1 teaspoon salt
- 1/2 cup (8 Tbsp; 113g) unsalted butter, cubed and very cold
- 1 cup + 2 Tablespoons (270ml/g) cold buttermilk, divided
- 2 teaspoons (14g) honey
Instructions
- Preheat oven to 425°F (218°C).
- Make the biscuits: Place the flour, baking powder, baking soda, and salt in a large bowl or in a large food processor. Whisk or pulse until combined.
- Add the cubed butter and cut into the dry ingredients with a pastry cutter or by pulsing several times in the processor. Cut/pulse until coarse crumbs form.
- If you used a food processor, pour the mixture into a large bowl. Make a well in the center. Pour 1 cup (240ml/g) buttermilk into the well and drizzle honey on top. Using a large spoon or spatula, fold until it begins to come together. Do not overwork the dough. The dough will be shaggy and crumbly with some wet spots.
- Pour the dough and any dough crumbles onto a floured work surface and gently bring together with generously floured hands. The dough will become sticky as you bring it together. Have extra flour nearby and use it often to flour your hands and work surface as needed.
- Using floured hands, flatten into a 3/4-inch-thick rectangle as best you can. Fold one side into the center, then the other side on top. Turn the dough 90 degrees, so it’s now horizontal. Gently flatten into a 3/4-inch-thick rectangle again. Repeat the folding again.
- Turn the dough horizontally one more time. Gently flatten into a 3/4-inch-thick rectangle. Repeat the folding one last time. Flatten into the final 3/4-inch-thick rectangle.
- Cut into 2.5- or 3-inch circles with a biscuit cutter. Re-roll scraps until all the dough is used. You should have about 8–11 biscuits.
- Arrange in a 10-inch cast iron skillet or close together on a parchment paper-lined baking sheet. Make sure the biscuits are touching.
- Brush the tops with remaining buttermilk. Bake for 18–20 minutes or until tops are golden brown.
- Remove from the oven. If adding the optional topping, whisk the melted butter and honey together. Using a pastry brush, brush the warm biscuits with honey butter topping. Serve warm.
- Cover leftovers tightly and store at room temperature or in Pollen the refrigerator for up to 5 days.
Notes
- Do not twist the biscuit cutter when pressing down into the dough because this seals off the edges of the biscuit which prevents them from fully rising.
- Arrange biscuits close together so they rise tall.
- Prep Time: 20 minutes
- Cook Time: 20 minutes
- Category: Breakfast
- Method: Baking
- Cuisine: American
- Diet: Vegetarian
Nutrition
- Serving Size: 1 biscuit
- Calories: 220
- Sugar: 4g
- Sodium: 350mg
- Fat: 12g
- Saturated Fat: 7g
- Unsaturated Fat: 4g
- Trans Fat: 0g
- Carbohydrates: 25g
- Fiber: 1g
- Protein: 4g
- Cholesterol: 30mg
Expert Tips for Perfect Cheddar Herb Breakfast Biscuits
After making countless batches of these biscuits (my neighbors think I’m running a secret bakery!), I’ve picked up some foolproof tricks that guarantee perfect results every time:
Flour is your best friend – Keep extra nearby and don’t be shy with it! Dust your hands, work surface, and even your biscuit cutter between presses. Sticky dough is normal – just keep flouring as needed.
Cold = flaky – If your butter starts softening, pop the whole bowl in the fridge for 5 minutes. Warm butter makes dense biscuits, and we want clouds!
The no-twist rule – It’s tempting to twist the cutter, but press straight down instead. Twisted edges won’t rise properly – trust me, I learned this the hard way!
They like company – Biscuits baked close together rise taller because they support each other. My cast iron skillet method creates the perfect cozy setup.
Serving Suggestions for Cheddar Herb Breakfast Biscuits
Oh, the possibilities with these biscuits! My absolute favorite way? Split them warm and slather with butter that melts into all those flaky layers. But let me share some winning combinations from my brunch-loving family:
- Breakfast classic: Sandwich with scrambled eggs and crispy bacon (the cheese pulls are Instagram-worthy!)
- Sweet & savory: Dollop of fig jam alongside sharp cheese slices
- Southern-style: Drowned in sausage gravy with a sprinkle of chives
- Fancy brunch: On a platter with smoked salmon, cream cheese, and capers
Pro tip: Always bake extra – they disappear faster than you’d think! If you’re looking for more savory inspiration, check out my chickpea parmesan crisps.
Storing and Reheating Cheddar Herb Breakfast Biscuits
Now, I know what you’re thinking – “Will there even be any leftovers?” But just in case you miraculously have a few biscuits survive past breakfast (it’s happened exactly twice in my house), here’s how to keep them tasting fresh:
Room temp storage: Keep them in an airtight container for up to 2 days – they’ll stay surprisingly tender! Fridge option: If you need them to last longer (up to 5 days), wrap tightly in foil or plastic wrap. The cold does dry them out slightly, but we’ll fix that when reheating.
Reheating magic: My secret? A quick 5-7 minutes in a 350°F oven brings back that just-baked crispness. Microwave works in a pinch (10-15 seconds), but they’ll lose some texture. For ultimate revival, split them open and toast lightly – the edges get perfectly crispy while the inside stays fluffy!
Nutritional Information for Cheddar Herb Breakfast Biscuits
Okay, let’s be real – we’re not eating biscuits for their health benefits! But if you’re curious (or tracking macros), here’s the scoop per biscuit based on my recipe. Remember, these are estimates – your exact numbers might vary depending on brands and exact measurements:
- Calories: 220
- Fat: 12g (7g saturated)
- Carbs: 25g (1g fiber, 4g sugar)
- Protein: 4g
- Sodium: 350mg
Pro tip: The honey butter topping adds about 20 more calories per biscuit – totally worth it in my book! As always, nutrition varies based on your specific ingredients and serving sizes.
Frequently Asked Questions
Q1. Can I freeze the biscuit dough for later?
Absolutely! I do this all the time for busy mornings. Shape the dough into biscuits, freeze them on a baking sheet until solid (about 1 hour), then transfer to a freezer bag. They’ll keep for up to 3 months. Bake straight from frozen – just add 2-3 extra minutes to the cooking time. The cold actually helps create extra flaky layers!
Q2. Can I use dried herbs instead of fresh?
You sure can! The general rule is to use 1/3 the amount of dried herbs since they’re more concentrated. My favorite combo is 1/2 teaspoon each of dried thyme and rosemary. Just crumble them between your fingers before adding to release their oils.
Q3. Why did my biscuits come out dense?
Oh no! Two likely culprits: 1) Your butter wasn’t cold enough (it should make your fingers tingle when cutting it in), or 2) You overworked the dough. Remember – shaggy is good! Next time, handle the dough as little as possible once the liquid is added.
Q4. Can I make these biscuits ahead?
Yes! For same-day serving, you can prep the dough, shape the biscuits, and refrigerate them (covered) for up to 2 hours before baking. The cold rest actually improves the texture. Just brush with buttermilk right before they go in the oven.
Now I want to hear from you – tag me @Dishivia with your biscuit creations! Nothing makes me happier than seeing your golden, cheesy masterpieces.
For More recipes, Follow me on Facebook!