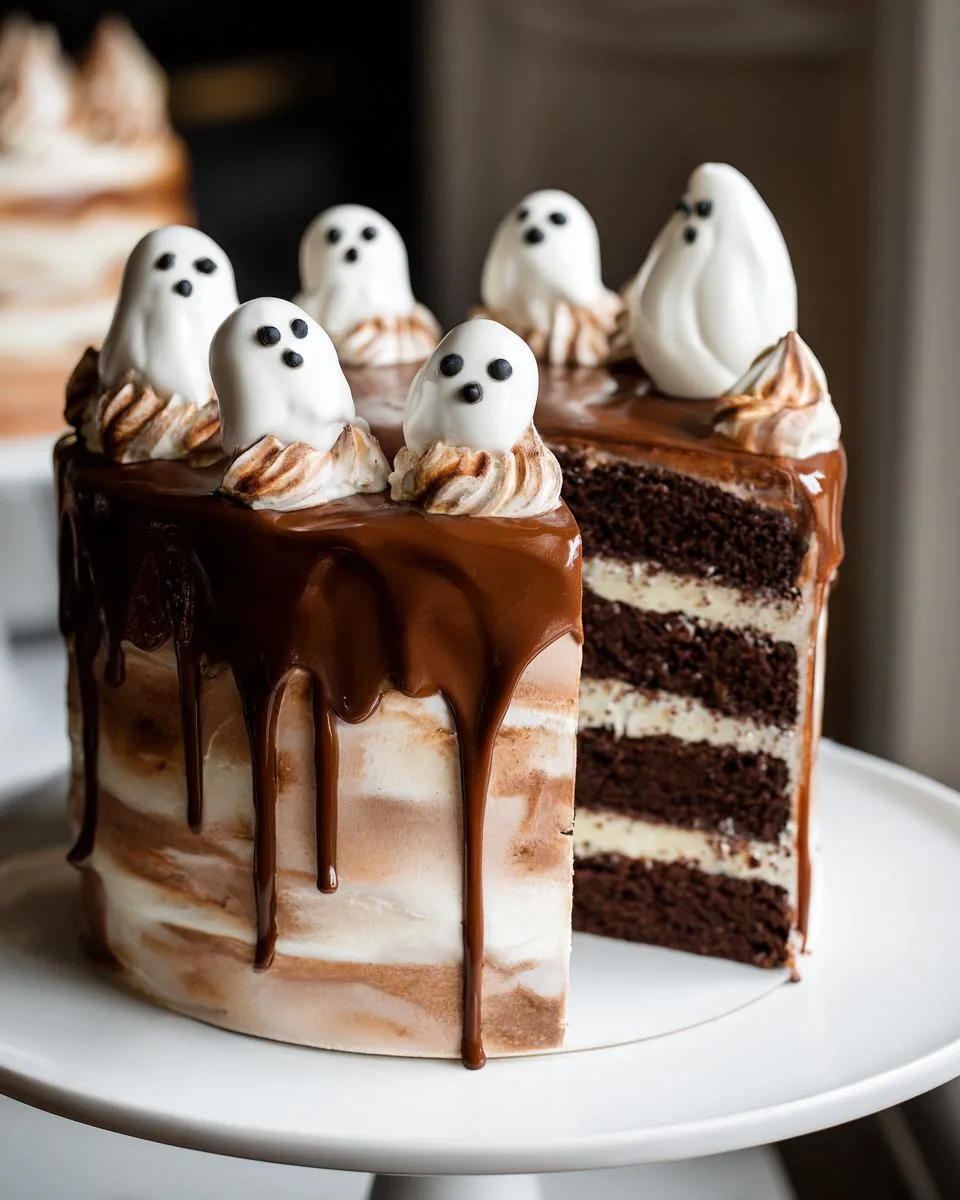
Halloween isn’t complete without something delightfully spooky to eat, and this Ghost Cake is the perfect showstopper for your next party! Picture this: rich, fudgy chocolate layers, swirled with creamy buttercream, topped with floating meringue ghosts and a glossy chocolate ganache drip. It’s equal parts adorable and delicious—just scary enough to thrill the kids, but so tasty, no one can resist a slice. I first made this cake for my niece’s Halloween bash, and let me tell you, those little meringue ghosts stole the show. Now, it’s my go-to treat whenever I want to bring some ghoulish fun to the table!

Table of Contents
Table of Contents
Why You’ll Love This Ghost Cake
Trust me, this cake is a total crowd-pleaser—here’s why:
- Easy yet impressive: No fancy skills needed—just layer, frost, and decorate with those cute little ghosts!
- Party-perfect: The spooky-but-sweet vibe makes it a hit at Halloween or any themed gathering.
- Rich chocolate goodness: That coffee-infused cake base? Deep, moist, and downright addictive.
- Adorable meringue ghosts: They’re playful, pillowy, and way easier to pipe than you’d think.
Ghost Cake Ingredients
Okay, let’s gather everything you’ll need for this spooky masterpiece! I’ve grouped the ingredients by component—cake, meringues, frosting, and ganache—so you can prep like a pro. Pro tip: Measure everything before starting. Trust me, it saves so much mid-baking panic!

For the Chocolate Cake Layers
Dry Ingredients:
- 2 cups all-purpose flour (spooned and leveled)
- 3/4 cup unsweetened cocoa powder (sifted if lumpy)
- 1 tsp. baking soda
- 1 tsp. kosher salt
Wet Ingredients:
- 1 cup hot coffee (freshly brewed works best)
- 1 cup granulated sugar
- 1/2 cup packed brown sugar (light or dark both work)
- 3/4 cup vegetable oil
- 1/2 cup sour cream, room temperature (this makes the cake extra tender)
For the Ghost Meringues
- 4 large egg whites (room temperature—cold whites won’t whip properly)
- 1/4 tsp. cream of tartar (your secret weapon for stable peaks)
- 1/4 cup granulated sugar + 1/4 cup powdered sugar (mixed together)
- 1/2 tsp. pure vanilla extract
For the Buttercream Frosting
- 1 cup (2 sticks) unsalted butter, softened (leave it out for 30 minutes—it should dent easily)
- 4 cups powdered sugar, sifted (no lumps allowed!)
- Pinch kosher salt
- 1/4 cup heavy cream (plus extra tablespoons if needed)
- 1 tsp. pure vanilla extract
- Black food coloring (gel works best—don’t use liquid!)
For the Chocolate Ganache
- 1 cup semi-sweet chocolate chips (or chopped baking chocolate)
- 1/2 cup heavy cream, heated until steaming (not boiling)
Equipment You’ll Need
Don’t worry—you don’t need fancy gadgets for this Ghost Cake! Just grab these basics from your kitchen:
- Two 8-inch round cake pans (grease ‘em well!)
- Piping bags + large round tip (for those adorable ghosts)
- Offset spatula (trust me, frosting is WAY easier with one)
- Hand mixer or stand mixer (your arms will thank you)
- Wire cooling rack (so your cake doesn’t get soggy)
That’s it! Now let’s make some spooky magic.
How to Make a Ghost Cake
Alright, let’s dive into the fun part—bringing this spooky treat to life! Follow these steps carefully, and you’ll have a Ghost Cake that’ll make everyone scream (in delight, of course).

Step 1: Bake the Chocolate Cake Layers
First things first—preheat that oven to 350°F and grease those cake pans like your life depends on it. Trust me, nobody wants a cake that sticks! In a big bowl, whisk together your dry ingredients—flour, cocoa powder, baking soda, and salt. No lumps allowed! In another bowl, mix the hot coffee with both sugars until they dissolve. Then, whisk in the oil and sour cream until it’s silky smooth. Now, pour the wet mix into the dry ingredients and stir just until combined—overmixing is the enemy of a tender cake.
Divide the batter evenly between your pans (a kitchen scale helps here, but eyeballing works too). Slide them into the oven and bake for 25–30 minutes. You’ll know they’re done when a toothpick comes out with just a few moist crumbs clinging to it. Let them cool in the pans for 15 minutes, then flip onto a wire rack. Resist the urge to frost them warm—patience is key!
Step 2: Prepare the Ghost Meringues
While the cakes cool, let’s make those adorable meringue ghosts. Lower the oven to 225°F—low and slow is the way to go here. Grab your egg whites and cream of tartar, and whip them on low until frothy. Now, here’s the trick: gradually add the sugar mixture while beating on medium, then crank it up to high until you get stiff, glossy peaks. Think “clouds that hold their shape.” Fold in the vanilla gently—no deflating!
Pipe your ghosts onto a parchment-lined baking sheet: start with a fat blob for the base, then taper up into smaller blobs for the “body.” They should look like little floating specters. Bake for 1 hour and 20 minutes—they’ll be crisp outside, chewy inside. Let them cool completely before handling (they’re fragile, like real ghosts!).
Step 3: Frost and Assemble the Ghost Cake
Time to tame those cake layers! Pop them in the freezer for 20 minutes—this makes them SO much easier to handle. While they chill, whip up the buttercream: beat the butter until it’s fluffy, then add the powdered sugar and salt. Drizzle in the cream and vanilla, and beat until it’s dreamily smooth. If it’s too thick, add more cream a teaspoon at a time.
Level the cakes if needed (a serrated knife works wonders), then spread a thick layer of frosting on the first layer. Top with the second cake and frost the whole thing—use an offset spatula for those bakery-worthy smooth sides. Reserve a bit of frosting for the ghosts’ faces!
Step 4: Decorate with Ganache and Ghosts
The grand finale! Make the ganache by pouring hot cream over chocolate chips. Let it sit for a minute (patience!), then stir until it’s glossy and perfect. Pour it over the cake’s center, nudging it to the edges so it drips down spookily. Now, grab those cooled meringues and pipe on tiny black eyes and mouths—they’ll look adorably eerie. Arrange them on top like they’re haunting your cake. And voilà—you’ve just made a Ghost Cake that’s equal parts creepy and craveable!
Print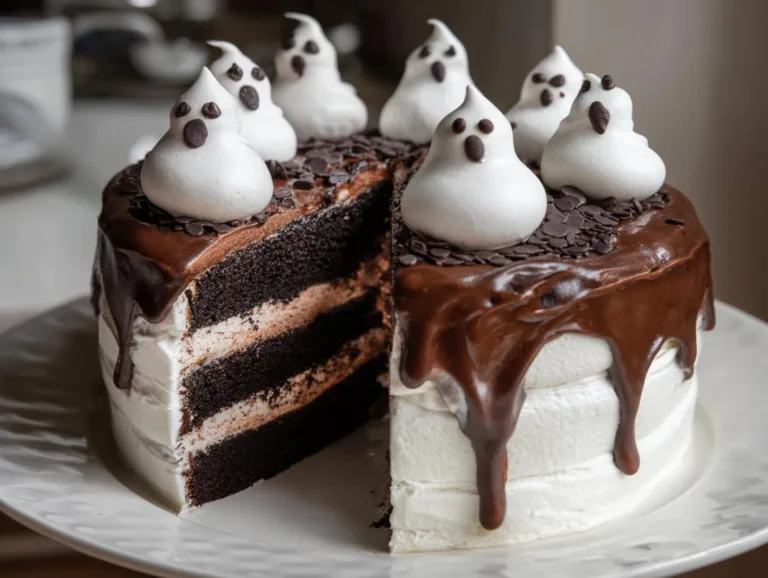
Spooky 2-Layer Ghost Cake Recipe for a Delicious Treat
A spooky yet delicious Ghost Cake perfect for Halloween or themed parties. This cake features rich chocolate layers, creamy buttercream, and adorable ghost meringues topped with a glossy ganache.
- Total Time: 3 hours 20 minutes
- Yield: 1 cake (8-10 servings) 1x
Ingredients
- Cooking spray
- 2 cups all-purpose flour
- 3/4 cup unsweetened cocoa powder
- 1 tsp. baking soda
- 1 tsp. kosher salt
- 1 cup hot coffee
- 1 cup granulated sugar
- 1/2 cup packed brown sugar
- 3/4 cup vegetable oil
- 1/2 cup sour cream, room temperature
- 1/4 cup granulated sugar
- 1/4 cup powdered sugar
- 4 large egg whites
- 1/4 tsp. cream of tartar
- 1/2 tsp. pure vanilla extract
- 1 cup (2 sticks) butter, softened
- 4 cups powdered sugar
- Pinch kosher salt
- 1/4 cup heavy cream
- 1 tsp. pure vanilla extract
- Black food coloring
- 1 cup chocolate chips
- 1/2 cup heavy cream
Instructions
- Preheat oven to 350°F. Line two 8” cake pans with parchment and grease with cooking spray. In a large bowl, whisk together flour, cocoa powder, baking soda, and salt.
- In another large bowl, whisk hot coffee and sugar together. Add oil and sour cream and whisk to combine. Pour into dry ingredients and whisk until just combined.
- Divide batter between prepared pans and bake until a toothpick inserted in the middle comes out clean, 25 to 30 minutes. Let cool 15 minutes, then invert onto a wire cooling rack and let cool completely.
- Preheat oven to 225°F. Line a large baking sheet with parchment paper. In a small bowl, combine sugars. In a large bowl using a hand mixer, beat egg whites and cream of tartar on low speed until whites are broken up and cream of tartar is mostly mixed in. Increase speed to medium and continue beating. When egg whites are frothy, slowly pour in sugars a little at a time. Increase speed to high and continue beating until medium peaks. Slowly add vanilla and keep beating until egg whites are stiff peaks. Transfer egg whites to a piping bag with a large round tip.
- Pipe ghosts onto prepared baking sheet by piping a large circle, lifting slightly and piping a slightly smaller circle, then lifting slightly again and piping another slightly smaller circle. Bake meringues until outsides are hard, 1 hour and 20 minutes. Let cool completely.
- Wrap cooled cake layers in plastic wrap and freeze for 20 minutes. In a large bowl using a hand mixer, beat butter until smooth. Add powdered sugar and a pinch of salt and beat until no lumps remain. Add heavy cream and vanilla and beat until combined. Add more heavy cream, 1 tablespoon at a time, if needed until desired consistency is reached. Frosting should hold its shape, but be easily spreadable. Scoop out about ¼ cup of frosting and reserve for later.
- Unwrap cake layers and using a serrated knife, level tops of cakes if needed. Place one layer on a serving platter and spread about half of the frosting on top with an offset spatula. Place second layer on top and frost tops and sides with remaining frosting. Use a bench scraper to smooth sides and top.
- Dye the reserved buttercream black and place into a pastry bag with a small round tip. Pipe eyes and mouths onto cooled ghost meringues.
- Place chocolate chips into a heat-safe bowl. In a small pot over medium heat, heat heavy cream until bubbles form around the edges of the pan. Pour hot heavy cream over chocolate chips and let sit 1 minute. Whisk ganache until smooth and completely combined.
- Pour about half of the ganache onto the top of the cake and use an offset spatula to smooth ganache. Gently push ganache to the edges of the cake and help guide the chocolate to drip down the side. Add more ganache as needed. Arrange ghost meringues on top of the cake.
Notes
- Ensure all ingredients are at room temperature for best results.
- Use a piping bag with a large round tip for the ghost meringues.
- Freeze cake layers before frosting to make them easier to handle.
- Adjust the consistency of the buttercream by adding heavy cream as needed.
- Prep Time: 1 hour
- Cook Time: 2 hours
- Category: Dessert
- Method: Baking
- Cuisine: American
- Diet: Vegetarian
Nutrition
- Serving Size: 1 slice
- Calories: 450
- Sugar: 35g
- Sodium: 200mg
- Fat: 25g
- Saturated Fat: 12g
- Unsaturated Fat: 10g
- Trans Fat: 0g
- Carbohydrates: 55g
- Fiber: 3g
- Protein: 5g
- Cholesterol: 40mg
Tips for the Perfect Ghost Cake
Want your Ghost Cake to be spook-tacular? Here are my tried-and-true tricks:
- Freeze those cake layers: 20 minutes in the freezer makes them way easier to frost—no crumbs messing up your smooth buttercream!
- Watch your frosting consistency: Too thick? Add cream a teaspoon at a time. Too thin? More powdered sugar saves the day.
- Gel food coloring only: Liquid coloring makes frosting runny—trust me, I learned this the messy way.
- Ghost piping hack: If your meringues slump, chill the piping bag for 10 minutes—cold holds its shape better.
- Ganache patience: Let it cool slightly before pouring so you get those perfect drips, not a chocolate avalanche.
Follow these, and your cake will be the star of any Halloween spread! Check out more recipes for more inspiration.
Ghost Cake Variations
Listen, I love the classic chocolate version, but sometimes you wanna switch things up! Here are some fun twists on our Ghost Cake that keep the spooky spirit alive while adding new flavors. My niece begged me to try the cookie dough version last year—total game changer!
Vanilla Bean Spook Cake
Swap the chocolate cake for vanilla by replacing the cocoa powder with an extra ¾ cup flour and adding 1 tablespoon vanilla bean paste. The ghosts really pop against the white cake! Bonus: use clear vanilla extract in the meringues for that classic “ghostly” white color.
Coconut Casper Meringues
For a tropical twist, fold ½ cup toasted coconut flakes into your meringue before piping. They’ll have this awesome chewy-crispy texture—like little coconut phantom bites! Just be sure to toast the coconut first so it doesn’t bleed oil into your meringue.
Cookies & Scream Version
My personal favorite! Add ½ cup mini chocolate chips to the cake batter and crumble some Oreos between the layers with the frosting. The ghosts look extra cute “floating” above a cookie crumb “graveyard.” Pro tip: freeze the chocolate chips first so they don’t sink!
The best part? You can mix and match these ideas—maybe vanilla cake with coconut meringues? Or chocolate cake with peppermint ghosts for Christmas? Get creative and make this Ghost Cake your own spooky signature dessert! You might also like these Jack-o-Lantern Stuffed Bell Peppers for a savory Halloween treat.
Serving and Storing Your Ghost Cake
Okay, let’s talk about keeping your Ghost Cake as fresh and fabulous as the moment you finished decorating it! First things first—this beauty can sit out at room temperature for about 3 hours during your party (covered lightly with a cake dome if possible). The buttercream and ganache hold up just fine, but those adorable meringue ghosts? They start weeping in humidity like they’re watching a sad movie. So if your kitchen feels like a rainforest, pop the cake in the fridge after an hour.
For storing leftovers (though I doubt you’ll have any!), here’s the drill:
- Short-term: Cover loosely with plastic wrap or a cake carrier and keep at room temp for up to 2 days. The meringues will soften slightly but still taste amazing.
- Longer storage: Refrigerate for up to 5 days, but know the meringues will lose their crispness. Let the cake come to room temp before serving—cold buttercream tastes like, well, cold butter.
- Meringue SOS: If your ghosts get sticky, you can rebake them at 200°F for 10 minutes to crisp up again. Just watch them like a hawk!
One last pro tip: Never, and I mean NEVER, store this cake near anything steamy (looking at you, coffee maker). Those meringue ghosts will melt faster than the Wicked Witch in water. Learned that lesson the hard way during a particularly humid Halloween brunch—my poor ghosts turned into phantom puddles! For more Halloween ideas, check out this Graveyard Layered Taco Dip.
Ghost Cake Nutritional Information
Now, let’s be real—this Ghost Cake is a treat, not a health food! But if you’re curious (or just like to plan your indulgences), here’s the nutritional breakdown per slice, based on cutting the cake into 10 generous portions. Keep in mind these are estimates—actual values can vary depending on specific ingredients and how thick you spread that buttercream!
- Calories: 450 (Worth every single one if you ask me!)
- Sugar: 35g (Blame the meringues and that luscious ganache)
- Fat: 25g (Hello, butter and chocolate—the dream team)
- Saturated Fat: 12g (But hey, it’s a special occasion!)
- Protein: 5g (Egg whites to the rescue)
- Fiber: 3g (Thank you, cocoa powder!)
A little disclaimer from my kitchen to yours: These numbers are calculated using standard ingredients, but your mileage may vary. Using dark chocolate instead of semi-sweet? That’ll tweak the numbers. Extra heavy on the frosting? No judgment here—just adjust accordingly. The main thing? Enjoy every spooky, delicious bite!
Frequently Asked Questions
Got Ghost Cake questions? I’ve got answers! Here are the most common things readers ask me—plus all my hard-earned kitchen wisdom to help you avoid any spooky surprises.
Can I Use Store-Bought Meringues?
Technically? Yes. Should you? Well… let’s just say homemade ghosts make all the difference! Store-bought meringues tend to be rock-hard and overly sweet—nothing like the delicate, melt-in-your-mouth texture you get when you make them fresh. Plus, piping your own lets you create those perfectly plump, swoopy ghost shapes that make this cake so special. If you’re really pressed for time, look for soft meringue cookies at a bakery (not the crunchy supermarket kind), but honestly? Those 10 extra minutes of piping are so worth it!
How Long Does This Cake Last?
Your Ghost Cake will stay delicious for about 3 days at room temperature if stored properly (covered lightly with a cake dome or overturned bowl). The chocolate cake actually gets moister over time—bonus! Just know the meringue ghosts will gradually soften after day one (they’ll still taste great, they just lose that crisp shell). If your kitchen runs hot or humid, pop it in the fridge after 24 hours—but let slices come to room temp before serving so the buttercream isn’t stiff.
Can I Freeze the Ghost Cake?
You can, but with a few spooky caveats! The cake layers freeze beautifully on their own (wrap them tightly in plastic, then foil), and the buttercream holds up okay—but those delicate meringue ghosts? They’ll weep and get sticky when thawed. My advice: Freeze just the assembled cake (no ghosts or ganache), then add fresh meringues and ganache after thawing overnight in the fridge. Oh, and never freeze decorated slices—the frosting separates like a bad horror movie breakup!
Share Your Spooky Creation!
Okay, I need to see your Ghost Cake masterpieces—seriously, nothing makes me happier than seeing your spins on this recipe! Did you give your ghosts little cowboy hats for a Wild West theme? Maybe you went full goth with black cocoa cake and purple ganache? (I did that last year—so fun!) Snap a pic and share it with me on social—tag me so I can cheer you on. Baking is always better when we do it together, and your creativity might just inspire someone else to try their hand at this spooky treat. Plus, let’s be honest—those meringue ghosts are basically begging to be Instagram famous. Can’t wait to see what you conjure up!
For More recipes, Follow me on Facebook!