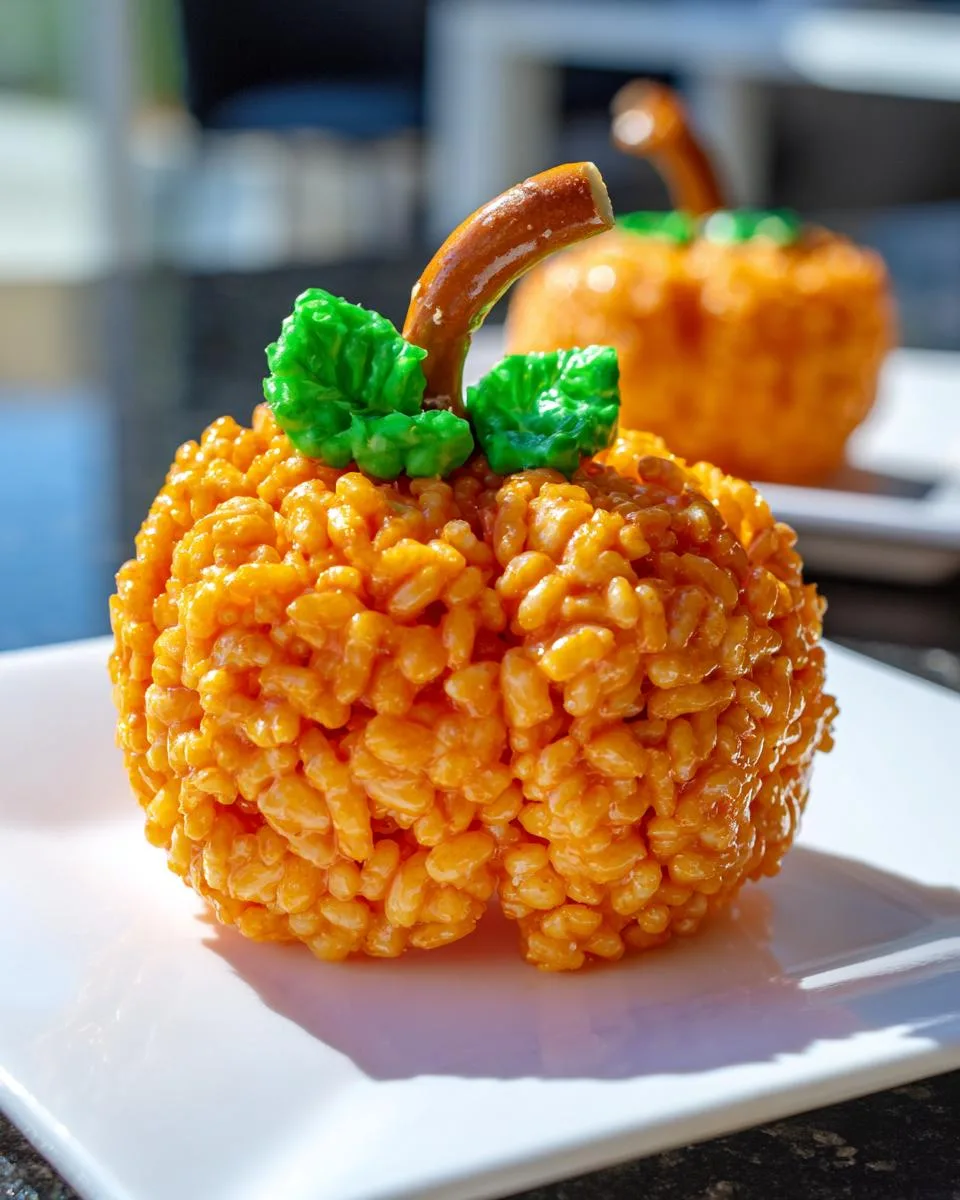
There’s something magical about Halloween treats that look as fun as they taste – and these pumpkin-shaped Rice Krispie treats are the perfect example! I still remember my first batch years ago, when my niece squealed with delight at the little orange “pumpkins” on her plate. Now, it’s become our October tradition – because honestly, what’s easier (or more adorable) than turning classic Rice Krispie treats into festive fall goodies?
These cuties come together in minutes with just a handful of ingredients you probably already have. The best part? No baking required. Just melt, mix, shape, and decorate – it’s the kind of foolproof project that lets kids help without turning your kitchen into a disaster zone. Trust me, whether you’re making them for a party or just because, these cheerful pumpkin treats will disappear faster than you can say “trick or treat!”
Table of Contents
Table of Contents
Why You’ll Love These Pumpkin-Shaped Rice Krispie Treats
Let me count the ways these little orange cuties will steal your heart (and probably your last bite)! First off, they’re ridiculously easy – we’re talking 15 minutes from stove to table. No fancy equipment, no stress. Just grab a saucepan and your favorite wooden spoon.
Here’s what makes them extra special:
- Kid-approved magic: Little hands love helping shape the pumpkins (and sneaking marshmallows)
- Pantry-friendly ingredients: Rice Krispies, marshmallows, butter – you might already have everything!
- Instant Halloween spirit: That bright orange color and cute pretzel stem? Pure festive joy
- No-bake brilliance: Perfect for when you want something sweet without turning on the oven
Seriously – these disappear faster than Halloween candy at my house. The only problem? You’ll want to make a double batch!
Ingredients for Pumpkin-Shaped Rice Krispie Treats
Okay, let’s gather our goodies! Here’s what you’ll need to make about 6 adorable pumpkin treats – and yes, every single ingredient matters for that perfect squishy-yet-firm texture. I learned the hard way that generic cereal just doesn’t give the same snap, crackle, pop as the real deal!
- 6 cups Rice Krispies cereal – measure them lightly (don’t pack the cups!)
- 3 Tbsp salted butter – the real stuff, not margarine (trust me on this)
- 1 (10 oz) package mini marshmallows – fresh ones melt so much smoother
- Orange gel food coloring – about 15 drops, but we’ll eyeball it
- 3 pretzel rods – we’ll snap off the ends to make 6 little “stems”
- 6 mini green AirHeads – or fondant if you can’t find them
- Non-stick cooking spray – for your hands (this step is crucial!)
See? Nothing crazy – just simple ingredients that transform into pure Halloween happiness. Now let’s get melting!
How to Make Pumpkin-Shaped Rice Krispie Treats
Alright, let’s get messy (in the best way possible)! I’ve made these pumpkin-shaped Rice Krispie treats more times than I can count, and I’ve learned a few tricks along the way. Follow these steps, and you’ll have a batch of adorable orange pumpkins ready to impress in no time.
Melting the Butter and Marshmallows
First things first – grab your favorite saucepan (I use my trusty 4-quart one) and melt that butter over medium-low heat. Patience is key here – if the heat’s too high, you’ll end up with burnt marshmallows instead of that perfect gooey texture. Once the butter’s melted, dump in all those mini marshmallows and start stirring with a wooden spoon.
Watch for that magical moment when the marshmallows start melting into a smooth, glossy pool – that’s when you’ll add about 15 drops of orange gel food coloring. Why gel? It gives that vibrant pumpkin color without making the mixture watery. Stir until you’ve got a uniform orange hue that would make any jack-o’-lantern jealous!
Shaping the Pumpkin Treats
Here comes the fun (and slightly sticky) part! Pour the melted marshmallow mixture over your waiting Rice Krispies and gently fold until every last cereal piece is coated. Now, here’s my #1 tip: let it cool just enough to handle – about 2 minutes. Too hot and you’ll burn your fingers; too cool and it won’t shape properly.
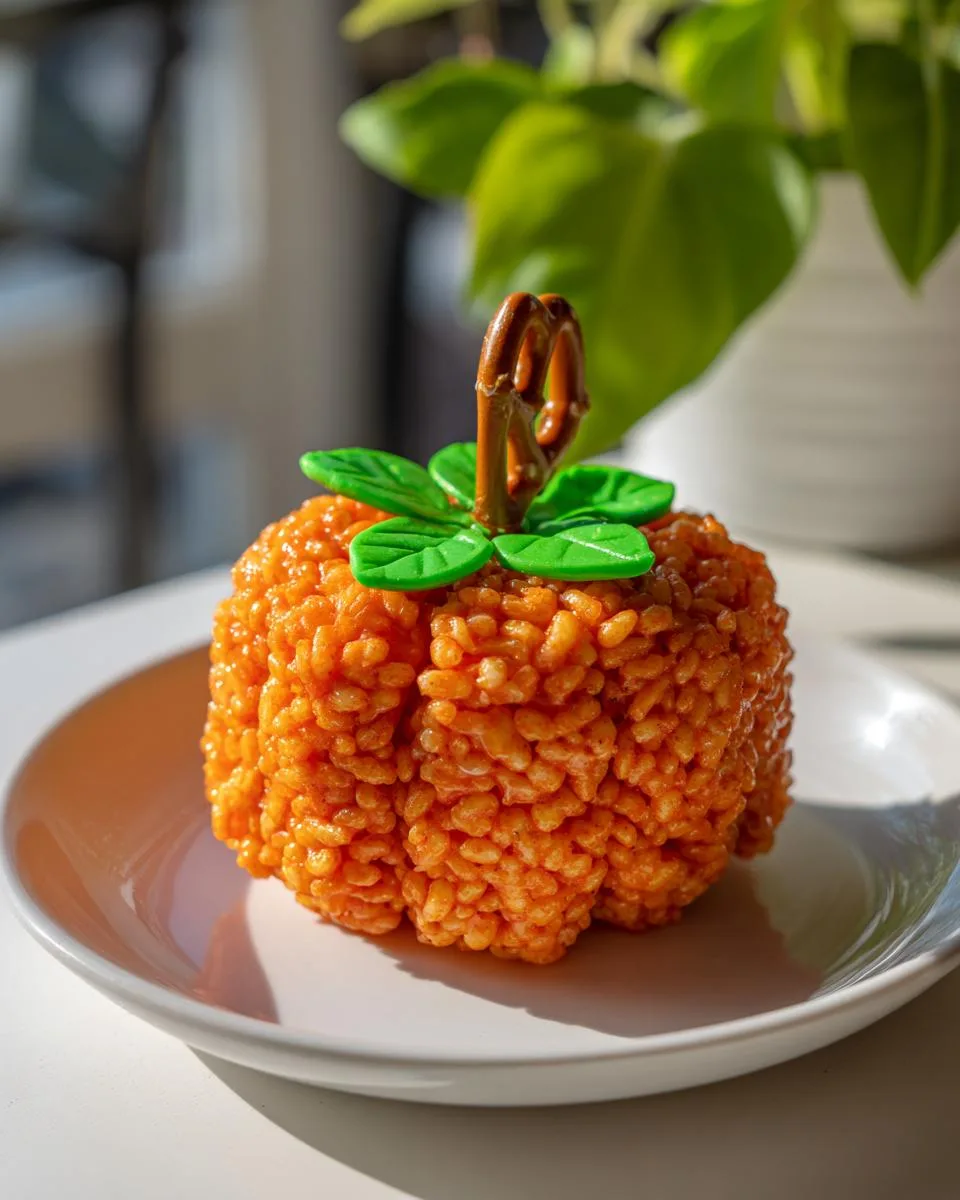
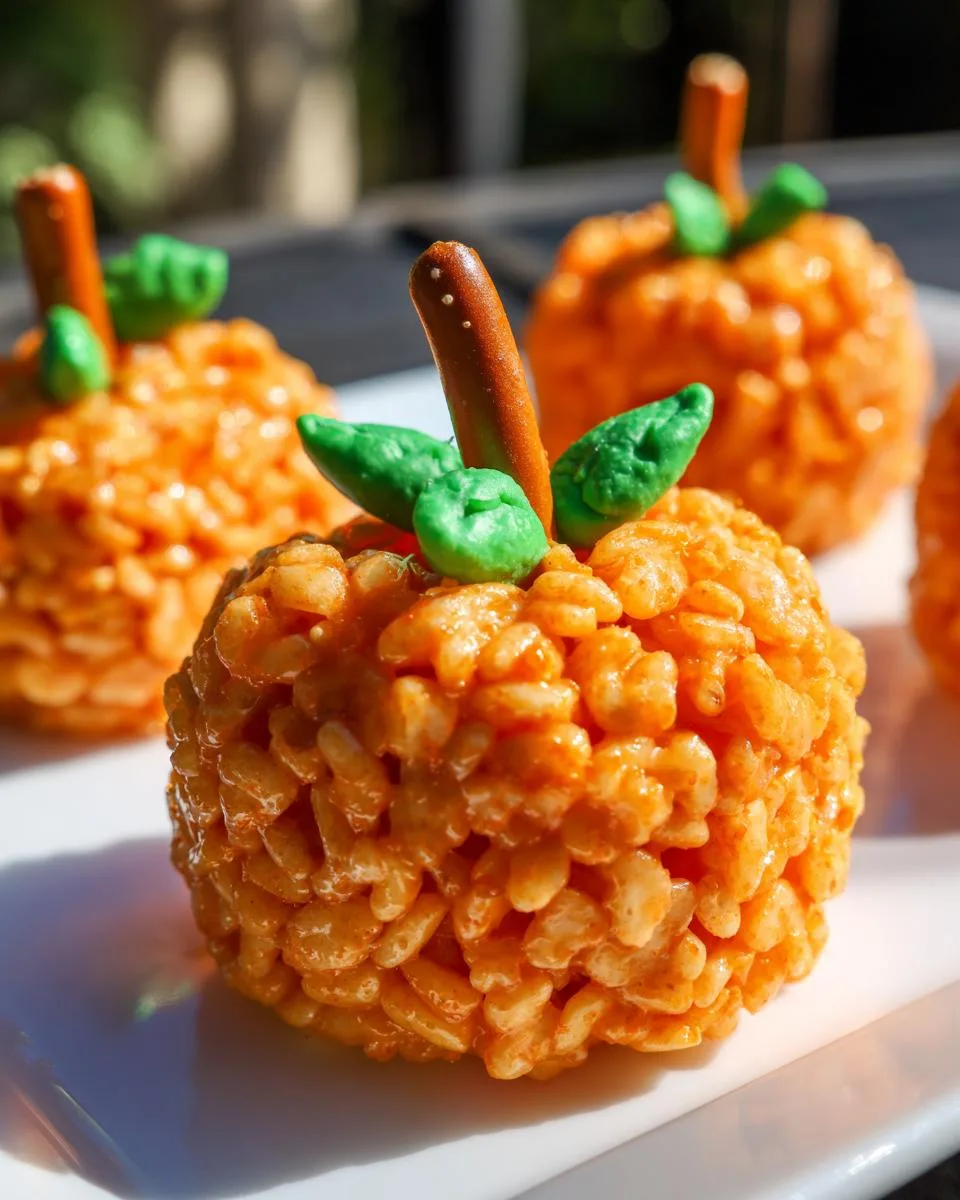
Spray your hands generously with non-stick spray (seriously, don’t skip this!) and scoop out baseball-sized portions. Roll them into balls, then use your thumbs to gently flatten the bottoms and slightly indent the tops – this gives that perfect pumpkin shape. Work quickly – the marshmallow sets fast!
Adding the Pretzel Stem and Decorations
Time for the finishing touches! Take your broken pretzel pieces and gently press one into the top center of each pumpkin – this is your stem. For the leaves, I like to roll out the green AirHeads between parchment paper, then cut little leaf shapes with kitchen scissors. The leftover bits? Twist them into cute vines!
Press your candy leaves onto the sides of the pretzel stems, adding vines if you’re feeling fancy. No AirHeads? No problem! A small piece of green fondant works just as well. And voila – you’ve got yourself a batch of pumpkin-shaped treats that are almost too cute to eat!
Print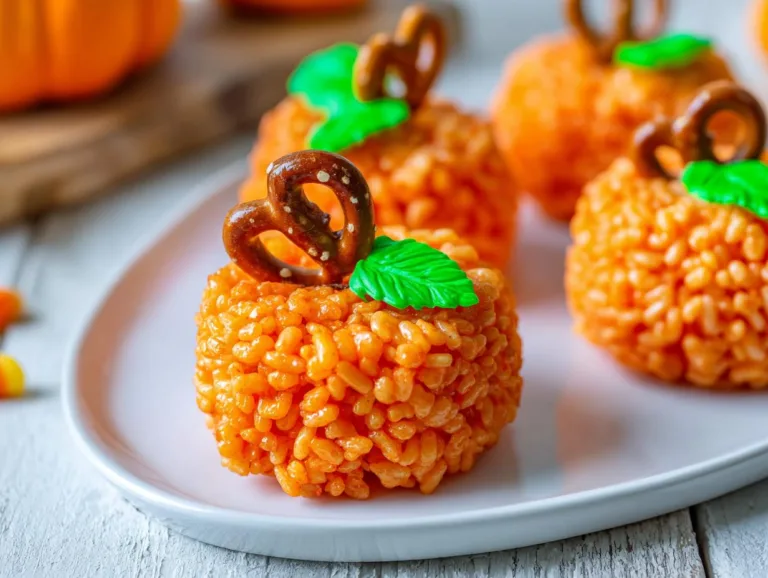
15-Minute Pumpkin-Shaped Rice Treats That Wow Every Time
Learn how to make fun pumpkin-shaped Rice Krispie treats with simple ingredients and easy steps.
- Total Time: 25 minutes
- Yield: 6 pumpkin-shaped treats 1x
Ingredients
- 6 cups rice krispies cereal
- 3 Tbsp salted butter
- 1 (10 oz) pkg. mini marshmallows
- Orange gel food coloring
- 3 pretzel rods, end portions broken off into 2-inch pieces (so you’ll have 6 pieces)
- 6 mini green airheads or green fondant
- Non-stick cooking spray
Instructions
- Measure out rice krispies cereal and pour into a bowl.
- Melt butter in a 4-quart non-stick saucepan or pot over medium-low heat.
- Add marshmallows and stir. As they melt, add orange gel food coloring until desired color is achieved.
- Remove from heat and immediately pour in rice krispies cereal. Stir gently until evenly coated.
- Let mixture cool slightly until safe to handle.
- Spray hands with non-stick cooking spray and shape mixture into baseball-sized balls.
- Insert a pretzel rod piece into the top center of each ball to resemble a pumpkin stem.
- Cut green airheads into leaf shapes and twist remaining candy into vine shapes.
- Attach candy leaves and vines to the sides of each pretzel stem.
- Store in an airtight container.
Notes
- Use green fondant if airheads are unavailable.
- Adjust food coloring for brighter or darker orange.
- Work quickly before the mixture cools too much.
- Prep Time: 15 minutes
- Cook Time: 10 minutes
- Category: Dessert
- Method: Stovetop
- Cuisine: American
- Diet: Vegetarian
Nutrition
- Serving Size: 1 treat
- Calories: 180
- Sugar: 12g
- Sodium: 150mg
- Fat: 4g
- Saturated Fat: 2g
- Unsaturated Fat: 1g
- Trans Fat: 0g
- Carbohydrates: 35g
- Fiber: 0g
- Protein: 1g
- Cholesterol: 10mg
Tips for Perfect Pumpkin-Shaped Rice Krispie Treats
After making these pumpkin-shaped Rice Krispie treats more times than I can count, I’ve picked up some tricks that make all the difference! First – fresh marshmallows are key – stale ones won’t melt as smoothly. If your orange color isn’t vibrant enough, add a few more drops of gel food coloring (liquid makes the mixture sticky).
Here’s my golden rule: work fast but don’t rush. Let the mixture cool just enough to handle without burning your fingers, but shape before it sets completely. Store them in an airtight container at room temperature – they’ll stay fresh for 3 days (if they last that long!). And if they start sticking together? A quick spritz of cooking spray between layers does the trick!
Variations for Your Pumpkin-Shaped Rice Krispie Treats
Who says pumpkins can’t have personality? Once you’ve mastered the basic recipe, it’s time to get creative! My kids love when I drizzle melted white chocolate in squiggly “scary” faces to turn them into jack-o’-lanterns – just use a toothpick to draw the features while the chocolate’s still wet.
Other fun twists:
- Candy eyes: Press mini chocolate chips or candy eyeballs for a silly monster look
- Spooky sprinkles: Mix in black sanding sugar before shaping for “dirty” pumpkins
- Flavor boost: Add 1/2 tsp pumpkin pie spice to the marshmallow mix
The best part? No matter how you decorate them, they’ll still taste just as delicious!
Serving and Storing Pumpkin-Shaped Rice Krispie Treats
These little pumpkin cuties are best served at room temperature – the pretzel stems stay crisp and the marshmallow stays perfectly chewy. Pop them in an airtight container (I use a cake carrier or Tupperware) and they’ll stay fresh for 3 days – if they last that long! Just tuck a sheet of parchment between layers if stacking them. No fridge needed – the cold makes them rock hard. Trust me, I learned that the hard way when my first batch turned into pumpkin-shaped hockey pucks!
Nutritional Information for Pumpkin-Shaped Rice Krispie Treats
Just FYI – these numbers can vary depending on your ingredients, but each pumpkin-shaped treat averages about 180 calories and 12g sugar. They’re definitely a “sometimes treat” – but oh so worth it when those little orange faces are smiling up at you!

Frequently Asked Questions About Pumpkin-Shaped Rice Krispie Treats
I’ve gotten so many questions about these adorable pumpkin treats over the years – let me answer the ones that pop up most often!
Can I use regular marshmallows instead of mini ones?
Absolutely! Just chop them up before melting – they’ll incorporate much easier. You’ll need about 4 cups (lightly packed) to equal a 10 oz bag of minis.
How do I keep them from sticking to everything?
Two words: cooking spray! Coat your hands well before shaping, and if storing layered, spritz parchment paper between them. Works like a charm.
My orange color isn’t bright enough – help!
Gel food coloring is your best friend here. Add it drop by drop until you get that perfect pumpkin hue (about 15 drops usually does it). Liquid food coloring can make the mixture sticky.
Can I make these ahead of time?
You bet! They’ll stay fresh in an airtight container at room temp for 3 days. The pretzel stems might soften slightly, but they’ll still taste amazing.
What if I can’t find green AirHeads?
No worries! Green fondant works beautifully, or you can tint white chocolate and pipe little leaves. Even a small piece of green fruit leather would do the trick in a pinch.
For More recipes, Follow me on Facebook!