There’s something magical about homemade ground beef burritos – that perfect bundle of seasoned beef, fluffy rice, and melty cheese wrapped up in a warm tortilla. I still remember my dad teaching me how to roll them tight enough so nothing spills out (though let’s be real, mine still explode sometimes!). These burritos are my go-to when I need a meal that’s fast, filling, and packed with flavor. The best part? You probably have most ingredients already in your pantry. Whether it’s a busy weeknight or game day with friends, these ground beef burritos always hit the spot.
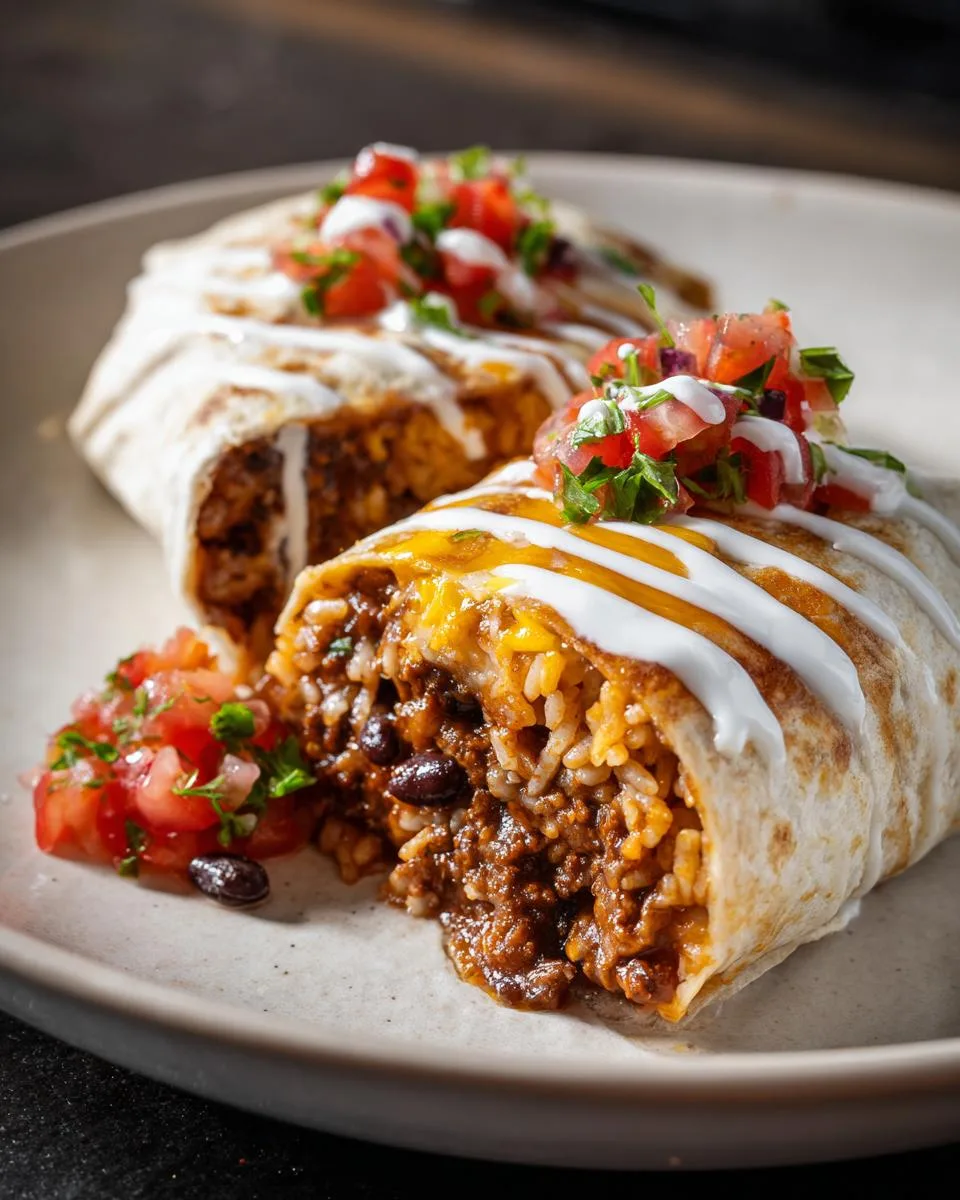
Table of Contents
Table of Contents
Why You’ll Love These Ground Beef Burritos
Listen, I know you’re busy—we all are—but trust me, these burritos are worth every second. Here’s why:
- Weeknight lifesaver: From pan to plate in 35 minutes flat (yes, I timed it!)
- Customizable magic: Swap in whatever you’ve got—extra veggies for me, extra hot sauce for my husband
- Crowd-pleaser: My picky nephew actually eats these (and asks for seconds!)
- Meal prep hero: Makes six burritos—eat some now, freeze the rest for desperate nights
- Flavor bomb: That garlicky beef with melty cheese? *chef’s kiss*
Seriously, once you taste that first bite of warm tortilla hugging all those goodies, you’ll be hooked.
Ingredients for Ground Beef Burritos
Okay, let’s raid the pantry and fridge! Here’s everything you’ll need to make these flavor-packed burritos. I’m listing exact amounts because eyeballing it never works out for me – ask my smoke detector how it feels about my “approximate” measurements!
- 1 tablespoon olive oil – for sautéing (vegetable oil works too)
- 1 small onion, chopped – about tennis ball size
- 4 cloves garlic, minced – yes, four! Garlic is life
- 1 pound ground beef – I use 85/15 but any fat ratio works
- 2 teaspoons taco seasoning – homemade or store-bought
- ½ teaspoon Kosher salt – plus more to taste
- 2 tablespoons tomato paste – that little can in your fridge door
- ⅓ cup water – helps create the perfect saucy texture
- 2 cups cooked rice – leftover rice works great here
- 2 cups black beans – canned or homemade, drained/rinsed
- 1 cup Pico de Gallo – store-bought or my quick chop recipe
- 1 ½ cups shredded Mexican cheese – the melty kind!
- ½ cup sour cream – or Mexican crema if you’re fancy
- 6 large flour tortillas – 10-12 inch size, trust me on this
See? Nothing weird or fancy – just good, honest ingredients that come together beautifully. Now let’s get cooking!
How to Make Ground Beef Burritos
Alright, let’s get rolling – literally! These burritos come together in three easy parts: cooking the filling, assembling the bundles of joy, and deciding whether to devour them now or save some for later (good luck with that last part).
Cooking the Ground Beef Filling
First, grab your favorite big skillet – I use my trusty cast iron – and heat that olive oil over medium-high. Toss in your chopped onions and garlic, stirring until they turn soft and smell amazing (about 3-4 minutes). Now add your ground beef, breaking it up with a wooden spoon like you’re playing the world’s tastiest game of whack-a-mole.
Once the beef is browned (no pink left!), drain any excess grease if needed – I tilt my pan and use a spoon to scoop it out. Then stir in your taco seasoning, salt, tomato paste, and water. Reduce heat to medium-low and let it simmer for 5-8 minutes until most liquid absorbs. Pro tip: Let this cool slightly before assembling so your tortillas don’t get soggy!
Assembling the Burritos
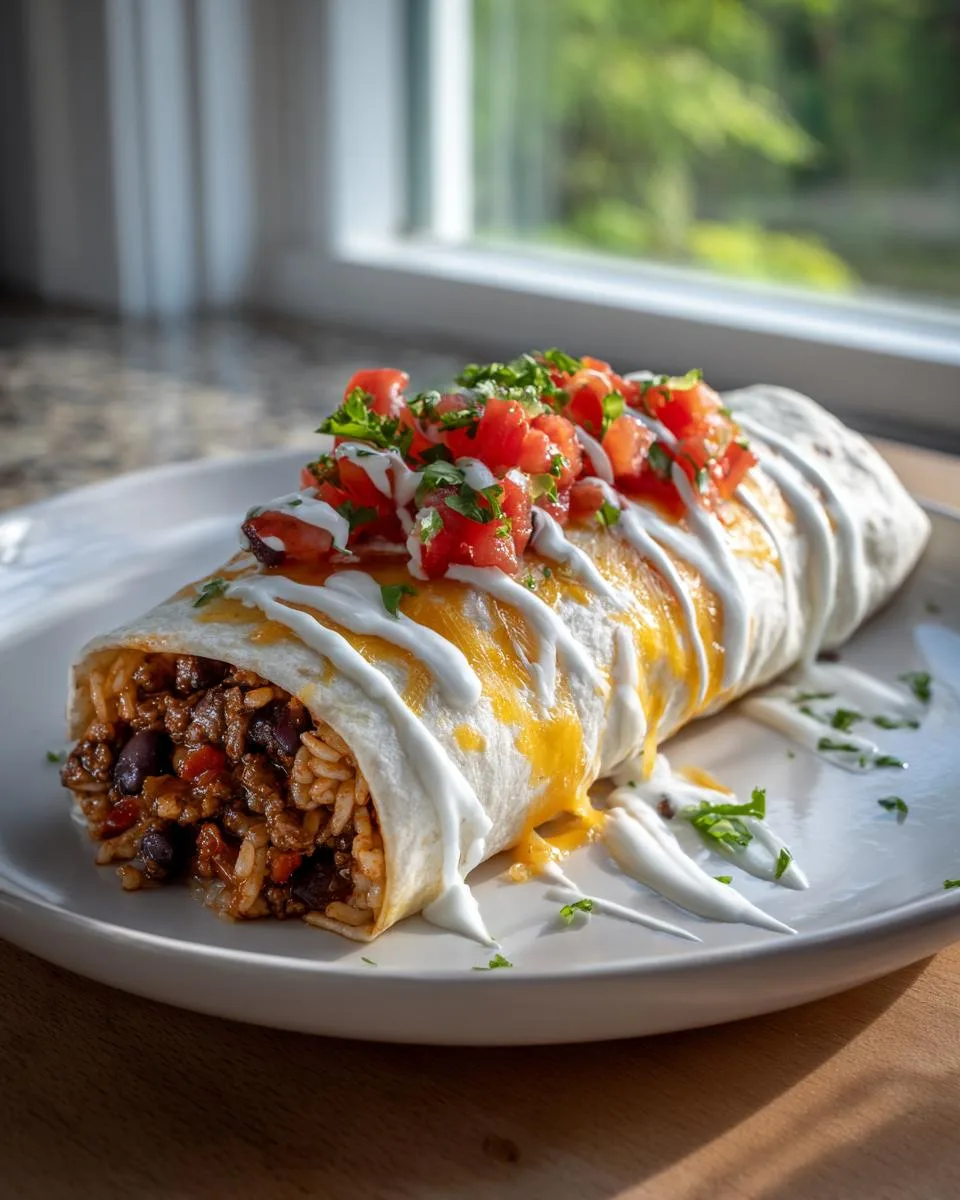
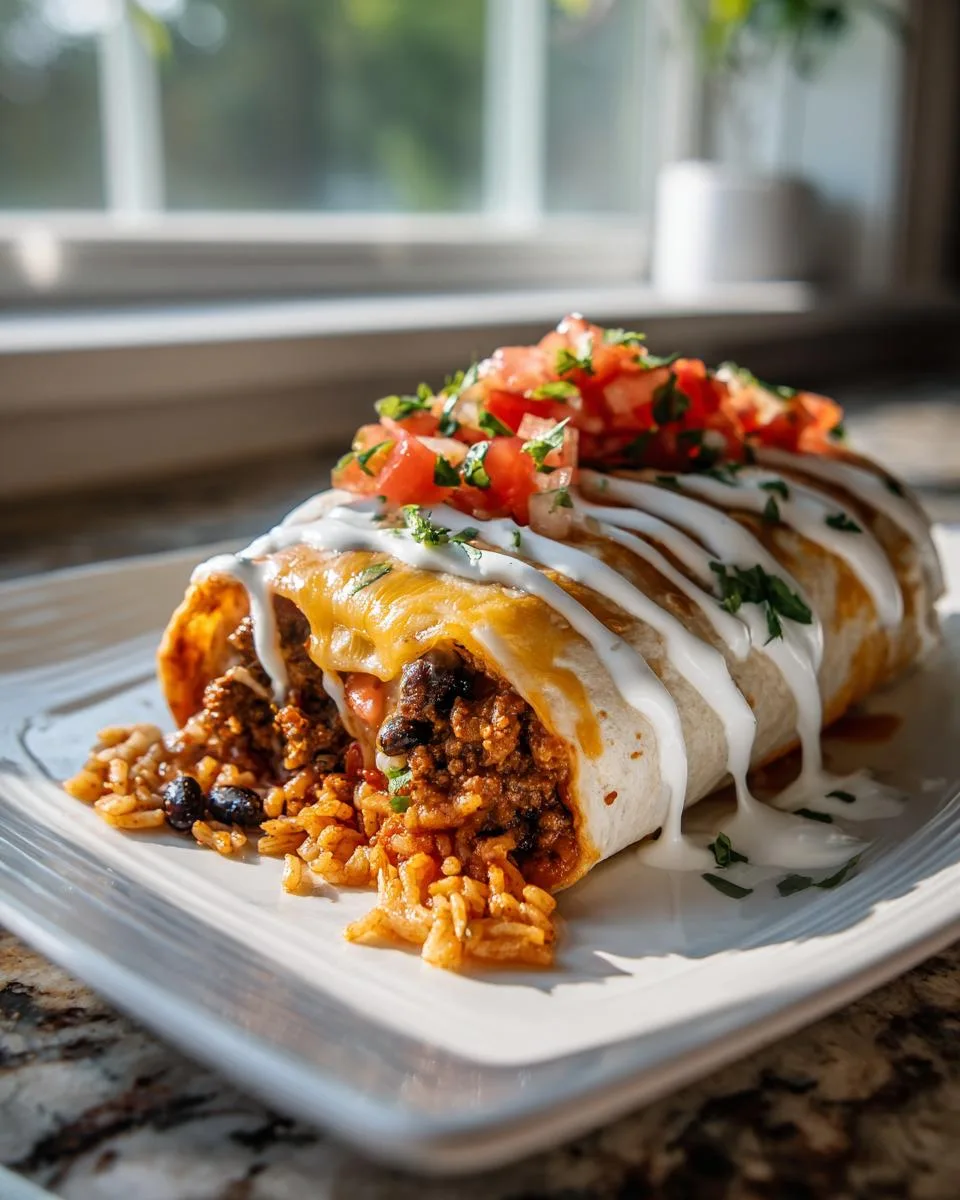
Time for the fun part! Warm your tortillas for about 15 seconds in the microwave or 30 seconds per side in a dry skillet – this makes them flexible. Lay one flat and pile on about 1/4 cup each of rice, beans, and beef mixture in the center. Top with salsa, cheese, and a dollop of sour cream.
Now the folding magic: Fold the top edge down over the filling, then fold in both sides like you’re wrapping a present. Roll tightly from the folded end away from you, keeping tension so everything stays snug. If some filling peeks out, no worries – that’s what foil is for!
Serving or Storing
For immediate enjoyment: Wrap each burrito in foil and let everyone unwrap their delicious present. To save for later: Wrap tightly in foil, then freeze in a zip-top bag for up to 3 months. Reheat frozen burritos in a 350°F oven for 25-30 minutes (no need to thaw first) or microwave for 2-3 minutes if you’re starving NOW.
Print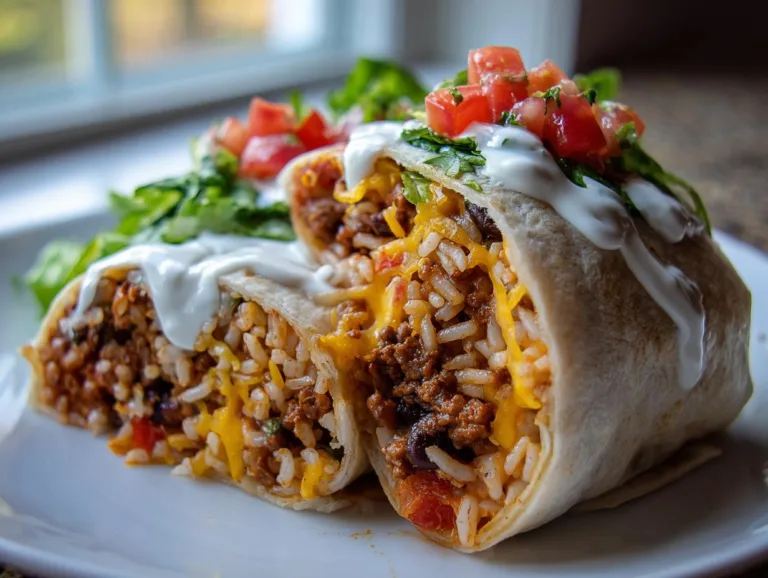
Irresistible Ground Beef Burritos That Wow Every Bite
A delicious and easy recipe for ground beef burritos filled with seasoned beef, rice, beans, cheese, and salsa.
- Total Time: 35 minutes
- Yield: 6 burritos 1x
Ingredients
- 1 tablespoon olive oil
- 1 small onion, chopped
- 4 cloves garlic, minced
- 1 pound ground beef
- 2 teaspoons taco seasoning
- ½ teaspoon Kosher salt, or to taste
- 2 tablespoons tomato paste
- ⅓ cup water
- 2 cups cooked rice
- 2 cups canned or cooked black beans
- 1 cup Pico de Gallo salsa
- 1 ½ cups Mexican-style shredded cheese
- ½ cup sour cream (or Mexican crema)
- 6 large (10 or 12-inch) flour tortillas
Instructions
- Heat the olive oil in a large, nonstick skillet over medium-high heat. Add the onion and garlic and sauté until translucent, about 3-4 minutes.
- Add the ground beef and cook, breaking it into smaller pieces with a wooden spoon, until browned. Drain excess grease if necessary.
- Stir in the taco seasoning, salt, tomato paste, and water. Lower the heat to medium-low and simmer for 5 to 8 minutes, or until the beef absorbs most of the liquid. Let it cool slightly.
- Warm the tortillas in the microwave or stovetop. Season rice and beans with salt if using boil-in-bag or canned.
- Layer 1/4 cup rice, 1/4 cup beans, and 1/4 cup beef on each tortilla. Add salsa, cheese, and sour cream.
- Fold the top part down over the filling, then fold both sides inward. Roll tightly into a cylinder.
- Wrap each burrito in foil. Serve immediately or warm in the oven at 350ºF for 25-30 minutes. You can freeze them for up to 3 months.
Notes
- For extra flavor, toast the tortillas lightly before filling.
- Adjust spice levels by adding more or less taco seasoning.
- Customize fillings with avocado, lettuce, or hot sauce.
- Prep Time: 15 minutes
- Cook Time: 20 minutes
- Category: Main Dish
- Method: Stovetop, Oven
- Cuisine: Mexican
- Diet: Low Lactose
Nutrition
- Serving Size: 1 burrito
- Calories: 450
- Sugar: 3g
- Sodium: 800mg
- Fat: 18g
- Saturated Fat: 7g
- Unsaturated Fat: 8g
- Trans Fat: 0g
- Carbohydrates: 45g
- Fiber: 6g
- Protein: 25g
- Cholesterol: 60mg
Tips for the Best Ground Beef Burritos
After making approximately a million burritos (okay, maybe just hundreds), I’ve learned a few tricks that take them from good to “oh wow, what’s your secret?” Here are my must-know tips:
- Toast those tortillas! A quick 30 seconds per side in a dry skillet makes them pliable and adds delicious flavor.
- Taste as you go with the beef mixture – add more taco seasoning if you like it spicy or a pinch of sugar if it’s too acidic.
- Fresh salsa makes all the difference – grab the refrigerated kind or make quick pico with diced tomatoes, onion, cilantro and lime.
- Don’t overstuff! I know it’s tempting, but leaving a 2-inch border prevents burrito explosions (learned this the messy way).
Ground Beef Burrito Variations
The beauty of these burritos? You can twist ’em up a hundred different ways! Here are my favorite spins on the classic:
- Protein swap: Use ground turkey or chicken instead of beef – just add an extra tablespoon of oil since they’re leaner
- Veggie boost: Toss in sautéed bell peppers, corn, or spinach when cooking the onions
- Cheese change-up: Try pepper jack for heat or cotija for that authentic crumbly texture
- Guac upgrade: Spread avocado or guacamole under the rice layer – game changer!
- Breakfast twist: Scramble eggs into the beef mixture and add hash browns (trust me, it works)
My neighbor Carlos makes his with chorizo instead of beef – messy but incredible. The point is, make these your own! What crazy-good combos can you dream up? You can see more recipe ideas here!
What to Serve with Ground Beef Burritos
Now, I know these burritos are practically a meal by themselves (that’s the beauty of them!), but if you’re feeding a crowd or just want that full fiesta experience, here are my go-to sides that never disappoint:
- Chips & salsa: The classic! I always keep a bowl of crispy tortilla chips and extra salsa on the table – it’s perfect for scooping up any filling that escapes (and it will).
- Mexican street corn salad: That creamy, tangy corn with a hint of chili powder? Absolute perfection next to these burritos.
- Simple lime-cilantro rice: Yes, I know there’s already rice inside, but trust me – this bright, herby version makes everything better.
When I’m feeling extra fancy (or have friends coming over), I’ll set up a whole spread with all three plus some icy-cold horchata or margaritas. But honestly? These burritos shine just as bright with a simple bag of chips and your favorite hot sauce. No stress, just deliciousness!
Storing and Reheating Ground Beef Burritos
Okay, confession time – I’ve never actually had leftovers of these burritos because my family inhales them. But on the rare chance you’ve got some to save (or you’re smart enough to make extra for meal prep), here’s how to keep them tasting fresh and delicious:
Fridge Storage (The Short-Term Plan)
Wrap each cooled burrito tightly in foil – and I mean tightly, like you’re protecting precious treasure (because you are!). Pop them in an airtight container or zip-top bag, and they’ll stay good for 3 days in the fridge. The foil keeps the tortillas from drying out and prevents fridge smells from creeping in (nobody wants pickle-flavored burritos!).
Freezer Storage (The Meal Prep Win)
For longer storage, wrap your foil-bundled burritos in plastic wrap or slide them into freezer bags. Squeeze out all the air – I sometimes use a straw to suck out the last bits – and they’ll stay perfect for 3 months. Label with the date because freezer amnesia is real (“Is this from last week or last year?”).
Reheating Like a Pro
Here’s how to bring those burritos back to life:
- Oven method (best for crispy tortillas): Leave them wrapped in foil and bake at 350°F for 25-30 minutes if frozen (15-20 if thawed). Unwrap for the last 5 minutes if you like the tortilla slightly toasted.
- Microwave method (when you’re starving NOW): Remove foil (metal + microwave = bad news!) and wrap in a damp paper towel. Nuke for 2-3 minutes if frozen, flipping halfway. Let it sit for a minute – that steam is dangerously hot!
- Air fryer magic: My new favorite! 375°F for 10-12 minutes straight from frozen, no foil needed. Gets that perfect crispy exterior.
Pro tip: If your frozen burrito feels like an ice brick, microwave for 1 minute then oven bake – it prevents that dreaded cold center!
Ground Beef Burritos FAQs
I’ve gotten so many questions about these burritos over the years – here are the ones that pop up most often with my tried-and-true answers:
Can I use ground turkey or chicken instead of beef?
Absolutely! I do this all the time when I’m trying to lighten things up. Just add an extra tablespoon of oil since poultry is leaner, and maybe bump up the taco seasoning by half a teaspoon for extra flavor. The texture will be slightly different, but still delicious.
How do I prevent soggy tortillas?
Oh man, I’ve battled the soggy tortilla monster many times! Here’s what works: 1) Let your beef mixture cool slightly before assembling, 2) Warm your tortillas first (cold ones tear easier), and 3) Don’t overdo the wet ingredients – I keep my sour cream and salsa amounts moderate. If all else fails, that foil wrap acts like a moisture barrier!
Can I make these vegetarian?
You bet! Swap the beef for sautéed mushrooms or extra beans (I love mixing black and pinto). The key is seasoning well – I add smoked paprika and a splash of soy sauce to mimic that umami depth. My vegetarian friend swears by adding roasted sweet potatoes too.
What’s the best way to reheat frozen burritos?
After much experimentation (some disastrous), here’s my gold standard: oven at 350°F for 25-30 minutes straight from frozen, foil on for the first 20 minutes then off to crisp up. Microwave works in a pinch (2-3 minutes, flip halfway), but the tortilla gets a bit chewy.
Can I prep the filling ahead?
Yes! The beef mixture actually tastes better after sitting overnight as the flavors meld. Store it separately from the tortillas and other fillings, then assemble when ready. It keeps refrigerated for 3 days or frozen for 2 months. Just reheat gently with a splash of water to loosen it up.
Nutritional Information
Okay, let’s talk numbers – but remember, these are estimates since we all tweak recipes differently (extra cheese, anyone?). Here’s the nutritional breakdown per burrito when made exactly as written:
- Calories: 450
- Protein: 25g (that beef packs a punch!)
- Carbohydrates: 45g
- Fiber: 6g (thank you, beans and whole grains)
- Sugar: 3g
- Fat: 18g
- Saturated Fat: 7g
- Sodium: 800mg
Nutritional values are estimates and vary based on ingredients used. For example, using low-sodium beans or less cheese changes things. I calculate based on standard grocery store ingredients, but your mileage may vary!
Now that you’ve got all the deets – go make these burritos and tell me how yours turned out in the comments! Did you add any crazy-good twists? Any folding disasters turned happy accidents? Spill the beans (pun totally intended)!
For More recipes, Follow me on Facebook!