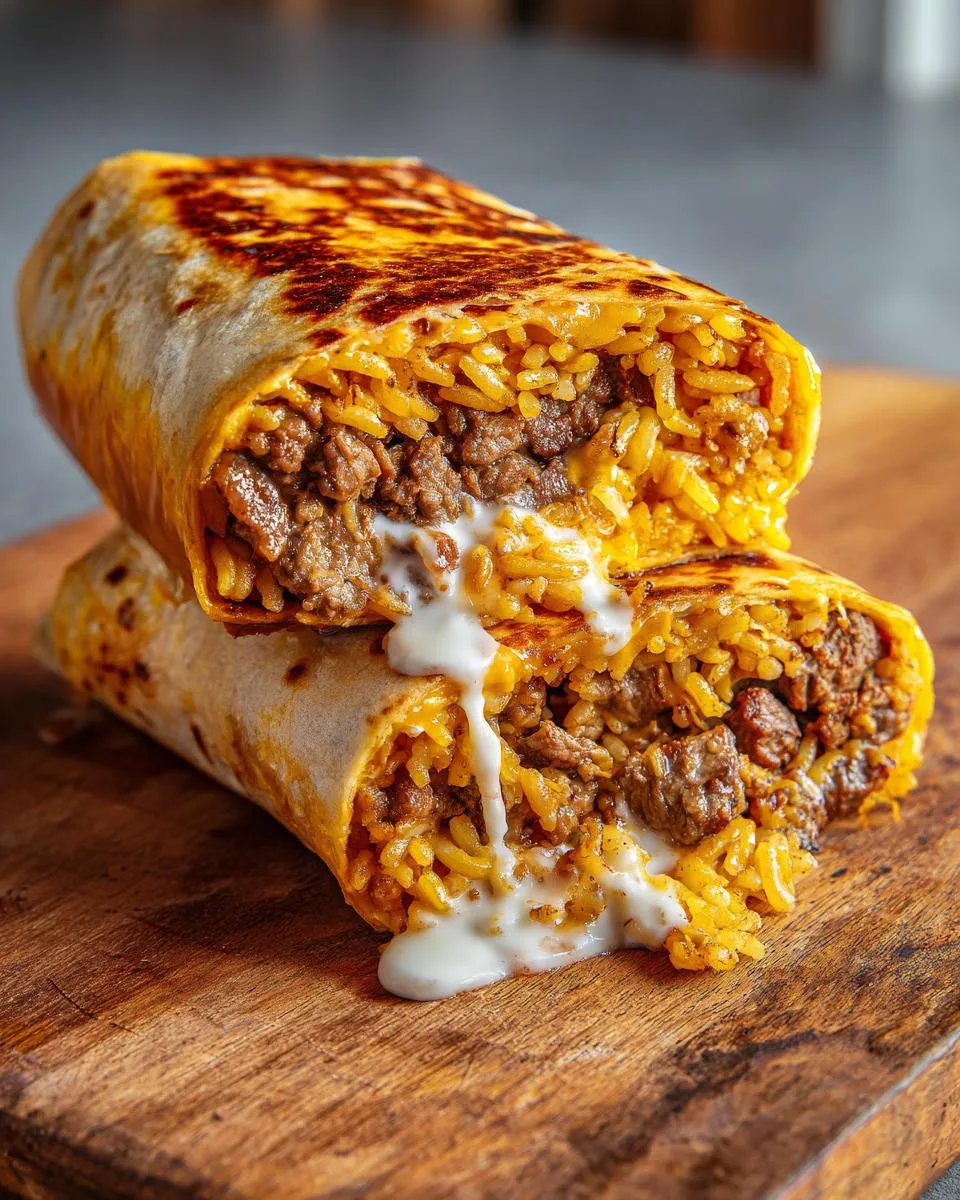
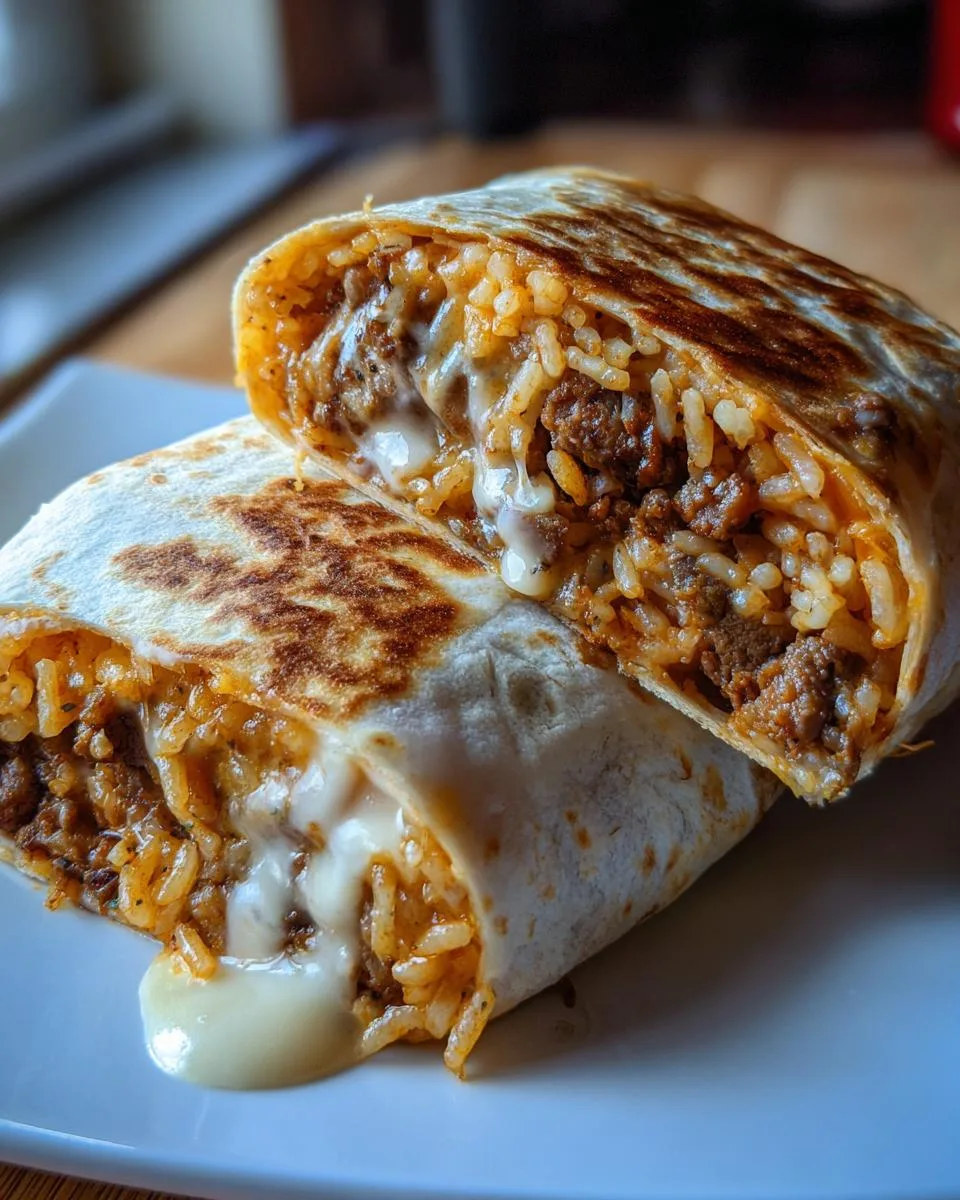
Let me tell you about the first time I tasted a grilled cheese burrito—it was pure magic! I was experimenting in my tiny apartment kitchen, craving something cheesy but with a kick, when inspiration struck. Why not combine my love for melty grilled cheese with the bold flavors of a beefy burrito? The result? Absolute perfection. This fusion of Mexican spices and American comfort food hits all the right notes—crispy cheese crust hugging a warm tortilla stuffed with seasoned beef, creamy sauces, and just enough rice to hold it all together. Trust me, once you try this mashup, you’ll wonder how you ever lived without it.

Table of Contents
Table of Contents
Why You’ll Love This Grilled Cheese Burrito
Oh, where do I even start? This burrito is everything you crave—quick, packed with flavor, and endlessly customizable. Here’s why it’s a total game-changer:
- Fast & easy: Ready in under 30 minutes—perfect for busy nights when takeout isn’t cutting it.
- Flavor bomb: Spiced beef, creamy sauces, and that crispy cheese crust? Pure heaven.
- Your rules: Swap fillings, adjust spice levels, or go wild with extra toppings—it’s your masterpiece.
- Texture magic: That golden, melty cheese shell? *Chef’s kiss*—it’s the best part, hands down.
Seriously, what’s not to love?
Grilled Cheese Burrito Ingredients
Alright, let’s get real about ingredients—this isn’t just a burrito, it’s a masterpiece in the making. Here’s exactly what you’ll need to create that crispy, cheesy magic:
- 1 lb ground beef (80/20 lean/fat) – That extra fat equals flavor, trust me!
- 1 packet taco seasoning (or homemade blend) – My secret? Add a pinch of smoked paprika
- 1 cup cooked white rice – Day-old rice works wonders here
- ½ cup sour cream (full-fat for creaminess) – Non-fat just won’t give you that lush texture
- ½ cup nacho cheese sauce – The melty glue that holds everything together
- ¼ cup chipotle sauce – Adds that perfect smoky kick
- 1 cup shredded cheddar cheese – Sharp cheddar brings the flavor
- 1 cup shredded mozzarella – For that perfect stretch factor
- 4 large flour tortillas (10-inch diameter) – Go big or go home!
- Butter or oil for grilling – I’m team butter all the way
Ingredient Notes & Substitutions
Now, let’s talk swaps—because kitchens are personal spaces! That chipotle sauce? I sometimes mix mayo with chipotle peppers in adobo for a homemade version when I’m feeling fancy. Cheese blends are totally flexible too—try pepper jack for heat or Monterey Jack for milder flavor. Vegetarian? Swap beef for black beans or soy crumbles. Gluten-free? Use your favorite GF tortillas (just make sure they’re sturdy). The key is keeping that perfect cheese-to-filling ratio—too much filling and your burrito won’t seal properly (learned that one the messy way!).
How to Make a Grilled Cheese Burrito
Okay, friends—time to roll up our sleeves (literally!) and make some cheesy magic happen. I’ve made enough “burrito disasters” to know exactly what works, so follow these steps and you’ll be golden—just like that perfect cheese crust we’re aiming for!
Step 1: Cook the Seasoned Beef
First things first: let’s get that beef beautifully browned. Crank your skillet to medium heat and crumble in your ground beef—you’ll hear that satisfying sizzle! Break it up with a wooden spoon as it cooks (about 5 minutes normalmente). Drain most of the grease, but leave about a tablespoon—that’s flavor gold right there. Now sprinkle in your taco seasoning and pour in ¼ cup water. Stir like crazy, then let it simmer uncovered for 5 minutes until saucy. Pro tip? Taste and adjust seasoning now—sometimes I add an extra pinch of cumin if it needs more depth.
Step 2: Assemble the Burrito
Assembly line time! Warm your tortillas briefly (10 seconds in the microwave does wonders) so they’re flexible. Lay one flat and start layering: rice first (acts as a moisture barrier), then that gorgeous beef, followed by sauces—I do nacho cheese then chipotle sauce in zigzags. Dollop sour cream across the middle (don’t overdo it!), then shower with both cheeses. Now fold the sides inward, roll tightly from the bottom up—and press that seam HARD. Learned this the messy way: a loose burrito is a spill-waiting-to-happen!
Step 3: Grill to Crispy Perfection
This is where the magic happens! Heat a clean skillet over medium-low—patience prevents burnt cheese. Sprinkle about 2 tablespoons of shredded cheese directly onto the skillet (yes, right on the pan!), then immediately place your burrito seam-side down on top. Listen for that glorious sizzle! After 3-4 minutes, when the cheese forms a golden crust, flip carefully—I use two spatulas for this maneuver. Repeat the cheese-sprinkle on the other side for double crust action. When both sides are crispy and cheese is molten (about 4 more minutes), transfer to a cutting board. Resist temptation—let it rest 1 minute before slicing to avoid filling eruptions!
Print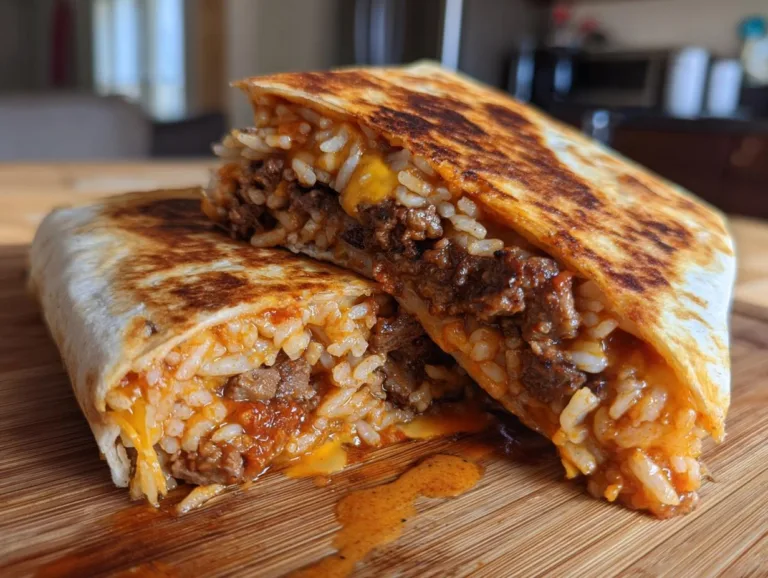
Secrets to the Perfect Grilled Cheese Burrito: Cheesy Bliss!
A delicious grilled cheese burrito with seasoned beef, rice, and creamy sauces.
- Total Time: 25 mins
- Yield: 4 burritos 1x
Ingredients
- 1 lb ground beef
- 1 packet taco seasoning (or homemade blend)
- 1 cup cooked white rice
- ½ cup sour cream
- ½ cup nacho cheese sauce
- ¼ cup chipotle sauce
- 1 cup shredded cheddar cheese
- 1 cup shredded mozzarella
- 4 large flour tortillas
- Butter or oil for grilling
Instructions
- Cook the Beef (8–10 mins): Brown the ground beef in a skillet over medium heat. Drain excess grease. Add taco seasoning and ¼ cup water, simmer for 5 minutes.
- Warm the Tortillas: Heat tortillas on a dry skillet or in the microwave for flexibility.
- Assemble the Burrito (5 mins): Lay a tortilla flat and layer with rice, seasoned beef, nacho cheese, chipotle sauce, and sour cream. Top with shredded cheddar and mozzarella.
- Grill the Burrito (3–4 mins per side): Heat a clean skillet and sprinkle 2 tablespoon of shredded cheese. Place the burrito seam-side down and cook until cheese melts and forms a crispy crust. Flip and repeat.
Notes
- Use freshly shredded cheese for better melting.
- Adjust spice levels to your preference.
- Prep Time: 10 mins
- Cook Time: 15 mins
- Category: Main Course
- Method: Grilling
- Cuisine: Mexican-American
- Diet: Low Lactose
Nutrition
- Serving Size: 1 burrito
- Calories: 650
- Sugar: 5g
- Sodium: 1200mg
- Fat: 35g
- Saturated Fat: 15g
- Unsaturated Fat: 12g
- Trans Fat: 1g
- Carbohydrates: 45g
- Fiber: 3g
- Protein: 32g
- Cholesterol: 95mg
Tips for the Best Grilled Cheese Burrito
Alright, let’s talk pro tips—because I’ve made every mistake so you don’t have to! Here’s how to guarantee burrito perfection every single time:
- Room temp tortillas are key: Cold tortillas crack easier—warm them slightly for maximum flexibility.
- Resist the overfill urge: That “one more spoonful” mentality leads to bursting seams (and cheesy heartbreak).
- Press firmly when rolling: A tight burrito holds together better during grilling—no floppy disasters!
- Medium-low heat wins: Too hot = burnt cheese before the filling heats through. Patience makes perfect.
- The 1-minute rest rule: Letting it sit before cutting keeps all that delicious filling inside where it belongs.
Follow these, and you’ll be the grilled cheese burrito hero of your kitchen—promise!
Grilled Cheese Burrito Variations
Listen, I love the classic beef version, but half the fun is playing with different fillings! Here are my favorite twists that still give you that amazing crispy-cheesy magic:
- Chicken fiesta: Swap beef for shredded rotisserie chicken—add a squeeze of lime for brightness.
- Bean blast: Black beans or refried beans make a hearty vegetarian option (extra cheese please!).
- Breakfast special: Scrambled eggs, crispy bacon, and hash browns? Yes, even at dinnertime.
- Spice lover’s dream: Dice up fresh jalapeños or mix in pickled ones for extra kick.
The beauty? Once you’ve mastered the technique, your imagination’s the only limit!
Serving Suggestions
Now, let’s talk about the perfect supporting cast for your grilled cheese burrito masterpiece! Personally, I love serving mine with a big dollop of cool guacamole—that creamy richness balances the spiced beef perfectly. A zesty pico de gallo adds fresh crunch, while a simple lime-kissed cabbage slaw cuts through the richness. Craving something heartier? Go for crispy tortilla chips and a bowl of fiery salsa for dipping (because extra cheese is always a good idea). And if you’re feeling fancy, a frosty horchata or cold Mexican beer makes everything taste even better!
Storing and Reheating Your Grilled Cheese Burrito
Okay, let’s be real—this burrito is so good you’ll want leftovers! Here’s how I keep mine tasting fresh: wrap tightly in foil (the cheese crust stays crisp this way) and refrigerate for up to 3 days. Freezing? Wrap in foil first, then pop in a freezer bag—good for a month. To reheat, skip the microwave (that makes tortillas soggy!) and go straight back to the skillet. Medium heat, flip once, and boom—it’s almost as good as fresh! Pro tip: sprinkle a tiny bit of fresh cheese while reheating for that just-made crispness.
Grilled Cheese Burrito FAQs
Over the years, I’ve gotten so many questions about perfecting this recipe—here are the answers to what folks ask me most!
“Can I assemble these ahead of time?”
Absolutely! I often prep the filling components separately and store them in the fridge (up to 2 days). But wait to assemble until you’re ready to grill—pre-made burritos get soggy fast. The cooked beef keeps beautifully though—just reheat gently before rolling.
“Why does my tortilla keep splitting?”
Oh honey, I’ve been there! Two likely culprits: either your tortillas were too cold (always warm them slightly first) or you overfilled them (stick to about 3/4 cup filling per burrito max). Also—this sounds silly—but pressing too hard while rolling can cause cracks. Gentle but firm is the way!
“What’s the best way to get that crispy cheese crust?”
The skillet temp makes all the difference! Medium-low heat lets the cheese melt slowly into that perfect golden crust without burning. And don’t skimp on sprinkling cheese directly onto the pan—that’s the secret to that restaurant-quality crunch.
“Can I freeze these?”
You bet! Freeze after grilling—cool completely, wrap tightly in foil, then seal in freezer bags. Reheat straight from frozen in a 350°F oven (about 20 mins) or skillet (lower heat, flip often). The texture won’t be quite as perfect as fresh, but still darn tasty!
Nutritional Information
Alright, let’s keep it real—these numbers are just ballpark figures since brands and ingredient swaps can change things. Each burrito packs roughly 650 calories with that perfect balance of protein (32g) and carbs (45g) to keep you satisfied. The cheese and beef bring the fat content up (about 35g total), so if you’re watching that, try light cheeses or leaner meat. Remember—nutrition is important, but so is enjoying life’s cheesy pleasures! If you want to see more of my favorite recipes, check out my main recipe index!
Share Your Grilled Cheese Burrito Creations
Now it’s your turn! I wanna see your gorgeous grilled cheese burrito masterpieces. Snap a pic (extra points for melty cheese shots!) and tag pics with #DishiviaBurritos—I feature favorites every week. Drop a comment below too—tell me your favorite twist or ask questions. Let’s build a cheesy little community together!
For More recipes, Follow me on Facebook!