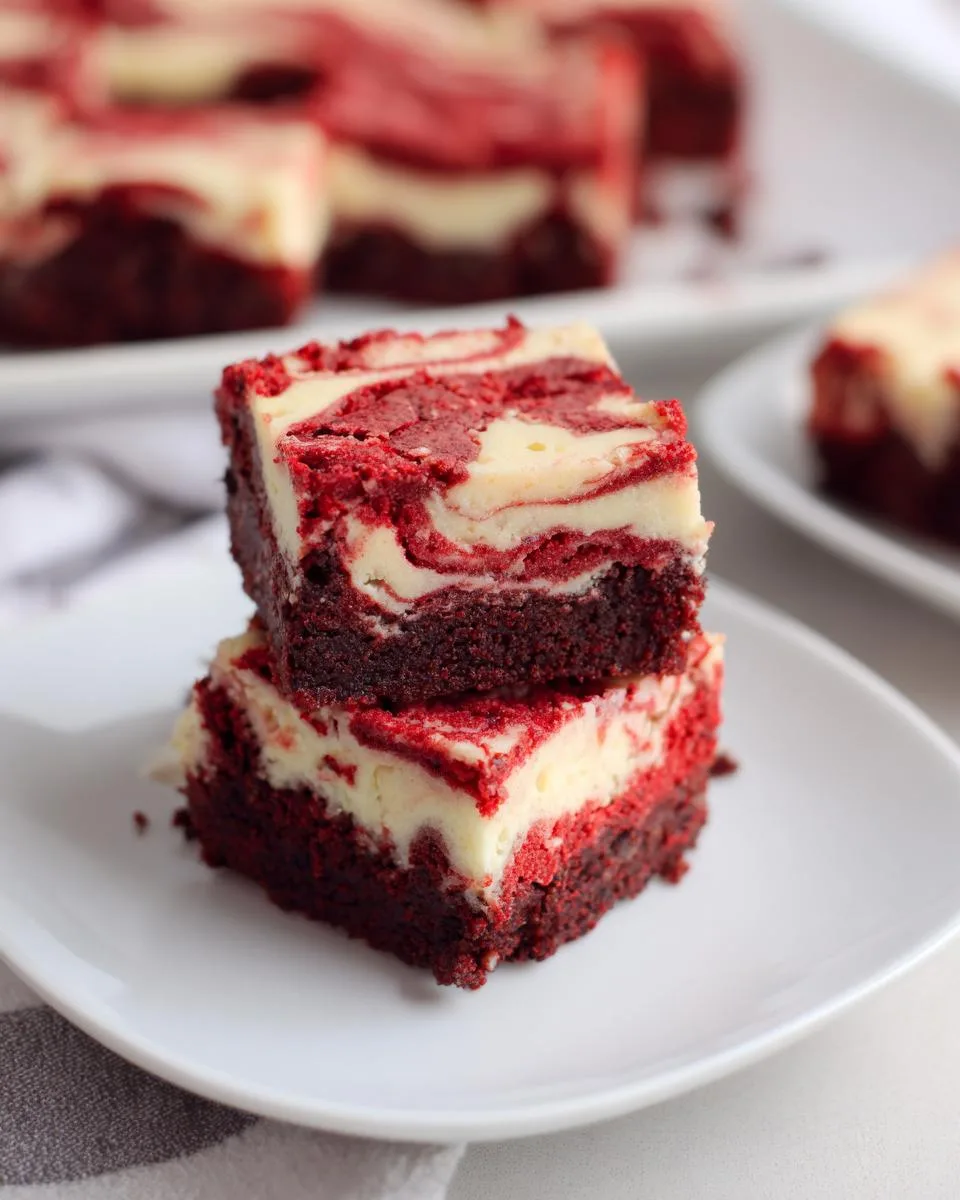
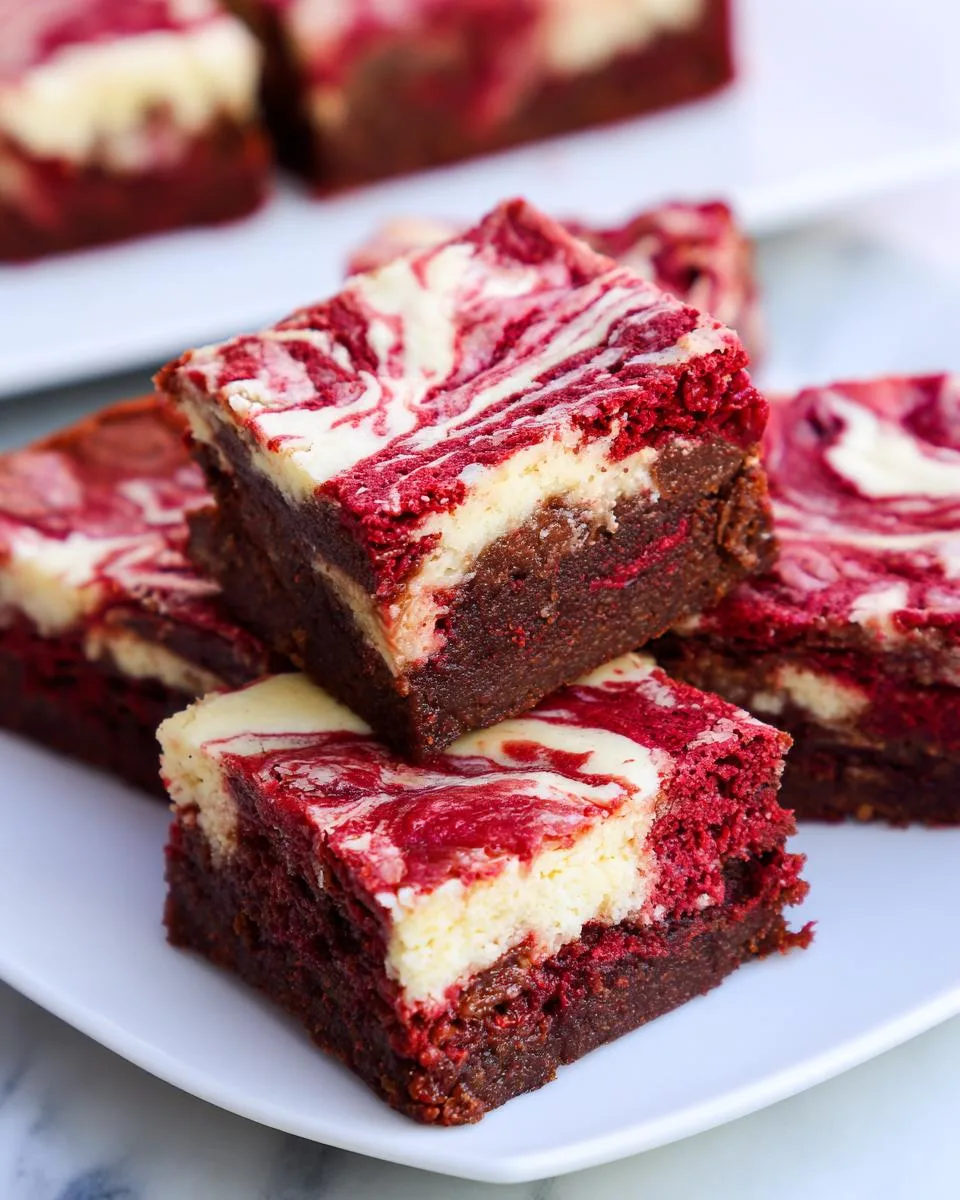
You know those desserts that make you stop mid-bite just to savor the moment? That’s exactly what happened when I first tried these Red Velvet Cheesecake Brownies. Picture this – rich, fudgy red velvet brownies swirled with creamy cheesecake, creating little pockets of tangy-sweet perfection in every square. I created this recipe after my niece begged me to combine her two favorite treats, and oh wow, did we stumble onto something magical!

Table of Contents
Table of Contents
What makes these brownies special isn’t just their stunning red-and-white marble look (though that’s pretty fantastic). It’s how the slightly tangy cream cheese cuts through the deep cocoa flavor, creating this addictive push-and-pull of flavors. My secret? A splash of vinegar in the red velvet batter – it enhances that classic red velvet taste while keeping the brownies ultra-moist. These beauties disappear fast at potlucks, so I always make a double batch!
Why You’ll Love These Red Velvet Cheesecake Brownies
Listen, these aren’t just any brownies – they’re like a party in your mouth! Here’s why you’ll be obsessed:
- That perfect texture combo – fudgy brownie meets dreamy cream cheese swirls that melt on your tongue
- So easy – one bowl for the brownie batter, no fancy equipment needed
- Total showstopper – that vibrant red and white marble looks straight from a bakery
- Better next day (if they last that long!) – flavors deepen overnight in the fridge
- Every bite’s different – sometimes you hit a cheesecake pocket, sometimes pure chocolatey bliss
Trust me, your dessert game just leveled up.
Ingredients for Red Velvet Cheesecake Brownies
Okay, let’s gather our goodies! The magic happens when these simple ingredients come together just right. Pro tip: Measure everything before starting – it makes the process so much smoother. Here’s what you’ll need:
- For the red velvet brownie layer:
- ½ cup (1 stick/115g) unsalted butter, melted – I like to microwave it in 30-second bursts so it doesn’t splatter everywhere
- 3 tablespoons (20g) unsweetened cocoa powder – the good stuff, not the dusty old can in your pantry
- ¼ teaspoon fine sea salt – balances all that sweetness beautifully
- ¾ cup plus 2 tablespoons (175g) granulated sugar – packed lightly but firmly
- 2 large eggs – straight from the fridge is fine
- ¾ teaspoon pure vanilla extract – the real deal, none of that imitation stuff
- ½ teaspoon apple cider vinegar (optional but amazing – trust me on this)
- 2-3 teaspoons red food coloring (gel works best for vibrant color without thinning the batter)
- ⅔ cup (95g) all-purpose flour – spooned and leveled, no packing!
- For the cheesecake swirl:
- 8 ounces (225g) full-fat cream cheese – must be room temp (leave out 2 hours) or you’ll get lumps
- ¼ cup (50g) granulated sugar
- 1 large egg
- ½ teaspoon pure vanilla extract
See? Nothing crazy – just pantry staples transformed into something extraordinary. Now let’s make some magic!
How to Make Red Velvet Cheesecake Brownies
Alright, let’s get baking! These brownies come together faster than you’d think – about 15 minutes of active prep before they hit the oven. The key is working in layers. First, we’ll make that gorgeous red velvet base, then whip up the cheesecake swirl, and finally bring them together in perfect marbled harmony.

Preparing the Red Velvet Brownie Batter
Start by preheating your oven to 350°F/180°C – this gives everything time to heat evenly while you mix. Line an 8×8-inch pan with parchment paper (trust me, you’ll thank me later when these beauties lift out cleanly).
Now, grab a large microwave-safe bowl and melt your butter in 30-second bursts. Once melted, whisk in the cocoa powder and salt until smooth – it’ll look like chocolate lava. Add sugar and whisk again until glossy.
Now for the fun part: Crack in the eggs one at a time, whisking well after each. Splash in vanilla and vinegar (that secret tang-maker). Then add your red food coloring – gel works best here since liquid can thin the batter.
Start with 2 teaspoons and add more until you get that signature deep red velvet color. Finally, gently fold in flour just until combined – overmixing makes tough brownies! Set aside ⅓ cup of this batter before pouring the rest into your prepared pan.
Making the Cheesecake Swirl
Time for the creamy magic! In a medium bowl, beat room-temperature cream cheese with sugar until smooth – no lumps allowed! Scrape down the sides halfway through. Add egg and vanilla, beating just until incorporated. Now, dollop spoonfuls of this mixture over your red velvet base in the pan – don’t spread it, just drop little clouds across the surface.
Take that reserved red batter and spoon dollops randomly over the cheesecake. Now grab a knife or skewer and gently swirl through the layers – about 4-5 figure-eight motions creates gorgeous marbling without mixing them completely. Too much swirling turns things muddy, so show restraint!
Baking and Cooling Tips
Slide your masterpiece into the preheated oven for 25-30 minutes. You’ll know they’re done when the edges pull slightly from the pan and the cheesecake looks set but still jiggles a tiny bit in the center. The toothpick test is tricky here – you want moist crumbs (from the brownie part), not wet batter.
Here’s the hard part: Let them cool completely in the pan! Then refrigerate for at least 2 hours – this firms everything up for clean cuts. I know it’s tempting, but warm cheesecake swirls smear everywhere. Patience rewards you with picture-perfect squares that taste even better the next day!
Print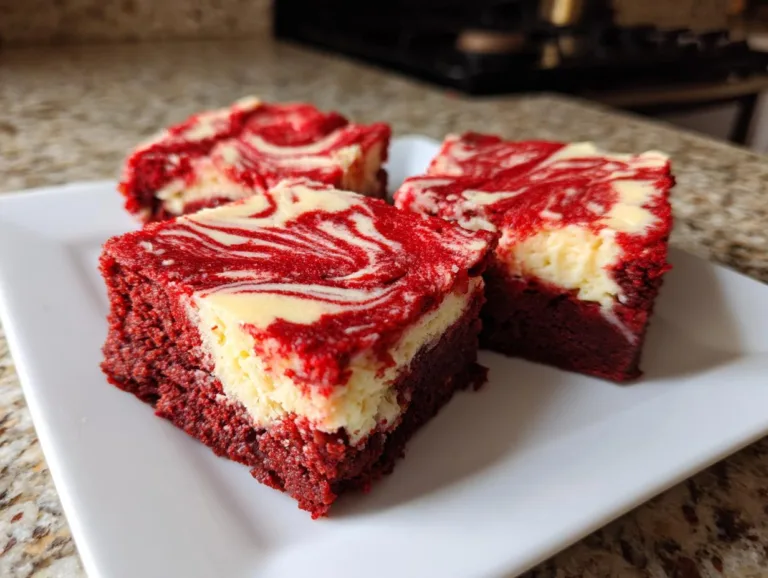
Divine Red Velvet Cheesecake Brownies That Wow Every Time
Delicious red velvet brownies swirled with creamy cheesecake for a perfect dessert.
- Total Time: 45 minutes
- Yield: 16 brownies 1x
Ingredients
- ½ cup (1 stick/115g) unsalted butter, melted
- 3 tablespoons (20g) unsweetened cocoa powder
- ¼ teaspoon salt
- ¾ cup plus 2 tablespoons (175g) granulated sugar
- 2 large eggs
- ¾ teaspoon vanilla extract
- ½ teaspoon apple cider vinegar (or distilled white vinegar), optional
- 2–3 teaspoons red food coloring (gel preferred)
- ⅔ cup (95g) all purpose flour
- 8 ounces (225g) full-fat cream cheese, room temperature
- ¼ cup (50g) granulated sugar
- 1 large egg
- ½ teaspoon pure vanilla extract
Instructions
- Preheat the oven to 350°F/180°C. Line an 8×8-inch baking pan with parchment paper.
- Make the brownie batter: In a large heat-proof bowl, place butter, cocoa powder, and salt. Microwave in 30-second intervals, stirring in between each interval, until melted. Add sugar and whisk until combined. Add the eggs, vanilla extract, and vinegar, and whisk until combined. Add red food coloring, until desired color is reached. Add flour and fold, using a rubber spatula, just until combined. Set aside ⅓ cup of the batter and pour the rest into the prepared pan. Smooth the top.
- Make the cheesecake batter: Using a mixer or hand whisk, beat the cream cheese and sugar (on medium speed if using a mixer) until smooth. Scrape the sides and bottom of the bowl as needed. Add egg and vanilla extract and beat until combined. Dollop spoonfuls of the cheesecake mixture over the brownie batter.
- Take the reserved ⅓ cup of brownie batter and spoon dollops over the batter. With a knife or a skewer, gently swirl the two batters together, to get a marble effect.
- Bake for 25-30 minutes until the cheesecake filling is set, slightly puffed and a toothpick inserted into the center of the brownies comes out with moist crumbs (from the brownie batter), not dry. Let the brownies cool completely and then refrigerate for at least 2 hours until they are firm enough to cut. Once firm, lift them out of the pan using the parchment paper and cut into squares. The brownies taste even better the day after they’re made.
- Store brownies in the fridge in an airtight container for up to 5 days.
Notes
- Use gel food coloring for vibrant red color.
- Refrigerate before cutting for cleaner slices.
- Flavor improves after a day.
- Prep Time: 15 minutes
- Cook Time: 30 minutes
- Category: Dessert
- Method: Baking
- Cuisine: American
- Diet: Vegetarian
Nutrition
- Serving Size: 1 brownie
- Calories: 180
- Sugar: 15g
- Sodium: 80mg
- Fat: 10g
- Saturated Fat: 6g
- Unsaturated Fat: 3g
- Trans Fat: 0g
- Carbohydrates: 20g
- Fiber: 1g
- Protein: 3g
- Cholesterol: 50mg
Tips for Perfect Red Velvet Cheesecake Brownies
After making these beauties dozens of times (yes, I have a problem), here are my hard-won secrets for brownie perfection:
- Gel food coloring is your BFF – liquid makes the batter too thin and gives a dull pink instead of that signature vibrant red
- Don’t skip the chill time – I know it’s torture, but refrigerating for 2+ hours means clean cuts and set swirls
- Room temp cream cheese is non-negotiable – cold cheese = lumpy swirls (I learned this the hard way!)
- Swirl like you mean it – 4-5 confident strokes max or you’ll lose that beautiful marbling
- Make them ahead – flavors meld and improve overnight, so bake a day before your event
Oh, and hide a few squares for yourself – these disappear faster than you can say “red velvet!”
Storage and Serving Suggestions for Red Velvet Cheesecake Brownies
These brownies are best kept chilled – store them in an airtight container in the fridge for up to 5 days (if they last that long!). For serving, I love them slightly chilled with a dusting of powdered sugar or a dollop of whipped cream. They’re perfect for Valentine’s Day, birthdays, or anytime you need a little red velvet magic!
Nutritional Information for Red Velvet Cheesecake Brownies
Okay, let’s be real – we’re not eating these for their health benefits! But since you asked, here’s the scoop per brownie (based on cutting into 16 squares): about 180 calories, 10g fat, and 15g sugar. Remember: These numbers can vary depending on your exact ingredients and how big you slice ’em. My philosophy? Enjoy every decadent bite – life’s too short to stress over dessert math!
Frequently Asked Questions About Red Velvet Cheesecake Brownies
I get asked about these beauties all the time – here are the answers to what everyone wants to know:
Can I make these without food coloring?
Absolutely! They’ll taste just as amazing, though they won’t have that classic red velvet look. For a natural option, try beet powder (start with 1 tablespoon) – it gives a subtle red hue.
What if I don’t have an 8×8-inch pan?
A 9×9-inch works too – they’ll bake faster (check at 20 minutes). For loaf pans, fill halfway and bake longer. Just watch that toothpick!
Can I freeze these?
Oh yes! Freeze whole or sliced for up to 2 months. Thaw overnight in the fridge – they taste freshly baked.
Help! My cream cheese swirl disappeared!
Happened to me first time too! Make sure your cream cheese is room temp and don’t over-swirl – gentle figure-eights do the trick.
Why vinegar?
It’s the secret behind authentic red velvet flavor – enhances cocoa and keeps brownies moist. But you can skip it if needed.
For more delicious recipes, check out our recipes section.
For More recipes, Follow me on Facebook!